Compile Section Layouts: Part Two
Let’s look at some examples to understand this process better.
Strongly consider working with a Compile (tester) Collection which would include every Section Type in your Novel or Project you will be compiling. A small focused collection allows you to rapidly Compile and see the results of changes you make in Section Layouts, or any other aspects of the Compile Format Designer.
Section Layouts settings affect the formatting of all aspects of a specific Section Type including what fonts will appear, which elements like titles, numbering, prefixes and suffixes will appear for a specific Section Type. Formatting can be applied to each of these elements individually. Separators between sections (like spacing after Chapters and Scenes) all occur in the Compile Format Designer but under the Separator tab.
Let’s look at the overall interface for Section Layouts.
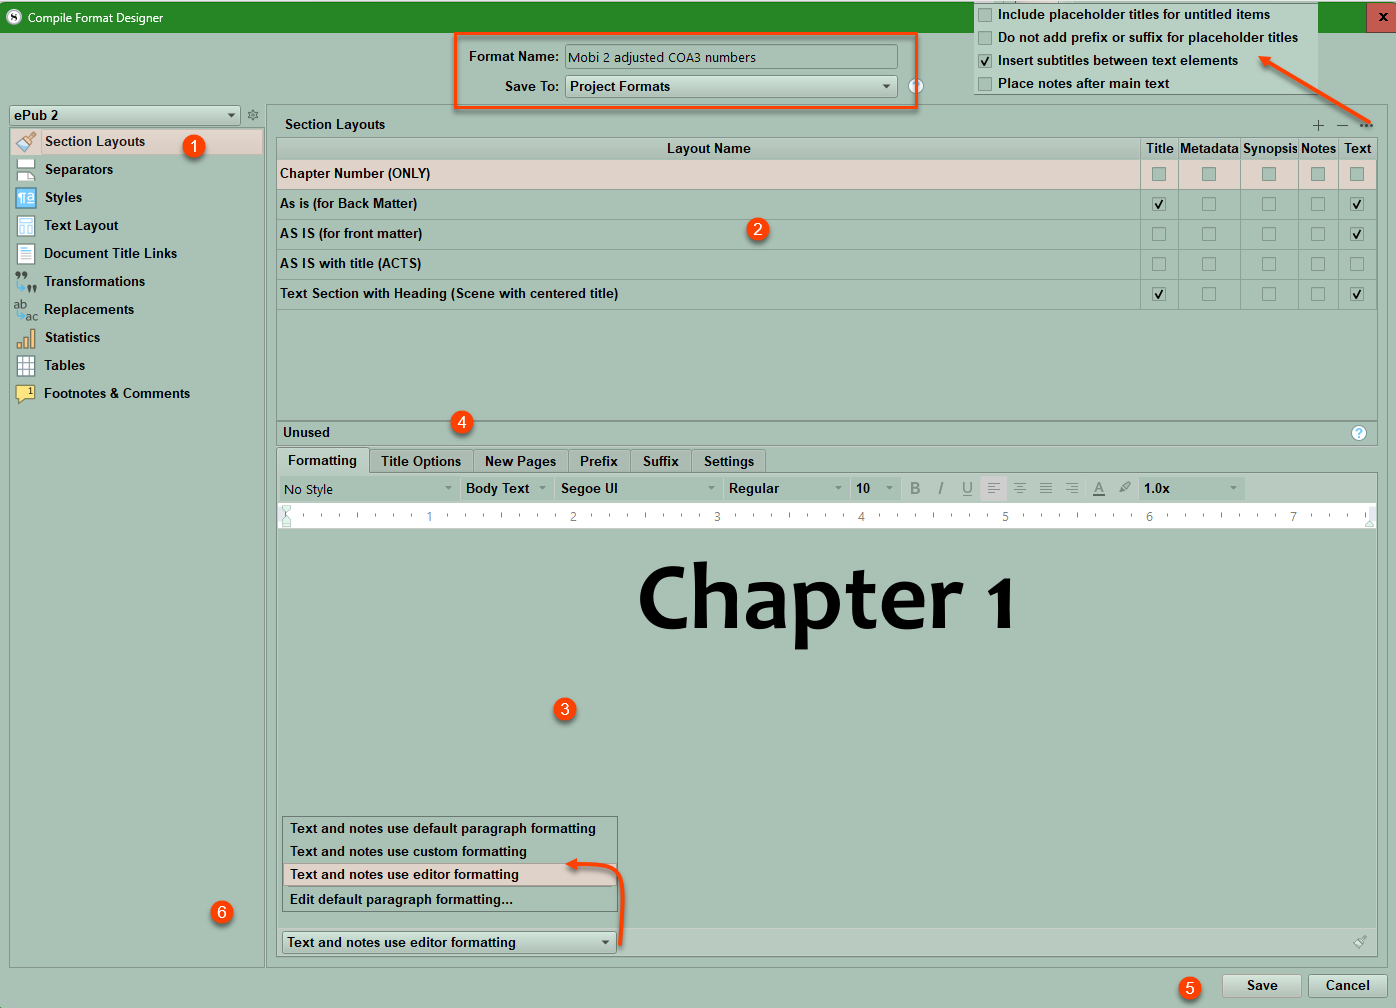
The Compile Format Name and whether it is a Project or My Format type are displayed in the red box in the center at the top of the screen. (You can change the name and whether it is a Project or My Format at any point in this process, but remember to click the Save button (#5) to preserve your changes. You choose the format you are Compiling for using the dropdown menu in the upper left above the Section Layout tab.
#1 These are the options you can customize in the Compile Format Designer and the current option you are working with is highlighted. (ex. Section Layouts)
#2 Is where you choose which of your current Section Layouts to use, manipulate, or duplicate to obtain the appearance you want when you Compile. Changes here DO NOT affect your project, but will change the Compile output appearance. (This section has multiple options to check which affect a Layout including Title, Metadata, Synopsis, Notes, and Text checkboxes.)
#3 Here you can change the formatting of text here. If you have a title and text you must click inside each one to be able to change the font in the format bar above this area.
#4 Are tabs which will be available to affect the appearance of every Section Layout. [I will explain how to use these for the first tab(Title), but these apply to every other tab.
#5 The Save tab will save changes you make for any Section Layout or other tab in the Compile Format Designer if you click it. Use the Save button frequently as you make changes to preserve your hard work.
#6 These options for Text and note formatting exist for Ebook settings. The option here for text based Compile outputs is a checkbox to override Text and Note Formatting.
What do these Section Layout checkbox headings mean?
You can set the case of text (upper case, lower case, etc.) and format these option choices under the Formatting tab. (You can also format text at the bottom left in the Compile Format Designer when clicking inside the text field.)
When you set this, then the changes will be reflected in the Section Layout pane of the Compile panel when you close the Compile Format Designer. (See below)
See how changes in the Formatting tab change the appearance of your title and numbering for chapters.
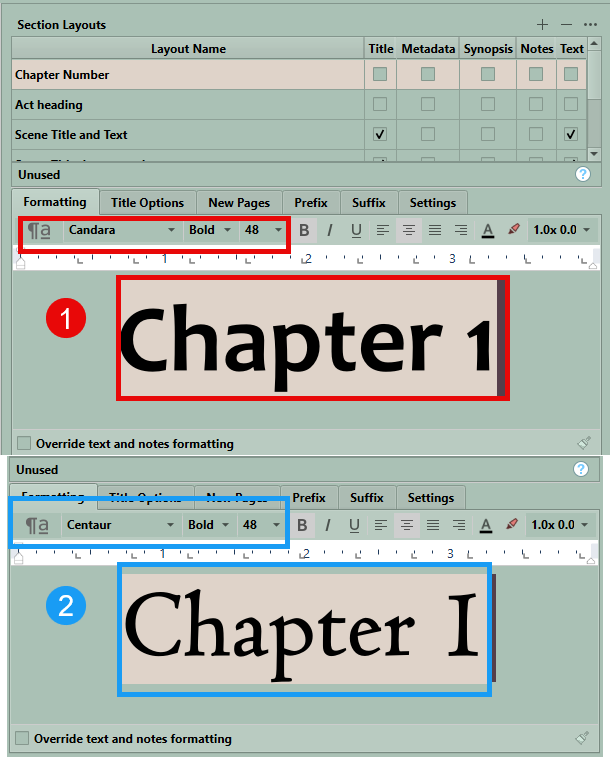
#2 Shows a different font and same size. Unless you click save before closing the Compile Format Designer, this change will not be saved. You must click inside the format window to have the option to change the formatting.
Let us discuss the Tab options above the formatting area. We have discussed the Formatting tab which works like the Scrivener Editor.
The tab options include:
Title-
This prints/includes the binder title of each item assigned to use this layout. The title will typically be placed on a line of its own at the very top of the section, much like a heading or chapter break would be. This checkbox is only used to bring the binder title into the content. If you only want to see the word Chapter followed by autonumbering, then the Title checkbox is not necessary. That can be accomplished with placeholders in the Title Options Tab, the Prefix, or Suffix sections.

The Title Options tab contains its own prefix and suffix sections related to the Title appearance.
The New Pages tab-

This tab affects options applied to sections after a page break. (Usually seen after Acts and Chapters). Choices including padding the page with blank lines and having several initial letters being uppercase.
Prefix/Suffix Tabs-
These position text and placeholders before or after the Title or text in a Section Layout This text can be formatted, but ONLY with any styles you have imported or created under the Styles tab in the Compile Format Designer.


Settings Tab-

Here you can change paragraph indent options. The default choice is no change.
Metadata
This includes a block of text below the title containing all metadata associated with the items printed by this layout. In the preview area, you will see a simple "Metadata: Listed Here" marker that can be used to format metadata lines in general. The precise content will depend on each document’s (attached Metadata)— for example every item will have creation and modification dates, but only some may have a line printing keywords if the document had that Metadata included. All lines of metadata will use the paragraph and character formatting you apply to the sample line.
Note: You can use placeholders to insert specific metadata or custom metadata in your section layout wherever you use placeholders.
Synopsis
The Synopsis for the item will be printed and can be formatted as a paragraph in the preview area below. Leave this box unchecked if you do not need the Synopsis to be included.
Notes
Any Inspector Document Notes associated with the item will be printed before the main text. (Your default option.) Under the … options in the upper right of the Section Layout area is an option to place notes AFTER the main text. Leave this box unchecked if you do not need the Notes to be included.
Text
The main text body of the item, such as the content of a section or chapter. Some layouts may not use this option if they are intended to be used with types of items that serve as headings, or in some cases they may be omitted to achieve an effect, such as in the "Enumerated Outline" format, where the goal is to print an indented outline of topics rather than the entire work.
If you include content, other than Title and Text, subheadings will be inserted automatically to announce them. E.g. ticking "Synopsis" and "Notes" will add their respective headings above the appropriate content. These headings can be formatted collectively to taste in the Formatting tab, or removed entirely by clicking
The • • • button (see below) allows you to uncheck/disable the Insert subtitles between text elements option.
Section Layout Creation or Editing
Add a New Layout by clicking the Plus Sign.
Delete a Layout by highlighting and clicking the Minus Sign.
Rename a Layout by double clicking on the name. (Other Projects using the same Layout will adjust the name to match the new one.)

What the … options mean:
— Include placeholder titles for untitled items
[Default is unchecked] Binder items that have been left untitled can optionally use the adaptive name generated from their content or synopses. The default behavior is for these items to never show titles, even if they are assigned to a section layout that chiefly exists to generate a title.
— Do not add prefix or suffix for placeholder titles (This option Is NONFUNCTIONAL)
— Insert subtitles between text elements
If checked, this adds automatic subtitles between different types of inserted content, such as Synopsis and Metadata. (Uncheck this box if you do not want the subtitles inserted.
— Place notes after main text
The default is to place any Inspector notes (if check the Notes box for a particular layout) above the main text for the item being compiled. When checked, notes will be placed below the main text area instead.
[REMEMBER: Backup and save your custom Compile Formats BEFORE making changes. In the Compile Panel you can click on the Settings icon in the lower left and choose Export Format. When you export the Format, you can rename or date it in a way to mark it as the original before you make changes. This will save you if you make unwanted or unintended changes and you can’t remember what you changed or how to reverse it. By saving a Compile Formats in a systematic way, it becomes easy to go back to an earlier version that worked well in the past. Feel free to frequently back up during this process, so if unwanted changes occur, you do not have to start again at the very beginning of this process.
Pro Tip: You can duplicate and tweak Section Layouts in the Compile Format designer so you can easily go back to an earlier layout if needed without remembering how to reverse the changes you made in the latest Section Layout.

#3-4 In the area below the Section Layouts make sure you have clicked the Formatting tab and inside the box containing text. Unless you click on the text, you cannot make changes. The formatting bar, ruler, and indents work like the normal Editor’s formatting bar. (Note: you may need to widen the Compile Format Designer window to see all your format options, such as line height and paragraph settings.)
#5 After you have made the adjustments you wanted then click the Save button.
#6 Here you have several options to choose on how the text is displayed (for Epub/Kindle formats)
Text-based formats like Word, RTF, PDF, and others have the option to override text and notes formatting. (see image below) This can come into play with Section Layouts that include either notes or text within them. When checked, this will replace the styles used in the Project Editor and Inspector with the Compile Styles you have chosen.
The paintbrush icon in the far lower right preserves uncommon alignments and indents for the text on this tab.

If you click this option, then you can change paragraph spacing. You must stretch the Compile Format Designer Section Layout pane enough to see the paragraph spacing option on the far right of the formatting bar. (see below)

To Reach this you must:
1. Compile to a text based Compile output.
2. Check the override text and notes formatting checkbox.
3. Click inside the text field.
4. Stretch the formatting bar enough to see paragraph spacing and click the dropdown caret and choose the other option to see the text box below #4. Here, you can change paragraph spacing. Here, you can set options about spacing around paragraphs.
Windows Tips:
Again, consider frequently backing up your Compile Format as you go through the process and check how this looks by doing a test Compile as you make changes.
You can even duplicate the Compile Format you are using and rename it Format Demo and experiment with the different Section Layout tabs to see what various changes occur due to different options in the Section Layout Appearance, without worrying about your main Compile Format.
Or it is easy to duplicate a single Section Layout and rename it as a version or by its function and change variables to achieve a new effect. Remember to click the save button to preserve the new Section Layout and to apply it to the Section Type to test out its effect with a test compile.
After Section Types have been assigned the second Compile panel will show a preview of the expected output appearance for each Section Type in your Project.

5. Consider creating a Compile Collection. You can, in the third Compile Panel in the contents dropdown, choose just a single collection to Compile. If you create a Collection with your Front and Back Matter, an Act/Part document, several chapter documents and several scenes (or include whatever other special sections are in your Compile output) a quick Compile of the collection can show you if all your elements are displaying the way you want without Compiling/printing the whole novel. This allows you to quickly assess changes as you make them and tweak the final Compile product until you get it the way you want.