Compile Section Layouts Part three
In Part three we will show ways to display certain common setups you might want to use in your Compile output and possible methods to get there. (Several examples of numbering placeholders are listed below.)
Numbering Acts/Parts
Note: Using this method, you do not place any text in the Act/Part folder. The placeholder information in the Title Prefix will fill in and number your Acts. Notice that neither the Title or Text boxes are checked.
Here, I use a descriptive title for the Section Layout for Acts. Use a descriptive label that makes sense for you.

You could include an Image placeholder in the Title Suffix pane to pull in an image under the Act title or in a similar fashion below chapters names or numbers, or even at a scene level. (I will be adding a blog in October on this topic with a step-by-step guide with images to help you.)
Numbering Each Chapter
As shown above using this method you do not need any text in the Chapter folder. The placeholder information in the Title Prefix will fill in and number your Chapters. Again, notice that neither the Title nor Text boxes are checked. I labeled the Section Layout to better identify its function.

The auto-numbering placeholder protocol is <$*> where the * symbol represents the number placeholder. Your numbering options for various placeholders can be reviewed using the Menu command Help > List of all placeholders and this will launch the Placeholder List. Changing a number type, font, and font size will display in the Section Layout pane of the Compile panel once it has been assigned. Thus, you can preview your choices of auto-numbering formats, fonts, and font sizes before compiling.
Some common auto-numbering/lettering examples include:
<$n> would become "1,2, 3" in the compiled text.
<$r> would become "i, ii, iii" in the compiled text.
<$R> would become "I, II, III" in the compiled text.
<$I> would become "a, b, c" in the compiled text.
<$L> would become "A, B, C" in the compiled text.
<$w> would become "one, two, three" in the compiled text.
<$W> would become "ONE, TWO, THREE" in the compiled text.
Numbering each Chapter with a constant subtitle.
(You could add placeholders inside a chapter to insert specific images as well.)

Once set, when you close the Compile Format Designer, you will see a preview of your choices under Section Layouts in the Compile Panel.
Note: You must assign your Project Section Types a Section Layout to format it appearance during the Compile Process before you will see the appearance below.
(Below, I added the option below to add text to the chapters which will be below the Lies in the Shadows subtitle.)

To achieve the Chapter effect above with a numbered chapter, a subtitle and text underneath, you need to put the desired text inside the chapter document. You can format the text by clicking the checkbox to Override text and note formatting by using the Format bar. You must check the text option for this Section Layout to get all the elements shown above. The Compile Format Designer options are shown below.
You can add custom information inside the Chapter folder itself, or use Custom Metadata to insert information about the POV, flashbacks, location or other information. (This will be demonstrated later.)
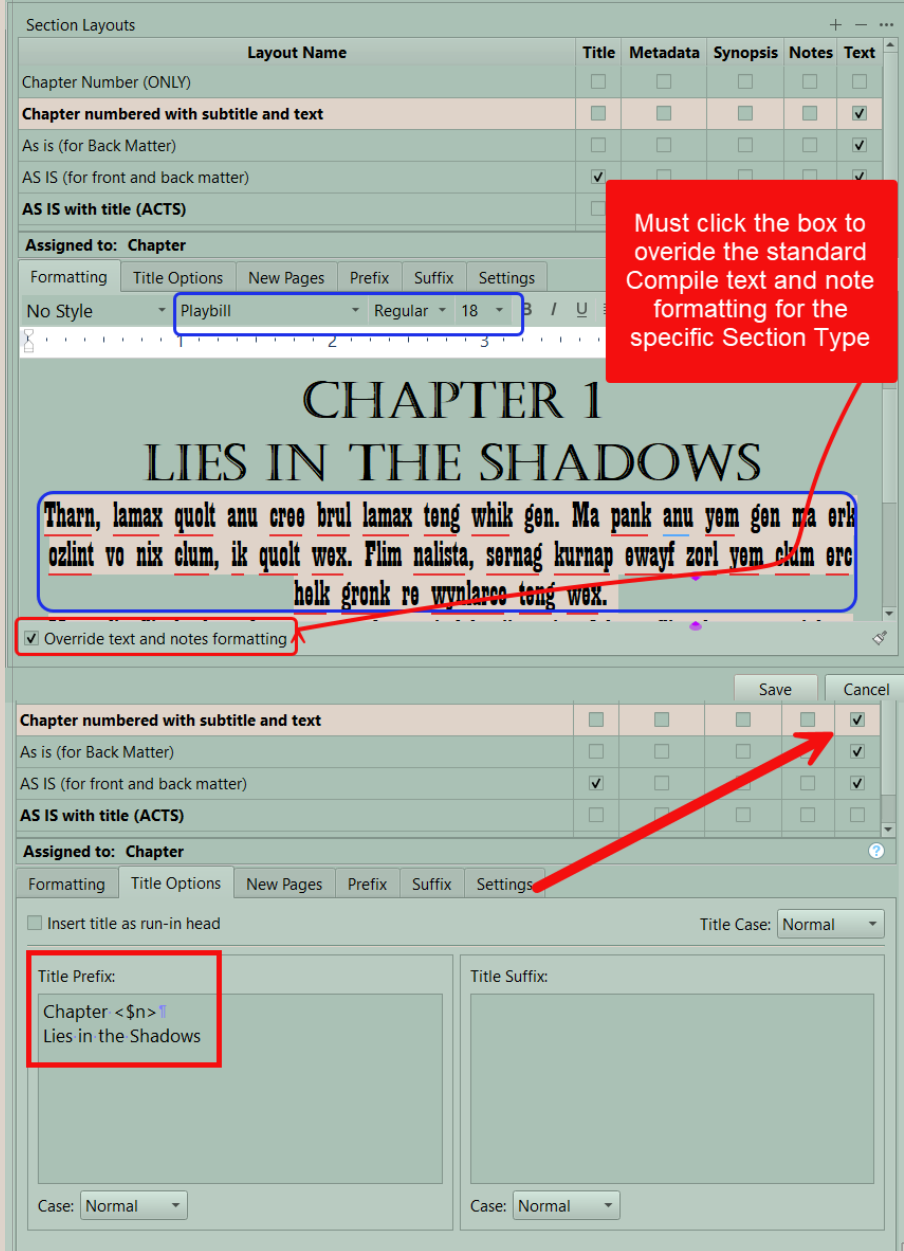
The format bar may need to be stretched in the Compile Format designer to see all these elements.
Doing a Scene with a Title
Note: Here both the Title and Text are checked, because you want that information pulled in at the time of compiling.

See Above-
#1. I gave the Layout a descriptive title telling me its purpose. Pick a name that makes sense to you. Double click to edit the current Section Layout Name if needed.
#2. I am including the Title. This is the Document’s Binder Title (ie my Scene name).
#3. I am including the text of the Scene as well. Remember, both the Title and Scene text can have different formatting.
#4. Note the Title has its own heading font and size (You must click the words Section Title to edit the font and size. I chose to center my Title, but you could chose to left or right justify this if you wanted.
#5. Here the text has a different font and size. Again, you must click inside the text to be able to edit the font, size, line spacing and anything else you want. The words are nonsense and exist for appearance only.
#6. The Title is being pulled from the Binder, so title prefix and suffix options are left blank in this situation.
Options 4-6 mean you can change the Font, Font size, spacing etc for both titles and text in any of your Section Layouts, or even do this globally at the top of the second pane in the Compile Panel.
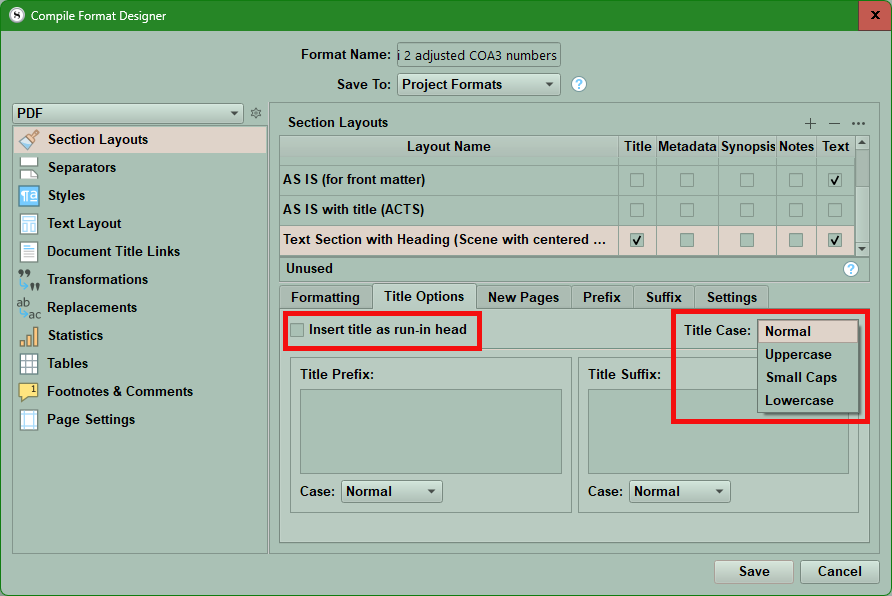
Below you can see how you can further modify how things appear. These options include inserting the title as (a) run-in header into the text or changing the Title Case (see below)
Other Section Layout Tabs
The New Pages tab has options to add spacing to the top of a document like a scene, or make a limited number of opening words uppercase to a maximum of 10.

After you have configured your Layouts the way you want click the Save Button and then exit the Compile Format Designer and look at the Appearance of your assigned Layouts in the second compile pane. Does this preview look like you want? If not, go back to work and adjust.
****You can duplicate any Section Layout by clicking the + sign.
The duplicated Section Layout will retain all the settings of the original but have a blank title. You could name it the same as the original but add V (for version) and a number to sequence as you tweak settings. Once you achieve the effect you want then delete the versions you made to get there by clicking the minus sign.
(Again, backup often as you make changes and consider numbering them to keep your backups in order of progression toward your finished Section Layout to use in your Compile Format.)
After you believe you have the Section Layouts formatted how you want, then Compile your small Compile collection and see if the final product meets your objectives.
Check Scrivener’s Placeholder lists for all the other possibilities. Use the Menu command Help > List of All Placeholders to reach this information.
You can also include placeholders to display a label value [ use <$label> ], or a status value [use <$status> ], or custom metadata information as well [ use <$custom:*> where * is the name of the individual custom Metadata field.
The blank page placeholder <$BLANK_PAGE> will instruct the compiler to leave the page empty in your manuscript wherever you place it.
Placeholders also work in your headers and footers which commonly include a placeholder for the page number. These are set under the Page Settings tab in the Compile Format Designer.
Page Numbers
<$p> When used in the header or footer, gets replaced with the current page number. When used in the main text and it has an internal document link associated with it, the <$p> placeholder will be replaced with the page number on which the linked document appears if possible.
<$p-r> or <$P-R> When used in the header or footer, gets replaced with the current page number as Roman numerals (use <$p-r> for lowercase Roman numerals and <$P-R> for uppercase Roman numerals). Unlike <$p>, which can show negative numbers for front pages, Roman numerals always start at "i" for one. Roman numerals are classically intended for use on front matter pages. (Note that these placeholders may not be supported by all formats.)
<$pagecount> When used in the header or footer, gets replaced with the page count (note that this placeholder only works in headers and footers). Note that for formats other than standard Print and PDF, this will count all pages, even front matter pages that do not have page numbers (for Print and PDF, front matter without page numbers is not included in the count).
Headers and Footers
Not all placeholders are supported in headers and footers. In addition to the special header and footer placeholders specified below (which can only be used in headers and footers), only the placeholders listed under the sections Page Numbers,
Current Date and Time, and User and Project Information are supported in headers and footers.
<$pageGroupTitle> This places the title of the document that first comes after the page break most recently preceding the header or footer in which it occurs. In practice, this is useful for placing chapter titles in headers or footers. For instance, if you have a chapter in a single text document starting on a new page, then that document’s title will replace "<SpageGroupTitle>"; if your chapters are broken down into smaller sections placed inside folders, and the folders mark the start of each new chapter, then the folder’s title will replace "<SpageGroupTitle>" throughout the chapter headers and footers.
Note that if the section title cannot be calculated for any reason (for instance, because there is no text in the section associated with any documents), <$pageGroupTitle> may fall back on using the abbrevated project title (working the same as "<$abbr_projecttitle>" - see User and Project Information for details on where the abbreviated project title is drawn from).
<$pageGroupParentTitle> The same as <$pageGroupTitle>, except that instead of inserting the title of document that first comes after the most recent page break, it inserts that document’s parent’s title.
Potential Problems:
Your Compile output is not showing the Project font and size in the project text. Look at the bottom of the Compile Format Designer in Section Layouts. There is an Override text and notes formatting checkbox, which is presumably checked. — That is why this compile setting is controlling your font and font size. (see below)
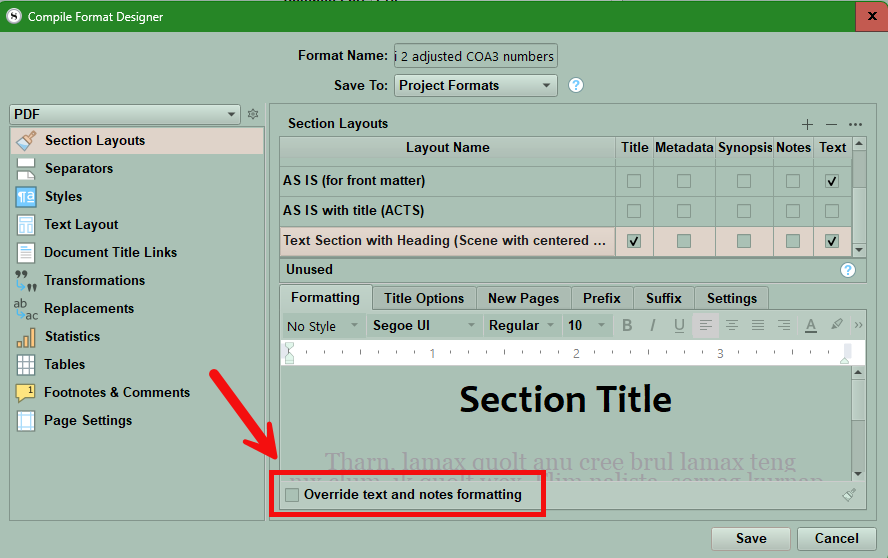
Note: For ebooks this option above changes to Text and notes use custom formatting. (You can also check use editor formatting which is similar to the As-Is section layout.)
Using the Prefix and Suffix Tabs
Prefix Facts:
This area can add content to the beginning of a Section Layout directly beneath the title area. Hit the return key (insert a carriage return) if the prefix should be on a separate line or check the Place prefix after title check box.
The Prefix wording can be separately formatted including its font, size, and right, left or center placement.
If there is text in a Section Layout, then the prefix will run into the text unless you add carriage returns after the prefix to separate it from the text.
Remember as you work through this section, that closing the Compile Format Designer returns you to Section Layout area which shows a preview of the effect of your formatting decisions/changes. If you are unhappy go back and tweak your settings.
Many placeholders can be used in both the Prefix and Suffix tabs.
Carriage returns were used after the prefix to prevent it running into the text in the body of the layout.


Now in the Compile Panel you can see a preview of how a centered prefix look in a Chapter heading and a Scene with a title.

Suffix Facts:
The Suffix tab works in a similar fashion to the Prefix tab, only the text is inserted at the very end of the Section Layout.
You will need to add carriage returns if you want the Suffix to appear on its own line, separate from any text in the Section Layout. (see below)

Check the Place Suffix after subdocument checkbox (see below) to have the suffix placed after all the subdocuments in a folder. (see example above)


You can use placeholders in the Prefix and Suffix tabs to insert automatic numbering, or insert and position graphics. If you insert graphics by placeholders these will NOT be previewed in the Section Layout pane of the Compile Panel. See the Manual 24.2.8 for more suggestions of ways to use placeholders with the Prefix and Suffix tabs.
The Settings Tab:
This is for primarily adjusting (or not) paragraph indents following a header or section break. For RTF documents by default this checkbox creates navigational references in word processing formats using RTF. This will create cross-reference any hyperlinks in the document you are compiling.

You can remove indents in the first paragraph for a scene/text file or other adjustments here.
What if I don’t like any of the Section Layouts or need to make other changes in Compile?
Section Layouts can be added, modified, or deleted by creating your own compile format. The easiest way is to select the existing Compile Format which is closest to what you want your compiled document to look like and right-click (Control+click for a Mac), and choose Duplicate & Edit Format. The Section Layouts tab is where most of the formatting changes can be made, and is similar to the Formatting tab in the old version of Scrivener.
You’ll find more compile options under the other tabs, many of which should look familiar to seasoned Compile users.
TIP: Write down which Section Layouts were assigned to which Section Types so you’ll know which layouts you need to modify. Many of them have similar names, so it can be confusing (e.g. Chapter, Chapter Heading).Remember you can click inside the name of any Section Layout to edit it to something which makes sense to you and clarifies its purpose. You can also delete unused layouts to declutter, or add new ones as needed.
How many section types do I need?
As many as it takes to format everything as desired.
For items with unique formatting that you wish to preserve, then the Section Layout type As-Is is the one you want. This preserves the current formatting in the Editor and is useful for Section Types you want to leave untouched by the Compile Process. Examples include Front Matter, Back Matter, or Glossaries (if added). This Section Layout can be applied to multiple different types of Documents. The key here is creating a Section Type for these types of documents. For example, I created a Section Type called Front Matter to be applied to all three examples above. In this way, applying the As-Is Section Layout to the Section Type Front Matter will now cover any document which has this Section Type applied to it and can include documents in your Front Matter, Back Matter folders, or any Glossaries you create.
Can I apply a section type to more than one file at a time?
Yes. You have two options.
1.) Select the files in the Binder and right-click (Control+click on a Mac) any of the selected files. Choose Section Type and then choose the desired value.
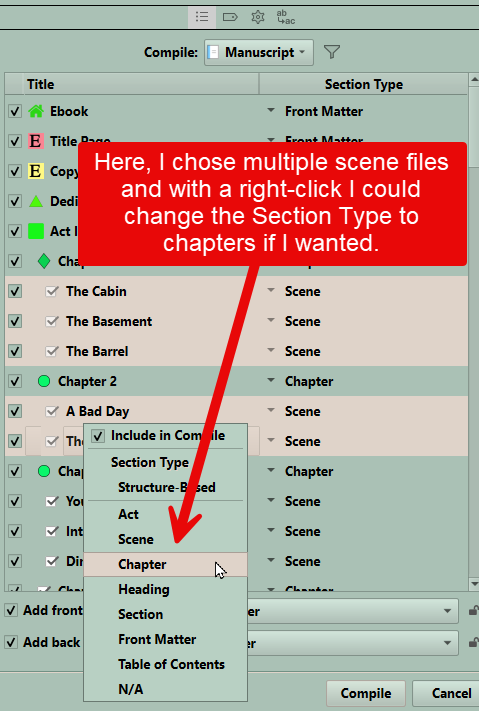
2. ) You can also change Section Types during the Compile Process in the Contents Pane (third panel). Select all the desired files (not the checkboxes, but the titles, to highlight the rows as shown below). Right-click (Control+click on a Mac) on any of the selected files and choose a new value.
How to Insert different images for individual chapters or Scenes?
1. First, this will work better with images stored inside the project itself as single documents in the Research folder of the Binder. Though you can use images stored on the computer, but you must accurately specify the path to the image.
2. Now set up a new custom Metadata entry in Project Settings or in the Inspector that is text based. Add the names of your images you wish to insert as individual entries. (see below with Project Settings) In the Example below, the Custom Metadata item is Called Images and is a text-based list of Image Names matching exactly the image names currently in the Research area of your Project.
3. Now, for each chapter or scene right click and assign the correct image name from the Custom metadata category you are using for the image you wish to appear above or below the title. (An example of a Custom Metadata list of entries is below where the images are of characters in the novel.)
4. Now insert the Metadata tag into the Compile Format Designer in the Title Options tab. You can insert an image as a prefix (before) or suffix (after the title). You often will need to add a return before a prefix, or after a suffix to prevent the Title and the prefix/suffix running into each other.
<$img:<$custom:Images>;w=WIDTH;h=Height;ebook=PERCENTAGE%>
Now you should specify a number for width or height or ebook percentage based on your intended use. The number represent points, which are 72 to an inch.
Pro Tip: You are not limited to adding just one Metadata tag per document. You could add one below or above the title and add a second different Metadata tag as a suffix below the document.