Image Compiling Facts
Images and Compiling Facts
You need higher resolution for print images (300 ppi/dpi) as opposed to ebook Images (require a minimum of 72 ppi/dpi). However, as the quality of Ereaders improve image resolution may need to increase.
Most images can be at or under 3o0 DPI.
Ideally your image should be .png files not .jpg. JPEG files will be much be larger files than the corresponding PNG version of the image.
**When compiling to Epub or Mobi make sure your image name does not contain any special characters in it.
If you do want an image anywhere in the text, don’t place the physical image there. Place it outside the Manuscript and use the placeholder <$img:imageName> in the text.
Using placeholder tags for images allows you to bring images into areas of the document that otherwise wouldn’t support them—on account of these areas being defined by plain-text fields — such as custom separators, title prefix and suffix fields.
When using Image Placeholder tags, everything after the image name is optional. The image must be specified either by its imported name, as displayed in the binder, or by a valid system path to the image’s location on your computer.
It is valid to specify only the height or the width alone for an image in points. (IF use only one dimension then the image will resize to remain proportional. Remember, there are 72 points to an inch.)
While working within the Compile Format designer, images will not be previewed. However, Image Placeholder tags will be visible in the Compile Panel if you have assigned Section Layouts. You can see by where the placeholder is as to where the image/separator will appear in the Section Layout preview pane before you Compile.
4 ways to Compile Images
There are four different ways to include images in your Compiled output, each with its own particulars:
If you do want an image anywhere in the text, don’t place the physical image there. Place it outside the Manuscript and use the placeholder <$img:imageName> in the text.
Embedded: It’s simple, you just drag stuff into the editor and it is there. It has significant downsides though, many of which you may ha1. ve encountered:
You are trusting the “host” to manage your graphics correctly from input to output, and you shouldn’t. Graphics formats may change, compression may happen, resampling might happen, color profiles may get damaged or lost, etc. Need CMYK? Forget about it. You are limited by what the host supports, which often means no SVG, no EPS, maybe no TIFF and other standard design formats.
Editing the image is a bother. You have to right-click and save it to the disk somewhere, edit it, delete the copy in the editor and then insert the update in its place.
Large scale changes of necessity (say your designer gets back with you and asks for all of the images 300 DPI) compound the above problem multiplied by however many images you have.
Storing graphics in a text file is inherently inefficient because the “code” of the image must be converted to text (Base64). With everything being larger than it needs to be means you run into efficiency caps earlier.
Tangentially, massive RTF files are slower to work with, and image corruption can mean troublesome recovery diagnostics.
Linked to the disk: using the Menu command Insert > Image Linked to File..., the result is a simple and short directive in the text that points to the image location. While you see the image represented as a graphic, none of its bulk is actually in the file, keeping it swift and easy to back up.
On the minus side, if you move the image on the disk or change the file name, then the link breaks and you have to restore it to relink the image.
On the plus side, having all of your core graphics available on the disk (single file location in computer)/or USB/external drive directly means being able to solve problems just like this one, so much easier. You can sort your image folder by size, and you’re done. You know which images are bloated and can fix them right then and there with an image editor.
Linked images are also advantageous if you need multiple versions of each image depending upon the output. You might need black and white for print, or color and slightly lower res for ePub.
Since images are all kept outside of the project, it keeps your total project size down, way down, meaning frequent backups of only your text is more feasible. More backups is always a big plus!
Linked to the Binder: Fundamentally this is very similar to the previous method, only instead of locating a file on the disk, you drop the image into the Binder somewhere and use the Menu command Insert > Image Linked to Document, or even just drag the image from the binder into the editor, to create a link to it.
With Scrivener managing the content, this negates the one big negative of linking in general. Renaming the image in the Binder or moving it into another area will not break the link.
With the images on the disk, you can readily edit them with a graphics editor or even run batch operations to clean them up and get them sized in an optimal fashion. With Binder linked images you can only open them one by one, and they’ll all have a generic “content.jpg” name.
But that said, it’s still a whole lot easier to hit the shortcut to open an image in an external editor and be done with it, over the whole export-edit-delete-insert routine with embedded images.
Of course with the image actually still stored in the project, it also negates the frequent backup bit, but if your total image payload isn’t massive that can be okay.
There is an interesting combination of features that can combat that however. If the image is imported as a shortcut or alias, then it isn’t actually stored in the project, but is referred to in a way that is more resilient to file system changes than a text path. You’re linking to a link to a file. To accomplish this use the Menu command File > Import > Research Files as Shortcuts.
Image placeholders: Image Placeholders (either link to the disk drive/USB key vs linked to images in the binder) They uniquely also allow you to provide separate size directives to an ebook output and a print output.
You don’t get a thumbnail, which for some can be a big downside. I’d count myself among them, I really like having a figure to write around, it helps me compose better than just staring at a code. Yeah I can open the image in another split or Quick Ref, or another program entirely, but that’s more juggling than just staring at it in the context it is meant to be within.
Everything after the image name is optional. Spaces in the name are replaced by _ (an underline).
Using tags allows you to bring images into areas of the document that otherwise wouldn’t support them—on account of their being defined by only plain-text fields — such as custom separators, title prefix and suffix fields.
On the other hand, placeholders are text, which means they can be manipulated by things that manipulate text, unlike all other image tools. Recall the example of the folder name changing and breaking your image links? Not a problem if you can run a global search and replace to fix all of the old paths to the new path to the image at one time.
By extension, text can be manipulated by Replacements when you compile. Shorthand can be used to refer to full paths, reducing the need for particular management of them in the placeholder, and keeping them more readable. You can also more easily swap out images for purposes, if “image name.jpg” can turn into “image name-pdf.jpg” or “image name-epub.jpg” depending on your compile format.
For some, typing is easier than messing with menus and commands. Those that like Markdown-type writing styles may find working with image placeholders to be equally convenient and preferable. (And of course, those actually writing using Markdown can and should use its native syntax for image referencing, though Scrivener’s Markdown integration includes compatibility with all of the above techniques.)
Adding Images for your Ebook Cover have very specific requirements. (Check with your retailer, but these are some general guidelines.)
Cover Images
Cover image requirements are pretty consistent across the major eBook retailers. You will normally need to provide a cover image inside your EPUB file, as well as a cover image separate from your EPUB that is used by the retailer for marketing.
Interior Cover Image
To satisfy the broadest range of retailer requirements, cover images inside EPUB files should be built according to the following specs:
File type: JPG or PNG
File name: Can be anything, but some retailers like it to be the ISBN.
Color: RGB (CMYK is not allowed)
File size: Less than 5MB
Dimensions: At least 1200px on the shortest side, no larger than 3.2 million pixels (width × height). FlightDeck will warn you if your cover image is to large.
Transparency: None
Content:
It is best to only include the book title and the author name on your cover image. Some retailers or distributors may not allow price, email addresses, website addresses, or other information.
Cover Image HTML:
It is a common practice to display the cover image as the first item in the EPUB. This is done by creating an HTML file that includes only the cover image, sometimes with special formatting to allow it to display without margins and without the page being broken into columns.
Marketing Cover Image: Typically, marketing cover images should be the largest image you have available. Other than that, the specs are similar to the interior cover image:
File type: JPG or PNG. Some retailers also accept TIFF.
File name: Can be anything, but some retailers like it to be the ISBN.
Color: RGB (CMYK is not allowed)
File size: No limit
Dimensions: Provide the largest image you have. At least 2000px on the shortest side is best.
Transparency: None
Content: It is best to only include the book title and the author name on your cover image. Some retailers or distributors may not allow price, email addresses, website addresses, or other information.
Using Image Placeholder Tags
Specifying Image Width and Height:
The width and height of the image is an optional value, declared in points. If you have already sized the graphics correctly in accordance with your printer’s specifications and output quality, then you will not need (or indeed want) to change the image size using Scrivener. However, if you are not concerned with pre-sizing the images and just want to let Scrivener handle them for you, you can specify the width and height of the image in the placeholder tag, to instruct the compiler to resize it as necessary.
It is valid to specify only the height or the width alone. (IF you only specify one dimension, then the image will resize to remain proportional.) This will cause the compiler to shrink or expand the image to match the specification you've provided, automatically resizing the opposing measurement, keeping the image's original shape, or aspect ratio, intact. If you declare both the width and height yourself, it is possible to squish or squash the image however you please.
<$img: Portrait of Dickens.jpg;w=468;h=Height>
The best way to do this is to figure out the widest your images should be in points (72 points to an inch), given the intended print settings, and then never exceed that. For example, a typical US Letter is 612 points, but with 1" left/right margins would be 612 points wide as paper, and minus the margins (144 points total) that would be a maximum of 468 points (=6.5 inches).
Once you know that, then you know the maximum size of images you can have on a standard letter page. So you now know your upper allowable width limits. Now, you want to create your images of that width, at the DPI needed for the print job. So commonly that will be 468 pt maximum at 300 DPI. With the images properly scaled from the start, you just drop them into Scrivener and leave them alone, no matter what they look like in the editor. The file size and detail you have set will give the best and most professional looking result—particularly if you are generating the diagrams from a scalable source.
Specifying Image Size based on a Percentage:
You can optionally declare an image to be set to a percentage of the screen's display area, rather than a fixed size. This will be done by using a secondary setting in addition to a default static width setting. The following example will display the image at 468 pts wide in most compile formats, but when compiling to ebooks, will instruct the image to be displayed at 50% of the reader's screen size (or the software's reader window, et cetera):
<$img:Portait of Dickens.jpg;w=468h=Height;ebook=50%>
Placing images into the Section Layout preview pane to display in chapters or scenes at the beginning or end of them was discussed above.
If you have two sets of images for different Compile outputs, such as print and an Ebook, then you may need to change image tags based on your Compile Output. Since Image Placeholder Tags are text, then the placeholder tag for images [<$img ] can be searched to create an Image collection containing any documents holding image tags. This makes it easier to change the image tags to different image groups for print or ebooks.
If multiple images share the same name, but have different resolutions, then consider using a number ( like 300 DPI to identify print images versus 72 DPI for ebook versions of the same image).
Using Images as a Scene Separator or as a Chapter or Scene Headers
A.) With a Chapter or Scene Header- you must place the Image Placeholder tag in the Section Layout area of the Compile Format Designer. You must choose the "Chapter" Section Layout and place the tag or use the "Scene" Section Layout that formats your scene (Section Types). See below, where to place the Image Placeholder tags. Using this method will place the same image for each chapter or scene in place.
****If you want individual images for chapters or scenes you must use individual Custom Metadata placeholder tags inserted into the text of your project in the appropriate places. (Custom Metadata in the form of lists referring to the Image name offer the most flexibility.) Use the format bar to align the image on its own line (left, center, or right). You can also specify a specific width or an ebook percentage for the width of the image which will be added here.

An example of an Image Placeholder Tag-
<$img:Portait of Dickens.jpg;w=468;ebook=50%>
Note: Using the return key in this area can help ensure the Image does not run into the title. This will put the image one line below the Chapter number or Scene title, based on how you are using it. If you do not add this, then the image could run into the Chapter or Scene title. If this is happening, then this will appear in the Section Layout preview area of the Compile Panel.
You can also use the option to place a prefix after (a) title. This would work for Scenes where you will want to pull in a title. Using this option, you could still insert an Image Placeholder tag in the Title Prefix box, but have it appear below the Scene Title; see the image below. See the box in white that must be checked to do this.

You could place a simple Image Placeholder Tag in the Prefix Tab-
An Example where the image being inserted is a file in the Research folder called Portrait of Dickens
<$img:Portait of Dickens.jpg;w=468;h=Height;ebook=50%>
OR
You could place a Custom Metadata Image Placeholder Tag in the Prefix Tab-
In this Example the Custom Metadata field is called "Image" and is in the form of a list of individual images stored as separate files in the Research folder.
The components of the Custom Metadata Image Placeholder Tag include:
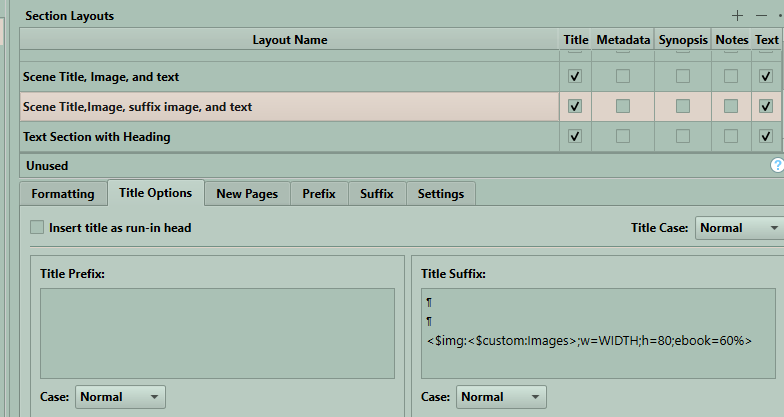
<$img:<$custom:Image>;w=WIDTH;h=300;ebook=60%>
<$img: This is the image placeholder tag.
<$custom:Image> This is the placeholder for a custom metadata entry called Image. This will pull in the current custom metadata entry in the Inspector Metadata area and insert the image where the placeholder is.
w=WIDTH;h=300;ebook=60% These settings are not needed but can be used to set the image size or percent of the ebook page which will be occupied by the image. The ebook size is expressed as a percentage because of the varying screen sizes/devices that can read ebooks.
Using an Image as a Scene Separator:
See the image below to show where to put this type of Image Placeholder. (This Image can either be a computer file or an image inside the project. This type of image is usually a small file, such as with a simple divider.) Often these are easier to use if added to the research section and have the images in a different Custom Metadata list so you can choose different images to use as a scene separator after the end of your text in a Scene.
There are two methods:
1. Using image placeholder tags inside the Scene Layout Section. (Simple, or a Custom Metadata list of images.)
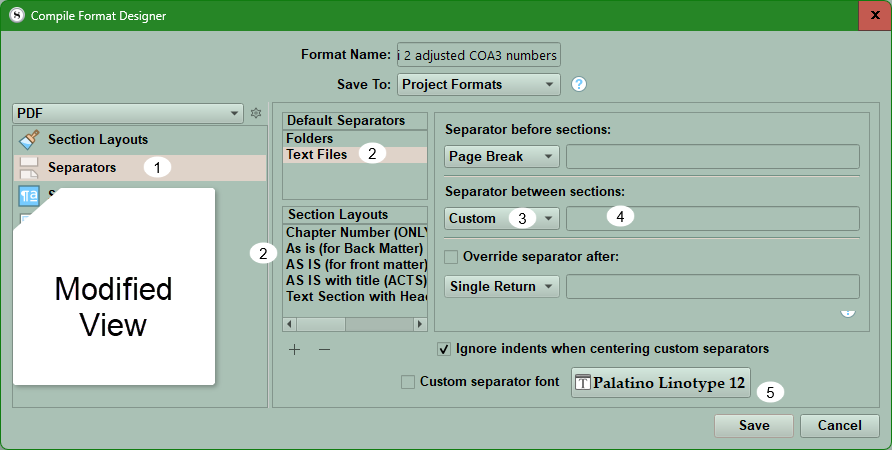
Open the Compile Format Designer and click on the Separators option (#1)
Now choose whether you are using Default (#2) or using separators per a specific Section Layout (#2).
Now click on the Separator between sections option and click the dropdown. Here, choose Custom (#3) and then put the Image Placeholder tag in the blank area to the right. (#4)
Note: Unless your image is already small, I suggest adding a specific height or width in points (or a percentage for Ebook readers). You need to designate only one parameter, and the image will adjust proportionally to this.
For example: <$img:ImageName;w=200;ebook=30%>
See an example of this below.

Outputting Images
Embedding very large high-resolution graphics inside your project can slow down Scrivener’s ability to load and save your work and even cause program instability. It makes more sense to link to high-quality graphics outside your project and provide these images to professionals when it is time to output your work to print and other media. Placeholder tags are the way around this.
Additional Image Compile Settings for Ebooks and special Ebook Image Points
The Ebook Cover Image
The Key is using the Menu command File > Import File command and select an image to import into the appropriate Front Matter folder as your first image. By default, your ebook cover is the First image in the Front Matter folder, but any image in your project can be used. Using linked images here will reduce the Project Size until Compiling. Specific requirements should be reviewed with the publisher but were discussed previously in this blog.
Image Resampling Options
You have additional options to resample images to reduce the file size and set a limit on the Maximum image size in points in the third part of the Compile Panel under settings. (see below) You can also add a placeholder tag to specify an image width as a percentage of the Ebook viewer’s screen.
Example: <$img:ImageName;w=200:h=Height;ebook=30%>

To cut down on the overall size of your ebook, you may wish to have Scrivener resample the graphics when compiling. This option will physically resize the graphics for the compiled output. It is not destructive, and the original images in the project will remain untouched.
Options in the red box above include
— DPI: This sets the maximum target DPI for all images in book. Those images with a higher resolution than this setting will be downsized. Default for ebooks is 72 dpi (currently, but is changing with improved ereaders) and print 300 dpi.
— Max size: sets the absolute maximum height or width in points. You can only define one limiting value.
Note: Recently, Amazon has been recommending not downsizing an ebook’s image DPI to 72 DPI given how many eInk and mobile LCD/OLED devices meet or exceed that resolution.
****Potential Scrivener bug for ebooks. The ebook percentage in the image placeholder tag is not applying unless there’s also a fixed image width included (though the value used for fixed width doesn’t seem to matter). I suggest including the width you want for print media and the Ebook percentage you want. This method covers either format for images. For ebooks, the ebook percentage will overrule a fixed width value for printing images.
Whether or not there is a tangible gain from using higher resolution images is perhaps subjective! However, nobody would buy high-res screens if there was no difference, and displaying a standard-res image on a high-res screen at the same scale could be noticeably blurry. The type of image makes a big difference.
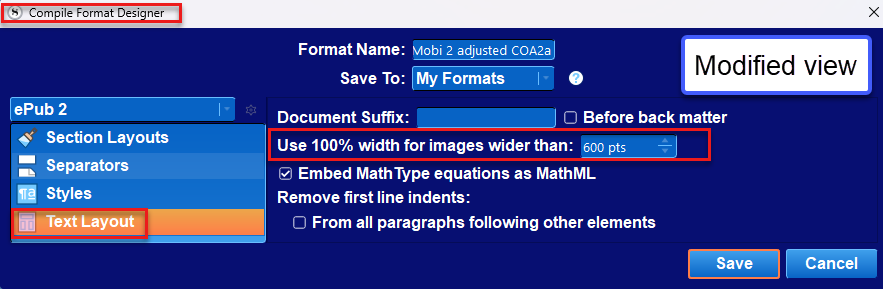
There is a default setting for ebooks in the Compile Format Designer under the Text Layout tab which can cause problems if you use large images in your Compile Output.
In the Compile Format Designer under the Text Layout tab is the setting:
Use 100% width for images wider than… For images that are wider than the width you set here (in points, not pixels), the compiler will set the requested width to “100%” of the image’s actual width, instead of giving it a static size. Most e-readers will fill the available width of the screen with the image. Some readers might always display images a certain way regardless of your settings here.
If problems occur, consider increasing the default (image width) of 600 pts to a larger number than your largest image parameter you intend to use when compiling. Doing this seems to eliminate this issue.
I will not discuss using SVG images here or advice on Cover Images here.
Images inside a Table
If place image placeholders inside a table and specify width and height then these can be included when you compile tables. The height and width parameters may need to be tweaked to get the appearance you want.
Compile Replacements for Images
Another option for inserting images is using Compile Replacements. That will not be discussed here but can be found in the Windows Scrivener Manual. (23.4.4) if you wish to explore this topic.
If linked images disappear in Scrivener:
The Scrivener support team discovered that resetting the application Options to factory default worked to clear this problem.
Do this by using the Menu command File > Options..., and clicking the Defaults button in the lower right, then restarting the software, can cause this problem to go away.

Compiling with Images
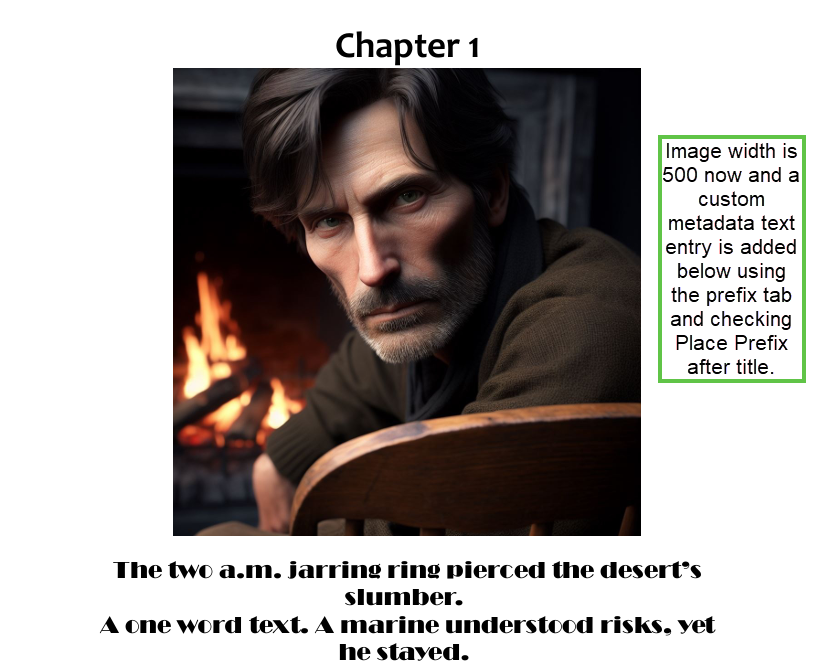
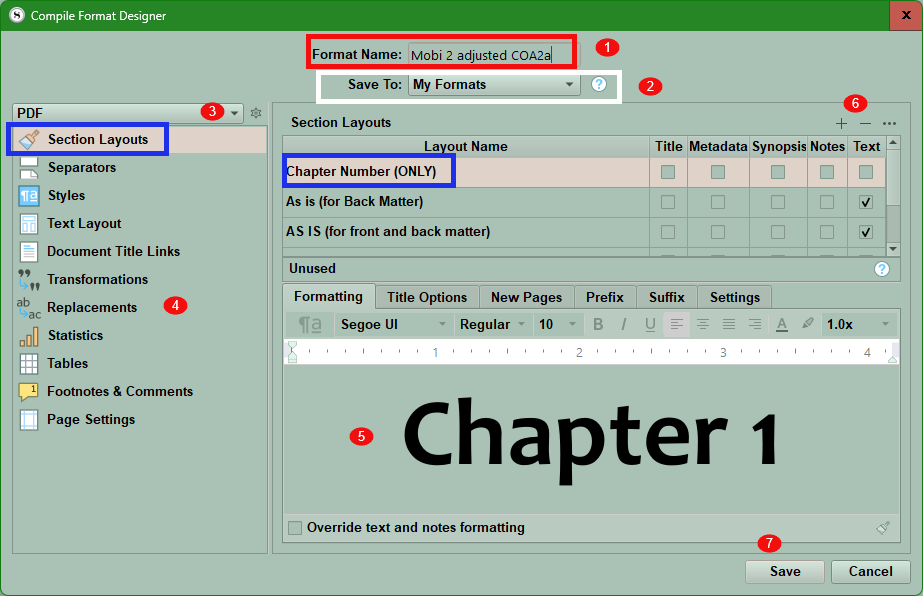
An example of adding images to Chapter titles (Scenes could be done the same way) and how I got there. This is long winded so bear with me. This example has a numbered Chapter (#1), a centered Image (#2) which in this example is text placed on a transparent background (png file) created in Photoshop with two different fonts. This could easily be a character, or location image instead. Finally, I included custom text (#3) from a custom metadata field of text with the wrap text option chosen. The text is entered (whatever you want) in the custom metadata field for the Chapter folder. In this example, the Custom Metadata text field is called ChapterPrologue.

Above, you see how this looks in the preview area of the Section Layout Panel of the Compile Panel AFTER the Section Layouts have been assigned to the Section Types. (Note: Neither the Image, nor the custom text will be displayed in the preview. This will be limited to the Placeholders. The preview will show the location of the placeholders and whether they have been centered. If things do not look right in this preview go back and tweak the Section Layout settings until the layout looks right.)
We see three components in the above Section Layout preview:
#1 Chapter and number (The number could be replaced by other things here like roman numerals etc depending on the placeholder you use.)
#2 Here you see only the Custom Metadata link to the Image and not the image itself. Note here I included parameters on size (You can define both width or height but defining one will define the other by default) and including a size for the ebook based on percentage of screen space for the image. Since an ebook can be read on many different devices you need flexibility in deciding image size.
**** Even though this appears to be text in the topmost image, this is actually a transparent png with text embedded. This allows you to preserve a unique formatting regardless of the font chosen by a person with their reading device. I used Adobe Photoshop to create this, but other programs should do this as well. (You could capture an image of text on a white background, which should blend into most ereaders as another option.)
#3 Here you see a second Custom Metadata link to a text-based entry called ChapterPrologue. Here you can type a multi-line (wrapped) text entry for each chapter if you choose to. You can see a different, unique font for this text reflected in the appearance of its placeholder. Setting up the Custom blank multi-line text field allows you to type or copy and paste any text into this which could be unique for each Chapter.
This could also easily be done at the Scene level.
Now below we see the same setting but with an image replacing the transparent text png file. The first image is 300 points wide, and the second one is 500 points wide and shows a display of the formatted custom text below the image.

How did we create this? Let’s go through the steps.
First, you do NOT need to check the Title or Text boxes to accomplish this. However, you could include text in a Chapter folder document and have it appear at the time of Compiling by checking the Text box.

#1
First, the Chapter numbering is done through the Title Options tab where a formatted title is added separate from the Binder Title (With the option for Title NOT checked, then the Binder title of the chapter will not be displayed here.) The Title Prefix has the word Chapter followed by a placeholder <$n> which includes a sequential number for each chapter. You could insert different placeholders for different results. (See below)

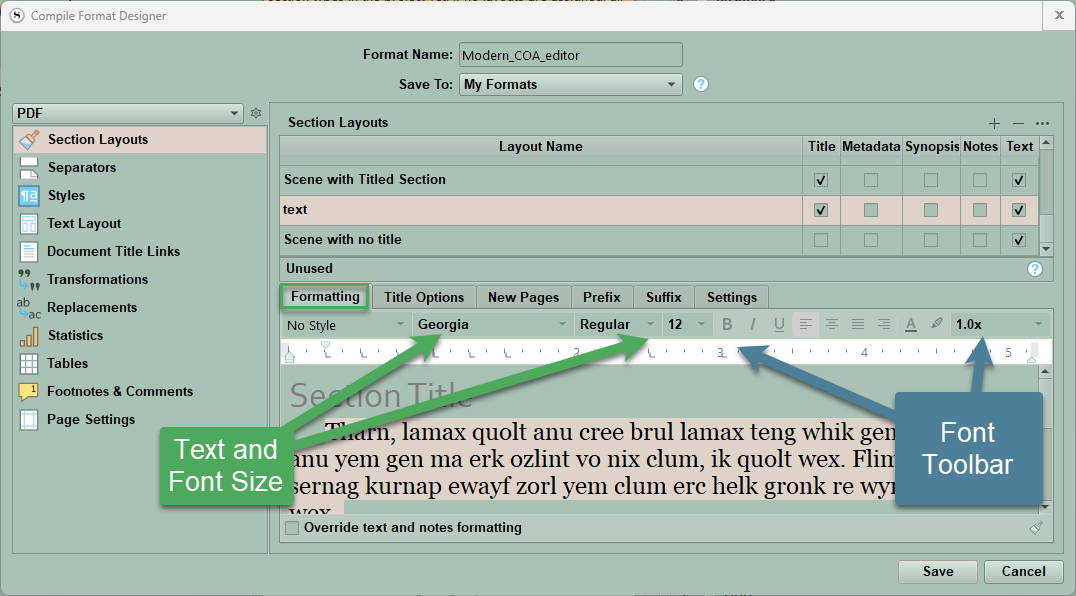
In the Formatting pane if you click on Chapter 1 and use the Format Bar, you can then change the font, font size, and alignment (centered) here (for the Chapter title and number) and this will reflect in the Compile Panel in the Section Layout preview when you close the Compile Format Designer. (As shown at the beginning of this blog.) The Title Options > Title Prefix is where you decide the Format of the text for "Chapter” and its numbering scheme. (see other placeholders for numbering below)
Some of the other Auto-numbering protocols are:

#2
Next, we will insert the image placeholder (<$img: ), which will insert the image selected from the Custom metadata list of images underneath the Chapter Title/Number. This is set in the Title Options > Title Suffix. Let’s look at the components.
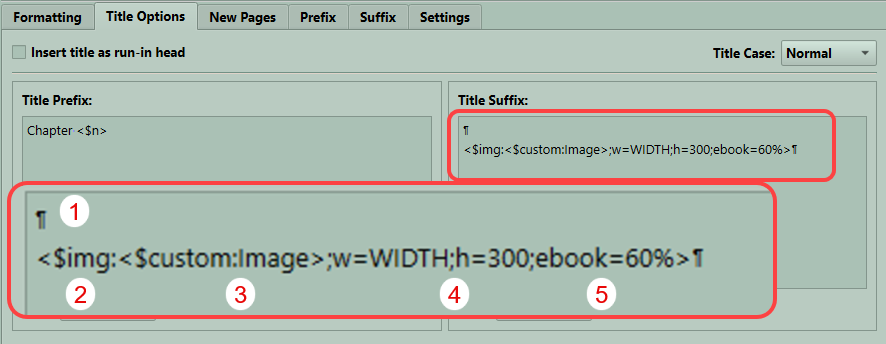
#1. This is a Pilcrow symbol, which indicates the return key was used to separate the Title Suffix from the Title Prefix (Chapter 1). If you do not place at least one, then the image will run into the Chapter 1 title in this example. How many you place here is based on what effect you want. The spacing will be previewed in the Section Layout Preview pane after you have finished assigning Section Layouts to the Section Types.
#2. This refers to the fact you are inserting an Image here. (<$img:) is the first part of the image placeholder tag.
#3. Is the name of the image being inserted by the placeholder <$img: In this example I am using a Custom Metadata (placeholder is <$custom:) item in the form of a list of entries called Image. This Custom Metadata is a list of the Image names of the Images stored in the Research Folder as individual items. When you create this Custom Metadata List the Image names listed must exactly match the names of the Image files in the Research Folder AND the name of the Custom Metadata field (Image) must also exactly match. If you had typed Images as the Custom Metadata entry, this would not work if the entry is actually Image. The same image from this Custom Metadata list can be chosen for multiple chapters if you want.
#4. This refers to the size parameters for the Image you will display in points. You can specify both Width (w), and Height (h) to get an exact size, or specify just one and the other will adjust to be proportional. Only the text will be visible in the Section Layout preview pane. You can check here to see if this is centered and how it is separated from the Chapter Title, but the preview will not display the actual image.
#5. This refers to ebook width as a percentage of the page and will only come into effect in ebook formats. Given that ebooks can be read on computers, phones, tablets, and Kindle devices, this allows the image to change size based on the screen size of the device being used.
Pro Tip - Use a Compile Collection. to create a mini version of your book elements to test the Compile Formats ahead of your deadline to work out the kinks. Separate from the Compile Collection in the third panel of the Compile Panel check the option to include your Front and Back Matter [If you want small roman numbers for these pages use the placeholder <$p-r> in the header or footer based on your preference in the Front and Back Matter pages] Your Compile Collection should include an Act/Part, one or two chapters (to evaluate the numbering scheme you chose and include multiple scenes. Make sure to check the options to include your Front and Back Matter. Having a small slice of the future book to practice on allows you to fine tune the appearance of the Compile output quickly and make adjustments as you go.
And the last component could be uniquely formatted text that could be inserted inside a Chapter page. This could add a prologue or epilogue where appropriate and allow formatting of the text outside of the main text used for the project.
How do we get this done?
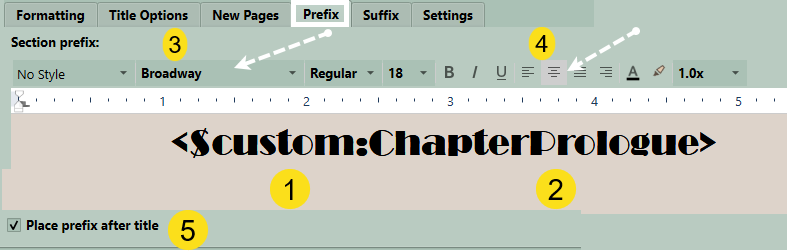
We use the Prefix Tab
1. States we are inserting Custom Metadata with this placeholder.
2. States the Specific Metadata being inserted. I called it ChapterPrologue, and it is a simple text field with the Wrap Text option chosen. This allows you to insert a unique text for each Chapter if you want to.
3. By clicking on the Placeholder you can set the font and size.
4. You can also choose the alignment of the text, such as centered.
5. Check this box to have the text appear below the Chapter title and Chapter Image.
You can use the return key to space these elements based on your desired choice.
This is placed for this example under the Prefix tab and can be formatted in this area. After you are done, the formatting you have chosen will be reflected in the Formatting pane in the placeholder text and will also be seen in the Section Layout preview pane.
Finally, once you have the Section Layout the way you want, then give it a unique name which makes its function clear to you.
This is one way, and I hope this helps you craft your own unique presentations for your creations you have slaved over.
A Compiling Philosophy
The easiest way to think about compiling your project is that Scrivener give you multiple preset outputs for different ways to export your project. You can export it as a PDF, a simple text file, several different Microsoft Word formats, screenplays and various e-book formats. You can also use multi-markdown as well. These preset compile settings cannot be edited, however they can be duplicated. A duplicated copy of the default Compile Format settings can be edited and adjusted to fit your needs.
This series will review some of the same information in several different ways. By doing this, I hope this complex topic will become easier to understand. If one of my explanations does not make sense, then looking another way may help you understand.
The Compile command is probably the safest place in all of Scrivener to experiment with. It can’t and doesn’t change the underlying project, and you can’t change the Compile Formats that come with Scrivener only duplicate and then edit them.
My strong suggestion is to try one of the default templates for a sample output in any of the different formats you are thinking of outputting to. Look at the results to see if they already meet your needs. If the result is way off of what you want, then try a different one of the default templates.
Step 1 Organize and Decide:
First, check the Section Types and the Include in Compile status of all the documents in the Manuscript/Draft. The easiest way to do this is in the Outliner view and check the Include in Compile and Section Type columns.
Are all the documents in your Manuscript set to Compile?
Are the Different Section Types assigned correctly?
Is your novel divided by Acts or Parts and have these been assigned correctly?
Do your Chapters serve as simple dividing points in your novel or do they include text? Do all the chapters have the same Section Type?
Do your Scenes have Titles or just Text? Have all the Scenes been assigned the same Section Type?
Do you have a Prologue or an Epilogue? Have they been assigned the correct Section Type?
Are you including Front and Back Matter? Have they been assigned the correct Section Type?
Are you decide your novel structure how do check to make sure the correct Section Types are being used"
You can view this in the Outliner to get a big picture view and change incorrect settings in this view. (Section Type and Include in Compile are columns you can display in the Outliner.
You can do Project Searches by Section Type to make sure they have been assigned correctly.
You can check the third panel in the Compile Panel which displays the Compile Status and Section Type of all the files you have chosen to Compile and you can change this information in this panel.
You can check the Inspector’s Metadata tab as well.
Setting up the Outliner to check this should look like the image below.

Now check the third panel to make sure you have chosen the Manuscript to Compile and NOT something else.

#1. This is what you are compiling. Normally you are choosing the Draft/Manuscript folder for your novel. (A). However, you can choose the Current Selection (B) which will be the currently highlighted files in the Binder. Or you could choose (C) which is a Collection. This can be useful if you set up a test Compile collection. (see below)
#2. This is the Filter Icon and using this will further refine what documents are included to be compiled. There are various settings here which will be discussed later in this series.
Don’t leave setting up the compiler to the last minute, close to a deadline.
Pro Tip - Use Collections to create a mini version of your book elements to test the Compile Formats ahead of your deadline to work out the kinks. Include one or two chapters, your Front and Back Matter, any cover art, and an Acts (or Parts) page if have one. Having a small slice of the future book to practice on allows you to fine tune the appearance of the Compile output quickly and make adjustments as you go.
2. Decide your Output Format for the novel/project.
Will it be a Word document, screenplay, PDF, or ebook.
Each of these choices will have different options which must be chosen.
For example, for e-book formatting you should include a cover image, front matter, back matter and at least an Act, 1-2 Chapters, and several scenes with text. This will give you all the main elements you would find with an e-book. Trying a sample Compile will allow you to customize how your book outputs. The key point to remember with e-books is that each reader will view your file differently and may use different fonts as well so don’t worry so much about the perfect font. With e-books, the other element’s appearance, such as Chapters with Scenes with or without titles, is more important.
3. Choose a Compile Format.
You can use a default or custom format. Often the default format can serve as a starting point to begin with and tweak to get the output result you want. Who you are sending the Compile output will effect how you Compile your project.
For more choices and freedom about how you format your output other programs are available as well. Basic formatting for sharing projects for editing and beta reading are all well within Scrivener's capabilities. The basic settings for e-book should function reasonably well also.
These compile formats can be saved for just one project or be used systemwide. Project Formats are specific to one project. My Formats are systemwide. Whenever you are finished saving a format, you have the option to save it either as a Project Format or as a My Format.
You should export these custom Compile Formats and save them in a folder on your computer. Over time, Compile Formats can degenerate and begin to have errors. Keeping a pristine copy to use again and again will be helpful.
Pro Tip- As you are experimenting with a Compile Format, consider naming the versions, in case you decide you actually like an earlier version. By having the versions numbered or lettered, you can go back and select a version that you want rather than remembering what steps/settings you used to create it. When you are done, you can delete the version copies.
All settings not related to a specific Output type (word, pdf, ebook), are hidden when you switch file types. Any settings that would conflict or are not available for your current output type will not be shown in the Compile Format Designer, which is for editing aspects of the current format you are using. So, for example, the CSS pane will vanish when you switch to a PDF output format, but available if you switch formats. But if you change the font size for your Chapter Heading layout in one output, this will then change settings across various outputs. Settings which are universal across all Compile outputs will change if modified for a specific format. In most cases that is considered desirable. You wouldn’t want to have to redo everything if you switched from RTF to ODT for example.
When you are creating a project in Scrivener, you are creating CONTENT. You can give it (while writing) attributes that make it easier to create, such as comfortable fonts for you, spacing, notes, tags, etc. Those are for YOU (only) while you CREATE.
But sharing with others is a whole separate thing, and Scrivener knows it. That's why Compiling tends to be rather complicated.
4. Who/Why are you Compiling your Project for?
Who you are sending it to, may have very specific requirements.
A submission to an editor or publisher using their required formatting rules
Putting the manuscript into the format required for Kindle Direct Publishing
Submitting just a section of your work to a critique group
Submitting the required first chapter to a writing contest using the required formatting
5. Assign a formatting style (Section Layout) to every part (Section Type) of your Novel.6. The final novel/project output appearance is affected by:
The Section Layouts you choose, but also your choices on the Separators (spacing between different documents), Styles of font, text layout, and any Transformations. You will also need to look at Page settings which affect the appearance of the header and footer of each page.
7. Check the Settings in the third pane of the Compile Panel.
The options available here will change based on your chosen Compile output. The cogwheel icon has many setting on what to include or not for your compile output.
If you uncheck items to be compiled that will change their settings in the project as well. Changes in the third compile panel about Compile status and Section Type will be reflected in corresponding changes in your project. Changing these in the Project will change settings in the third panel of the Compile Panel.
Updated 8/30/25.
The Compile format designer overview on section layouts
Scrivener comes with several default Compile Formats for each type of possible output. These can not be edited as such, BUT they can be duplicated and then manipulated to fit your specific Compile needs. When you do this, the newly created format is now a Custom Format and can be edited to your heart’s content. When you duplicate a default Scrivener Compile Format, it receives a specific name. This is the original format’s name followed by the word copy. This name can be edited and changed to what makes sense to you. I suggest using a name that reveals its planned use or a special aspect of it.
After you open the Compile Panel, you can either use a Compile Format as is by selecting, assigning Section Layouts to the Section Types currently in your project and then checking the third panel for what you want to Compile. In the third panel you check on the content you will compile, metadata such as title and author information, options on things to exclude like highlighting and annotations, replacements and images for certain formats like ebooks. You must decide in the bottom of the panel whether you have front or back matter to include before hitting the Compile button.
If you need to do some customization or tweaking of a default or custom Compile Format, you have three options.

Option 1- Is to Right-Click any format (default or custom) and see the options by #1. The Edit and Delete options will be non-functional for any of Scrivener’s Default Compile Formats.
Option 2- Is to double-click on any format. All formats both default and custom can be duplicated and then customized.
Option 3- Click on the Settings icon and see the dropdown options. Here you can import/export a format, or edit/delete format. The last two options only exist for Custom Formats, these options will be non-functional for any Default Compile Formats. (However, you can export the default Scrivener Compile Format Designs.)
When importing a Compile Format, you will be asked whether to save it as a Project Format (project specific), or as a My Format (available to all Scrivener Projects)
Fives ways to open the Compile Format Designer

#1 You can double-click a Compile Format design to open the Compile Format Designer.
#2 You can right-click and choose the best option. (as shown above)
#3 You can click on the Settings cogwheel in the lower left of the Compile Panel and choose the option you want.
#4 You can click on a displayed assigned Section Layout, and the pencil icon in the upper right corner will appear. You can click on the pencil and then click on the Edit "Layout name" button in the text window that appears.
#5 You can double-click any Section Layout in the second pane of the Compile panel and open the Compile Format Designer.
You will now see the Compile Format Designer which is used to create or edit a Custom Compile Format. (see below)
#1. Shows the name given to the duplicate Compile Format. Click inside the name to edit it.
#2. Is where you save the new Compile Format in Project Formats (unique to the current project) or My Formats (which are system wide and available to all your projects on your current device).
#3. Here you decide your Compile Output file format. Different outputs will have different options that can be adjusted. (See #4 above)
#5. This is the panel which changes depending on which part of the Compile Format options (#4) you want to change and if you choose Section Layouts, this will vary depending on which Section Layout you are modifying and what elements are included with it. (ie Title, Metadata, Synopsis, Notes, and/or Text)
Note: Consider including the desired output in the name of your custom Compile Format. Such as My Ebook Format 1 to show this is your preferred Compile Format for Ebooks. (Consider including the year the format is created in the name as well.)
#6. Here you can add blank Section Layouts (+) or delete a highlighted Section Layout or add other options as shown below for a specific Section Layout. Clicking the (+) sign will DUBPLICATE the currently selected Section Layout and all of its current settings, except the name will be blank. This option can be useful when you are experimenting with different options on how your Compile output will appear without losing the current version.
#7 When you are finished making changes then click the Save button to preserve those changes.
To confirm the changes are displaying what you want, Save your changes to the Compile format and close this window. Go back to the Compile Panel and now click the Assign Section Layout button in the middle pane and you will see how your newly created and assigned Section Layouts will appear when you Compile. The Section Layout’s name is listed below it. (See the image below.)
(Pro Tip: Give them descriptive names which explains their intended function. This makes it easier to assign them and be sure you are using the right one for what you are trying to Compile.)
After you have assigned your Section Layouts to your Section Types, then you will see a preview of how this will appear. (see below) Note the Section Layout name is BELOW its corresponding Section Layout. The option to assign various Section Layouts to the different Section Types occurs in the order the Section Layouts are found in the Compile Format Designer, except for the As-Is Section Layout which is always included at the bottom by default.
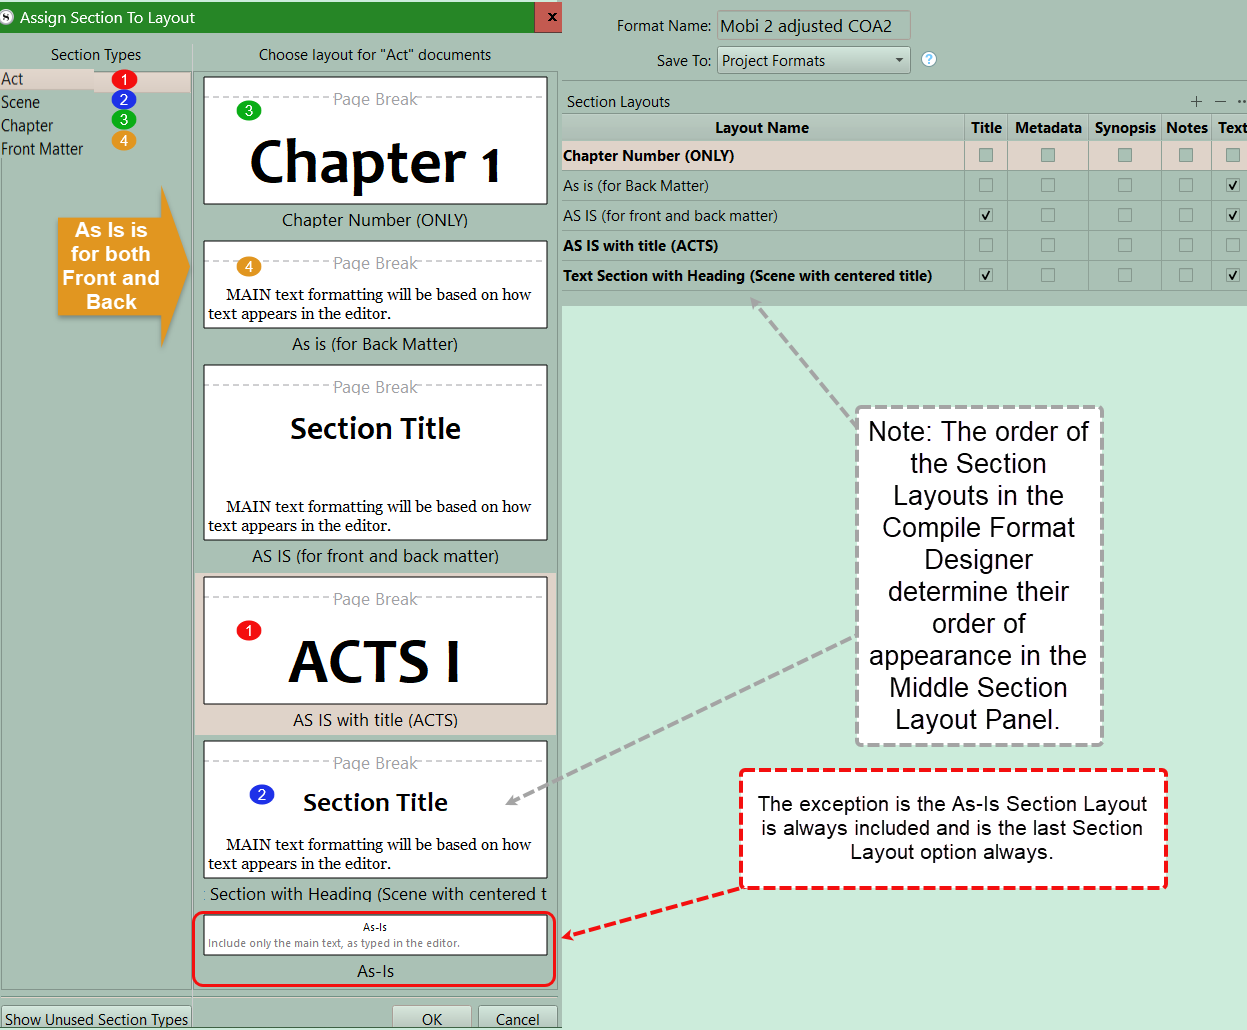
Note: You can not change the order of the Section Layouts within the Section Layout Tab. However, if you go to the Separator Tab, you can right-click and drag the Section Layouts to change their order as you would move documents in the binder. This will then be reflected both in the order of the Section Layouts when assigning the Section Layouts to the Section Types and in the Layout name order in the Section Layouts tab. Remember to click save after done rearranging. Doing this puts your currently used Section Layouts at the top and can be placed in the order of your intended use. The Section Layout As-Is is a default Section Layout and always appears at the bottom of the assign Section Layout interface.

These Section Layouts give you a preview of how the current options will appear for your chosen Compile output. If it does not look right here, then you will need to make further changes inside the Compile Format Designer until you achieve the results you want.
When click edit or double click on a custom Compile Format, then this window appears with a myriad of options.
Every Section Layout you currently have or create has the options to add Titles, Metadata, a Synopsis, Notes, or Text to the Section Type it is being applied to.
Titles:
If you want the Title from your Binder document applied for a Section Type, then check the Title box for the Section Layout you are editing. Any item can still have a heading (Example- Chapter 1) without checking the Title Box.
Clicking the … option at the far right of Section Layouts (see below) shows multiple options that can affect what appears or not for Titles for a specific Section Layout.
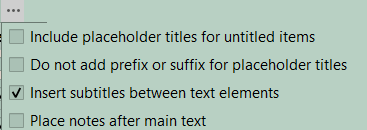
Include placeholder titles for untitled items -(If checked) Binder items that have been left untitled can optionally use the adaptive name generated from their content or synopses, as they are shown in the binder and outliner. The default behavior is for these types of documents to never show titles, even if they are assigned to a section layout that chiefly exists to generate a title.
Do not add prefix or suffix for placeholder titles
Insert subtitles between text elements - (Unchecking this) Disables automatic subtitles (such as Synopsis or Metadata) between different types of inserted content.
Place notes after main text- The default is to place any Inspector notes above the main text for the item being compiled. When this box is checked, notes will be placed below the main text area instead.
Metadata:
Metadata includes a block of text below the title containing all metadata associated with the items printed by this layout. In the preview area, you will see a simple “Metadata: Listed Here” marker that can be used to format metadata lines in general. The precise content will depend on each item— for example every item will have creation and modification dates, but only some may have a line printing keywords.
Pro Tip: You can insert images under chapters titles if you use the specific image name (without the image type) in a custom metadata text field (call it Image) added to each Chapter document you wish to add a picture/image to. You will need to use a placeholder in the Title area of the Section Layout you are using for your Chapters. Place this placeholder in the prefix or suffix section depending on how you want it to appear. You can also decide to center the image as well. You can also put parameters on the image size as well. [If the image is too big for an ebook, check the Text Layout Section of the Compile Format designer and look at the image size which triggers images to be displayed at 100% width. This may need to be adjusted.]
All lines of metadata will use the paragraph and character formatting you apply to the sample line. See an example below (the pilcrow symbol represents using the return key to move the image position. In the Compile panel when see the preview of your Compile output in the second panel area, you will only see text.)
Synopsis:
Synopsis The synopsis for the item will be printed and can be formatted as a paragraph in the preview area below if this option is checked.
Notes:
Any inspector Document Notes associated with the item will be printed before the main text unless you check the checkbox shown above which will place notes AFTER the main text.
Text:
Text will include the main text body of the item, such as the content of a section/scene or chapter. Some layouts may not use this option such as in the “Enumerated Outline” format, where the goal is to print an indented outline of topics rather than the entire work.
If you include content, other than Title and Text, subheadings will be inserted automatically to announce them. E.g. ticking “Synopsis” and “Notes” will add respective headings above the content. These headings can be formatted collectively to taste in the Formatting tab. You can choose to not have titles above the inserted text by clicking the • • • button and UNCHECKING the box to Insert subtitles between text elements.
Placeholders can be inserted to automatically use numbers, roman numerals, letters, or numbers as words for Acts and Chapters if desired.
For a list of all Placeholders, use the Menu command Help > List of All Placeholders. These types of snippets can be found in the list of Placeholders under Auto-Numbering. (Below you see the Chapter numbering is determined by the <$n> placeholder after Chapter in Title Options.)

If you want to have your Scenes titled with the text following, this might look like the image below. (Notice the descriptive name for this Section Layout makes it easy to understand its intended function. I have chosen these options to include both a title (#1) and the body of text (#2) in the Scene.

The Formatting tab allows you to adjust information in the window below the format bar AFTER you click on the text in the window which is just a placeholder and not a preview of any actual text in your project.
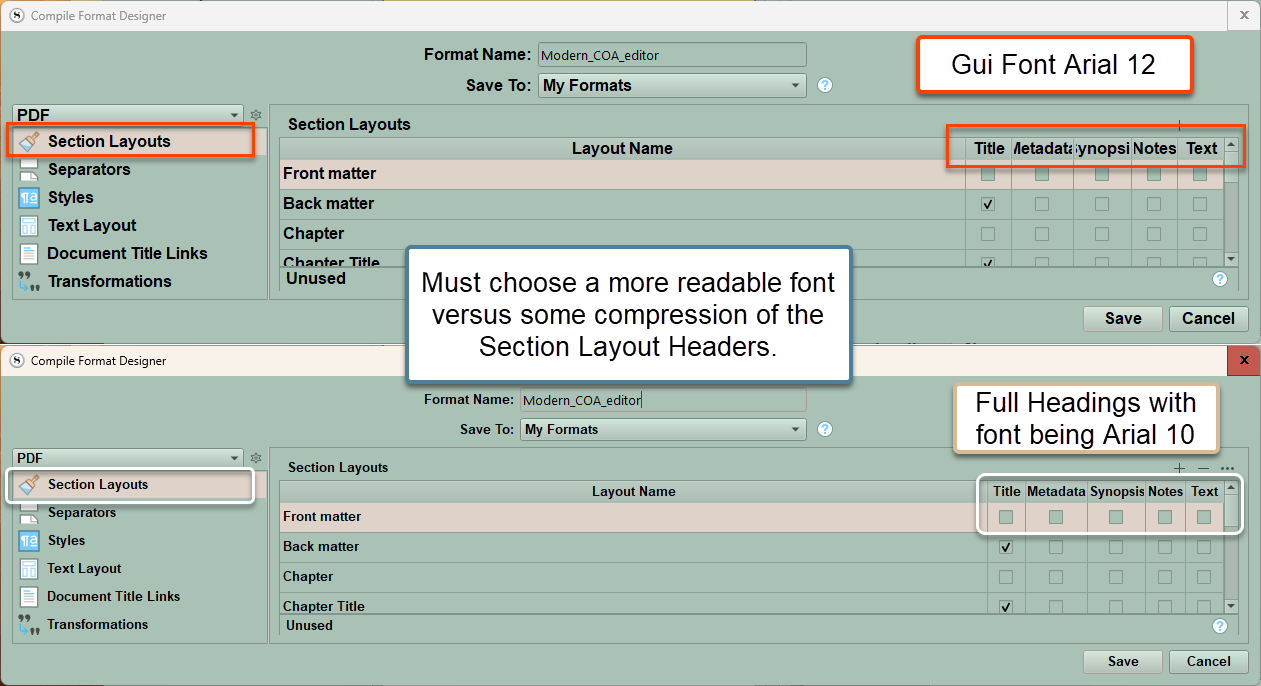
The phrasing in the Format Designer layout section can have text squished if the GUI Menu and Windows font is set to larger than 10 points. The columns cannot be expanded enough to correct this problem when the GUI menu font size is greater than 10.
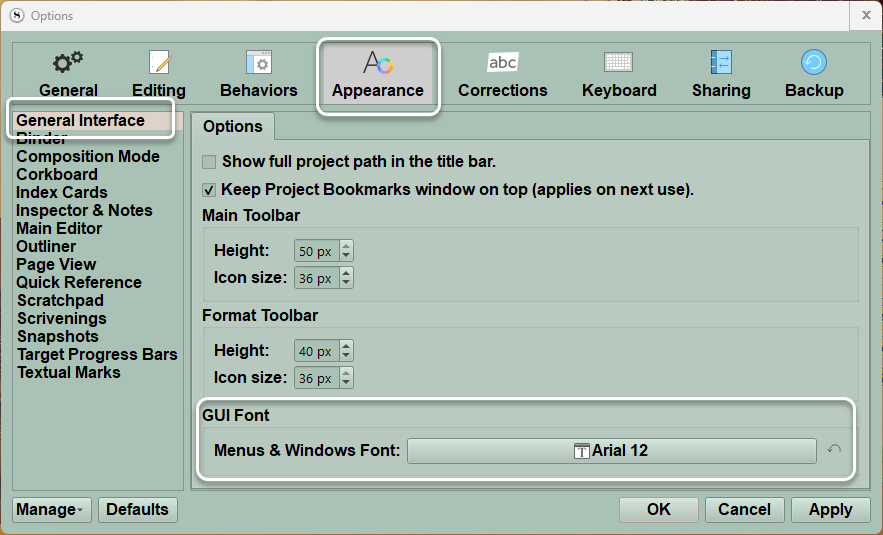
Use the Menu command File> Options > Appearance > General to change the GUI font.
See examples of two different font sizes for the GUI Fonts and how this impacts the Section Layouts readability in the Compile Format Designer. If needed, you could change the font size just for readability when compiling the options in Section Layouts and change back for more readable menus with the rest of the Scrivener interface at other times.
In the lower half of the Section Layouts area on the right are multiple tabs. Each tab has many settings that can be adjusted to change the final appearance of any specific Section Layout. The Images below have been modified to show the various options more clearly in one image.

*** For Custom Compile Formats ONLY
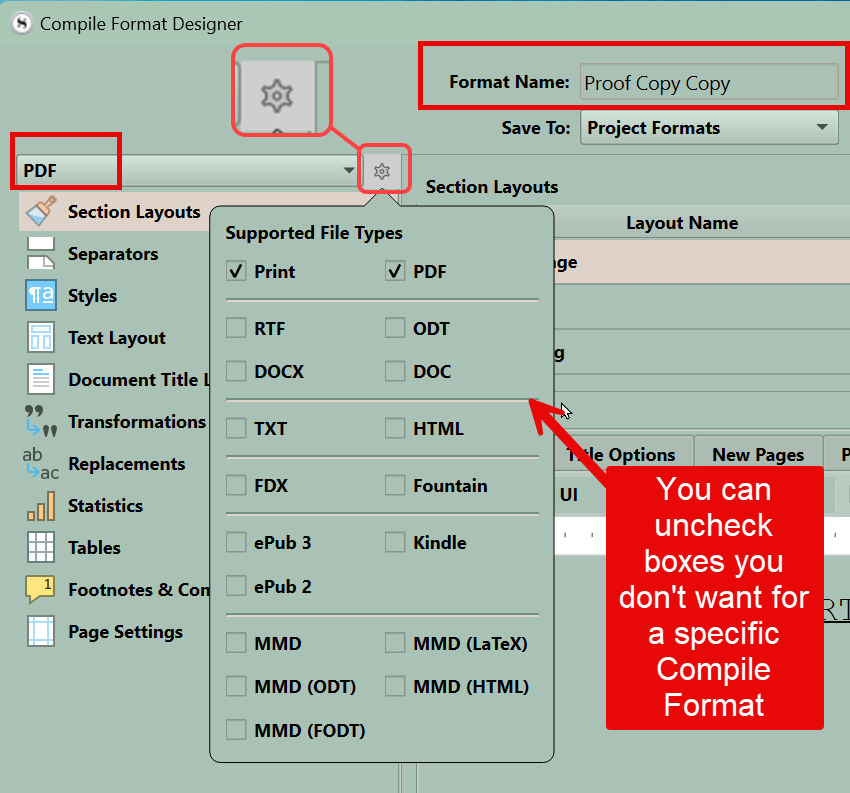
You have the option of restricting a custom format to only certain types of Compile Outputs. When you open the Compile Format Designer, you can specify which types of Compile Outputs a specific Format will support. If a Compile format does not support an Output like Epub then the Compile Format will not appear in the list of Compile formats when you choose to compile an Ebook. See below where you can customize (limit) which outputs a Compile Format will support by unchecking boxes.
Note for the New Pages tab:
1. Set the amount of padding you want above your title on the page.
2. Here you can also choose to have up to the first ten opening words capitalized in either standard or small caps.
! Not in windows version but in the Mac version.
3. You can choose to have sections start on a specific page side (!)
4. A drop-down for each allows selection of Recto (Right) or Verso (left) page. (!)
The Suffix tab offers the similar options to above prefix tab.
1. You can choose to have text appear after the title or end of a subdocument.
2. If the Place suffix after subdocuments checkbox is NOT selected then the suffix will appear after the Title. Selecting the checkbox places the suffix text at the end of the subdocument.
3. As previously, the text can be formatted via the format toolbar.
The Settings tab offers several options for Paragraph first line indents.
This is a matter of personal choice. I vary depending on what I am writing.
These tabs will be discussed in further detail in another blog post.
When your Compile output is in Word (Doc/Doc X and RTF/ODT formats) and you have issues with the appearance of your final product, then look at the Compile Format Designer and its last pane, which is Compatibility.
There are multiple settings here that can affect how the Compiled document will look.
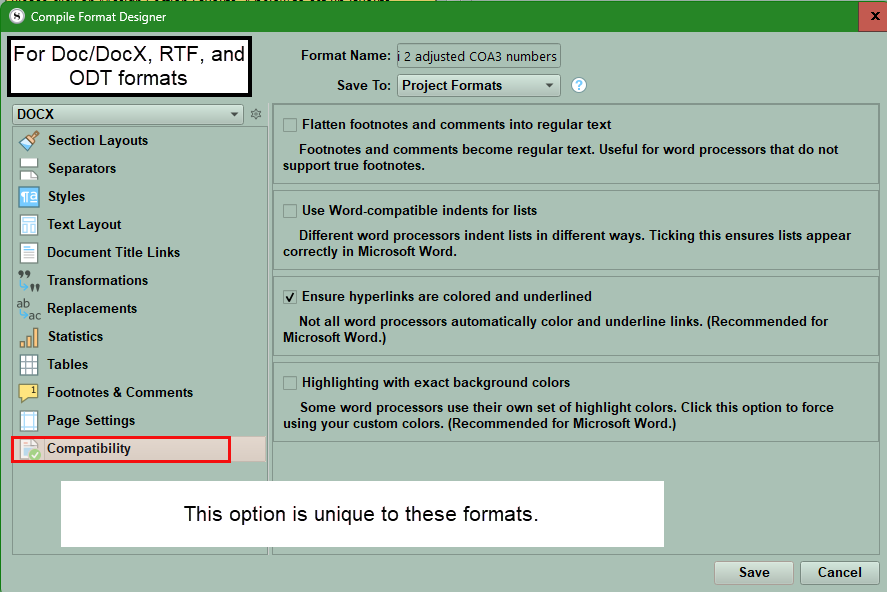
If your Word Compile output does not appear the way you want, then you should look at these Compatibility Options. Checking some or all of these may improve how the Compile Output functions/appears in the final product. (see above)
What do these Compatibility options mean?
***** Flatten footnotes and comments into regular text -
If you don’t remove all footnotes or comments during Compile, this option replaces all your footnotes and comments with endnotes and will insert a reference marker at the place they originally appeared. Use this option with Microsoft Word or other RTF-editors to ensure footnotes and comments don’t get lost.
Use Word-compatible indents for lists -
Problems with indenting bullet-listed paragraphs in Word may occur, but ticking this box should ensure those lists appear correctly in Word.
Ensure hyperlinks are colored and underlined -
To avoid hyperlinks being rendered invisible in Word, make sure the compiler colors and underlines hyperlinks has been checked.
Highlighting with exact background colors -
Highlighting colors may change between word processors, like Word, when they are using their own set of colors. Selecting this option forces your custom colors into the output document.
There will be more about using Section Layouts during the Compile Process in future blogs.
Steps before compiling Part one
1. Clean up your text
Use the Menu command Edit > Text Tidying for several essential aids.
1. Replace Multiple Spaces with Single Spaces is one that can be a cause for spirited discussion among writers. Accidental double spaces definitely need removing and this feature can do that, however some writers subscribe to the double space after end punctuation philosophy. It is a hangover from typewriter and mono-spacing days and while modern computer fonts may make it superfluous, some find reading easier with double spaces after punctuation.
2. Remove Empty Lines Between paragraphs strips out any additional blank lines between paragraphs to make spacing uniform.
3. Strip Leading Tabs removes manual tabs entered so that formatting is uniform.
2. Decide your output format and practice.
It is important to decide how you want to export your project and practice as you are writing to get the look you desire by the time you have finished your novel or project.
First, start with a preset default format. Try different options and, if not satisfactory, then chose the one closest to what you want, and then tweak to modify a copy of this to obtain the look you want.
Use a smaller version of the project to practice on. For example, with a novel in Ebook format-You will need a cover image, front and back matter (often are formatted As-Is to preserve the special needs for those sections), and pages representing (Acts/Parts-if use) Chapter Headings (do you want them numbered in order or titled?) and Scenes (where you will set the base text and font settings for your novel). This will allow you to see a abbreviated version of your output which contains all the functional elements of your project. This version can be compiled quickly so you can easily make multiple adjustments to get the look you want.
I will discuss the Layout panel of the Compiler later. Here is where you choose how each type of book part (Section Type) will appear. This Layout Section of the Compile Panel will show you a rough preview of your output after you assign Section Layouts to each Section Type in your Project you are using.
2 A. Check your metadata settings in the third panel of Compile for completeness and errors.

Metadata is a crucially important step, because the slightest typo can easily mean that your book’s name is spelled wrong across every page of your print book, for example. This starts with the default Title being your project name. However, this can be changed to any title you want to Compile with, without affecting the Project Title.
Note: the metadata is not the same as the Title Page of your book, which you should have setup in the initial manuscript. Instead, the metadata here is what Scrivener uses to fill in the information displayed in the headers or footers of your book.
2 B. Make Sure you are including what you want in your novel and it has the correct Compile Status and Section Type.
1. In the lower right footer, the small file icon will have a check mark if included in the compiling process, or you can check this in Inspector metadata settings.
2. A quicker/more efficient way to check on the Compile status of documents is to view your whole manuscript in the Outliner View and add the column Include in Compile. (see below) This Column has a check in the checkbox if it is included to be compiled. In this view, click inside the outliner view and collapse all files by using the collapse icon in the toolbar (if added), Menu command View > Outline > Collapse All, or keyboard shortcuts. Now expand all the files to fully open the Outliner View with the toolbar icon (if added), Menu command, or keyboard shortcut. Now you can review the Include in Compile column and look for any unchecked items. If a document is unchecked, is that what you want or an error? This becomes a quick way to make sure all of your novel documents you intend to Compile will be compiled.
3. While in this view, also add the column for Section Type. This way you can view this information next to the Include in Compile status and make sure all items in the Manuscript have the correct Section type (see below) and will be compiled. This becomes a quick way to ensure the Section Types in your project are assigned to the correct files/folders. Ie Acts have the same heading (ex Part Heading/Acts), Chapters all have the same heading (ex. Chapter heading), Scenes all have the same setting (Scene), Front and Back Matter all have the same setting (Front Matter- or another unique Section Type name for these folders). Note: The last sections often use the (As Is) Section Layout type to preserve the formatting for these sections.
In the Picture below, it becomes easy to rearrange Outliner columns to make sure these two columns are visible and adjacent to each other. This arrangement allows you to quickly check the Compile Status and Section Type of every file/folder in the novel to ensure a consistent approach.


Clicking the Section Type column allows you to change the order of documents from Binder order to Section Type order. In this view it is easy to see if you have assigned the correct Section Types and if all documents in the Draft (Manuscript) are set to be compiled.
If you need to change the compile status, you can click/select multiple Binder items at once and change their Compile status by clicking on the Compile icon in the Editor Footer and changing as a group from not compile to compilewhile in the Editor view.

will NOT be compiled

Check means document will be compiled
The organization of your Binder outline is of crucial importance when compiling your book. A strictly regular structure is best, but Scrivener can deal with exceptions to the rule as well.
These Units of structure can be renamed (Even Default Section Structure names) to make sense to you.
Parts (Acts) -
Used only if your writing contains separate parts (Acts).
Chapters -
A normal folder with a collection of text documents.
Scenes or Sections -
A series of text documents in a folder. If multiple scenes are contained in a chapter, then you will need a separator, be it an empty space, #, ***, or some small image divider that occurs as a transition between files in one folder. You can also give individual Scenes a title to use as the separator between multiple scenes in one chapter.
Note: Only text documents that are outside the Draft or Manuscript folders can be used for front matter or back matter and they are not compiled UNLESS you click the box at bottom of compile in the third pane on the right and choose specific folders to include when you Compile.
2.C Make sure your Section Types are right. (Another Method)
Scrivener allows you to see the default Section Types in your Binder using the Project Settings Panel.
1. Use the Menu command Project > Project Settings > Section Types > Default Types by Structure. First click the Root Folder (or Manuscript in this case). Clicking the Root Folder will highlight the Manuscript folder.
2. Now clicking on a Level Folder or File group will highlight any document on that particular level in the Binder that is visible. (You cannot scroll the Binder once you do this in the Project Settings panel.) To view the entire Manuscript you will create the view below, then check for the correct Section Types, exit, scroll the Binder further down and repeat this process until the entire Manuscript has been viewed and the Front and Back Matter folders have been checked.
3. You may need based on the Novel (Project) structure to click the plus button in the footer to add more levels to see various items in your Novel. (see below)
All my Level 1 folders are Acts. You want every Act (or Part) to be on the same level and also be the same Section Type.

All my Level 2 folders are Chapter(s) and I will view different sections of the Manuscript in the Binder to make sure every Chapter is on the same level.

All my Scenes are at Level 3 or deeper and are files.

Pro Tip- Consider using the built in Windows Snipping tool to capture images of the whole Binder Manuscript. First setup a Search collection based on Section Types and use the Scene Section Type. Now use the Windows Snip Tool (Use the Keyboard Shortcut Windows Key + Shift + S, followed by the Keyboard shortcut for the Clipboard Viewer Windows Key + V. If you open a blank document and then click on the captured image in the Clipboard viewer it will appear in the blank document where your cursor is. You can capture your scene list in a few images within a single document. Open this as Quick Reference Panel to compare as you the Scene Section Types in the Project Settings panel to ensure all your scenes have the correct Section Types as shown in Project Settings. (see above and below)

2.D Understand your Placeholders
Scrivener has an extensive list of Placeholder that can assist with auto-numbering Parts/Acts and Chapters for example. These can also provide word counts and so much more. Review these in Scrivener. These can also be used to insert images into your project and the Compile output as well.
3. Backup your project
Save a copy on an external drive, online storage, or USB key prior to starting in the rare case where this is a problem before playing with the Compile process, changing compile status values, or Section types, especially when you first begin. This strategy should be in place during the whole writing process to prevent losing your work. There are several articles on Project Backup on this Site.
4. Understand your Table of Contents (TOC)
The Table of Contents (Toc) points ONLY to documents with a page or section break.


Documents outside the Manuscript folder are essentially invisible to the compile command and are not included in your compile output unless you make certain choices such as:
Using an <$include> placeholder.
Use the Current Selection choice to Compile the items currently highlighted in the Binder.
Compiling a specific collection. Collections can include files from anywhere in your project depending on your search criteria, or files you added to a static collection.
Note: The Front Matter and Back Matter sections are added to the Compile process separately and are outside the Manuscript.
5. Recheck.
Again, check your Manuscript Structure, Compile Status, and Section Types. Now when you choose a Compile Format you will assign Section Layouts to your Section Types and edit a Custom Compile Format if any additional formatting of Section Layouts is needed. You can only use a Default Scrivener Compile Output if you do not need to edit the Compile Format.
Ask yourself these questions. Have you?
A.) Correctly structured your Project: Make sure the organization in your Binder has a sensible hierarchy—it can be simple, rather complex, or anywhere in the middle.
B.) Correctly applied Section Types: As needed, override Scrivener’s defaults to better match the structure of your project.
C.) Correctly assigned Section Layouts: As needed, override Scrivener’s defaults to determine how Chapter titles display, how the body text appears in your Scenes and whether to include a Scene title, and Front and Back matter often saved As Is.
D.) Do you need to edit the default Section Layouts formatting? If you don’t like the section layout choices available, you can create your own.
After you assign and format Section Layouts, click the Save button to save your changes to the current layout assignment or formatting within the current Compile Format Designer. This will save these changes for future use. When you reopen a Compile Panel the assigned Section Layouts will appear in the order they will appear in the book and give you a preview of what the final Compiled product will look like. (Front Matter, Acts, Chapters, Scenes, Back Matter). Placeholder tags will appear, but not any added images or separators.
E.) Choose a Compile Format, either from a Scrivener premade Format, a Standard Default format or a Custom one you have created or imported.
Available Compile Formats Include:
Default
Meant as a very simple format, its layouts will pass through editor formatting and “glue together” the pieces in your draft folder with little alteration or complexity.
— Folders will still generate page breaks by default, and it comes with a few layout choices for adding additional headings as need be.
— The current page number will be added to the center of the page footer. No other headers or footers will be applied.
— This is a good starting point for your own formats, or as a basic way to export projects that do not require any special compilation options.
— It’s also a good option if you’d rather defer formatting for work in another word processor or desktop publishing program.
The following Compile Formats are for Word processing and Web Outputs
These formats pertain to the print, PDF, RTF, DOC, DOCX, ODT and HTML types.
Enumerated Outline (titles only)
— If you need a basic outline of topics (taken from the binder titles) alone in an indented list, this format is a good starting point.
— Unlike most formats, it will not export any text, only the titles of documents.
— The four section layouts that come with this format provide different spacing and numbering schemes for your outline.
— The placeholders used to generate numbering are set in the “Title Options” tab.
— The amount of indent applied per level can be adjusted with the Add indent per outline level setting, in the Transformations format option pane. (You must assign a Section Layout to create some formatting for EACH Section Type in your Project.)
(Windows Tip: In outline formats you may want to make sure separators you choose for this format are single line and NOT page breaks between folders or files.)
You can use any mix of styles for different types of documents in your project. To create your own numbering schemes, duplicate the format and use one of the existing Section Layouts as a starting point.

Full Indented Outline (Can include BOTH Titles and a Synopsis)
— This format presents an indented, easy to read outline that includes titles and synopses for all binder levels.
— The provided layouts provide a choice between alphanumeric numbering, hierarchical or no numbering at all.
Refer to “Enumerated Outline” in the previous section for tips on adjusting the indent and numbering styles. (As with the above format, you must choose a Section Layout for EACH section type and decide which ones will include a synopsis with the title. Every Section Layout has a number of checkboxes to decide what is added to the layout. One of those checkboxes is for the Synopsis. Notice you also have chosen a numbering scheme as well.) If you do not see an included synopsis with some titles, again check the Section Layouts you have assigned with this output.
(In outline formats you may want to make sure the separator options you choose for this format are single line and NOT page breaks between folders or files.)

Manuscript (Courier)
— Formats your book using standard Courier 12 pt type and a number of common conventions such as scene separators as hash marks, double-spacing, underlined emphasis (instead of italic), page numbers, standard page headers and so forth.
— It has a broad set of section layouts capable of handling a book with parts, chapters, scenes and titled sections.
— It is thus equipped to work with all of our built-in book generating project templates, fiction and non-fiction alike.
Common Alterations include empty lines instead of a hash mark. By default, the stock compile formats considers empty lines that you create in the editor signify minor breaks in the text, such as scene transitions or changes in topic. Some formats, such as submission manuscripts, require a more clear signal of such a break than a mere empty line, and commonly use a single hash mark (#) to do so.
Manuscript (Times)
— Functionally very similar to the Courier manuscript format, only using Times New Roman, another commonly required typeface for submission manuscript.
— Italics will be rendered as italic text rather than underscored.
Scene separators remain hash marks, double-spacing, page headers and so forth. It provides the same array of layouts as the Courier format.
Modern
— Provides a fresh look, this layout is designed for printing your own copies or generating PDFs for proofing.
It includes a full complement of layout designs, working with all of our book generating project templates.
Outline Document
— This layout is designed for printing full outline information (title and synopsis), but in a standard document layout rather than an indented outline format.
— The page footer contains the title of the work, author’s name, date and page number, separated from the page with a dividing line.
— It also has several layouts to choose from that only export the title. (This could be useful for some projects where larger categorical groupings like parts and chapters may not have any specific synopses of note and just need to insert a sectional break.)
(As with the above formats (Full Indented and Enumerated Outlines) you must choose a Section Layout for EACH section type and decide which ones you want to have a synopsis to be included with the title by clicking the Synopsis checkbox. You can choose Section Layouts with a numbering scheme for this option as well.) If you do not see an included synopsis with some titles, again check the Section Layouts you have assigned with this output.
(In ANY of the outline formats you may want to ensure the separators you choose for this format are single line and NOT page breaks between folders or files.)

Paperback (6′′ x 9′′)
— Functionally similar to the previous, this Format is optimized to work with standard paperback sizes in the U.S.
Paperback (5.06′′ x 7.81′′)
— A format designed to produce a typographically pleasing layout that could be taken into a word processor or desktop publishing program for self-publication with little effort.
As with the other book generating formats, it is designed to provide a full spread of layouts to accommodate many different book styles and structural setups.
(By using logical “Heading 1”, “Heading 2” and so forth styles your document will have an outline which some software may use for navigation aids, as well as facilitating the construction of a dynamic table of contents.)
Proof Copy
— A useful preset for internal proofing. It will reformat your script to double spacing so you can easily take notes and prints a disclaimer after each section heading as well as in the header. Thus making it easy to send out “Not for distribution” copies to your proofing team.
Script or Screenplay
— This format is also available to the Scriptwriting formats and will not be discussed here. (Please refer to the Manual for further information.)
Vellum Export (Mac OS only)
Available only to the DOCX file type, this Format is designed to convey your work to the Vellum book creation tool.
Ebook Publishing (ePub 2 Ebook, ePub 3 Ebook, and Kindle Ebook .mobi)
Since most Ebook readers will handle the majority of the typesetting, choosing a format will be more about getting the basic building blocks together, rather than exerting total control over the appearance.
Ebook
A suitable format for Ebook design.
Electronic books generally require basic and flexible designs in order to be displayed on many devices, from cellular phones to tablet computers to dedicated black & white e-ink displays. This is a good starting point for your own formats when creating Ebook formats. If you have a lot of experience in Ebook design, you may find starting from a simpler default to be easier, as this format is built to be used with very little customization, and thus assumes a lot.
Currently you should use ePub 3 to output your books. This is the format required by Amazon. Kindle books do NOT natively read ePub3, but you can download and use the (free) Kindle Previewer 3 from Amazon to convert the ePub 3 file to a format that can be read on Kindle devices and software. If you publish on Amazon, then they will convert your submitted ePub 3 file for you.
Ebook Screenplay
When publishing a screenplay intended for display on an Ebook device or reader software, you’ll want to use this format, which has a stylesheet designed to print the various scripting elements in a format mimicking a screenplay.
Since the average reader won’t have a screen large enough to truly display a standard screenshots, some of these elements will be estimated, or designed to merely suggest what they would look like on a typical printed page.
Other Options depending on your Compile output include:
(Ebook) Outline Document
And specific Compile Formats for Scripts/Screenplays and Markdown/Pandoc documents.
As you Apply Section Types —-Think about the elements of the last book you read.
The cover was probably followed by various bits of front matter: copyright page, title page, introduction, and table of contents. After the front matter, the book probably had chapters. Back matter may include an afterword, notes, and an index. Each element has a specific formatting. The copyright page may have centered text in a small font size, and chapters may have title pages, or specially formatted chapter titles.
We will continue this in Part Two of the steps before compiling. This will be published in the next several weeks.
Steps before Compiling Part two
In part two of the Steps before compiling, we will start with step 6 which is Assigning Section Layouts. The Section Layout pane of the Compile Panel will give you a preview of how the Compile Output will appear. If what you see is not the result you want, then you will have to go back to the Compile Format Designer and tweak the Section Layouts until you have the desired result.
6. Assigning Section Layouts

One important step before you compile is to assign Section Layouts. This area is quite different in Scrivener 3 than in previous versions.
At the bottom-center of the middle panel of the Compile interace is a button that says “Assign Section Layouts”. Clicking on this will open a new screen with a list of section types and the list of possible section layouts you can assign to each one. This is where you’ll select the design for each “section type” or element of your book. You will have different styling options that can be applied to Chapters or Scenes. So you can choose among different choices to get the look you want. Do you want Scenes with just text, or do you want a title with the text?
Think of Section Types as different parts of a your outfit such as a shirt/blouse, pants/dress, shoes/hats. Think of Section Layouts as the types of pants you could have including jeans, dress pants, short skirt, or a full length one. The Section layout gives different ways to present Acts, Chapters, Scenes, or other elements like the Front and Back Matter sections in your Compile output.
Each Section Type must have a single assigned Section Layout. However, multiple Section types could be assigned the same Section Layout such as the As-Is Section Layout.
**** Check to make sure Section Types have been applied consistently.
If all chapters are not the same Section Type, then this can lead to an inconsistent Compile output.
There are two methods to check this. Using Outliner columns or Project Settings. Both were discussed in Part one of this series. I will review the second method again to make sure it is clear on how you should use it.
An example is shown below showing Acts, Chapters, and Scenes. To see your whole novel to check for the proper structure, you will have to open the Project Settings Panel and examine the Binder in small chunks. In this view, you cannot scroll the Binder to evaluate the different sections. You must exit this view shift your position in the Binder and check again.

Now that you know your novel is properly structured, you can assign Section Layouts confidently knowing the layouts will be applied consistently when you compile. (The Front and Back Matter folders were not shown in this example. It may be easier to check the Inspector’s Metadata Panel when you only need to check a few documents. Below you see the Compile Status and the current Section Type of the document in the Inspector Metadata pane. Clicking the dropdown caret allows you to change Section Types right here.)

In the example below, each Section Type has been assigned a Section Layout (which is the format which determines the appearance of the Section Type). The appearance of a Specific Section Layout is adjusted in the Compile Format designer.)

For a fiction book, these sections are pretty standard. They include things like Chapter Headings, Scenes, Front Matter, Part Headings (Acts), Table of Contents, etc.
The nice things about Scrivener’s Section Layouts is that if you change the style for one element (Section type), it will change it for all matching Section Types. That means that all your Chapter Headings, for example, will look uniform AS LONG AS every Chapter has the same Section Type.
Make sure that each Section type has an assigned Section Layout. Simply scan through what they have and select what looks good. Then hit OK. Each Section Type will have several different Section Layout styles to choose from. Click Ok when you have decided. Hitting ok will show the three pane view of the Compile Panel. In the second pane (below), you will see a preview of how the arrangement you have chosen will look when you compile with each Section Type labeled.
If you are not happy the preview appearance, click the Assign Section Layouts button again and choose a different arrangement. If you add placeholders other than for Chapter and Act numbers, the placeholder will appear in the section layout in the position where the object will be placed. If a placeholder runs into a title, hitting the return key will change the position of the placeholder and will usually fix this issue. Remember to hit save in the Compile Format Designer when you make changes.

Pro Tip: You can duplicate a Section Layout in the Compile Format Designer. Doing so will retain all the settings of the original without a name. As you experiment to get the look you want you could duplicate existing Section Layouts and create new versions. Example, such as Section Layout Chapter Heading version 1, 2, 3, etc. This way it becomes easy to go back to an earlier version of the Chapter Headings Section Layout and experiment with a different look WITHOUT having to remember how to reverse the changes you made.
7. Review Front and Back Matter
Write your Front Matter (ex. Dedications, Copyright and Title Page) and Back Matter (ex. About the Author, Future Projects, Glossary if needed), and a cover photo which should be the first image in the Front Matter Folder.
Front and Back Matter

1. Click the Checkboxes to add Front and Back Matter.
2. Click the caret and you will see everything to be compiled included for the Front Matter at the top of the listed files, and the Back Matter at the bottom.
3. Click the Lock Icon to lock the settings to prevent any changes, if you are satisfied. Pro Tip: You could keep a series of books in one Scrivener project and have custom Front and Back Matter folders for each one, depending on your needs.
4. When you are satisfied, click and hold the Alt key and the Compile button in the lower right will change to Save. Clicking this will save any changes you made to the current Custom Compile Format.
This is why it’s important to have this setup earlier while you’re constructing your novel. If you’ve done this properly, all you need to do is select the appropriate folder. You can also have different Front and Back Matter folders based on what Format you are compiling to. For example, with Ebooks you have the option of including a cover image.
8. Back up and save your project in at least two different save locations BEFORE COMPILING or adjusting your Compile Format Designer.
Again, Compiling does not alter your actual Project, but it is best to always back up your project in at least two different locations before making significant changes, or doing anything you are not familiar with.
9. Look at the Settings icon in the third Compile panel.
Here you will decide what to include or not include when you Compile. Choices to exclude or include are Footnotes, Comments, Annotations, Highlighting, text color, hyperlinks, etc. Options on what to include or not vary by what your final Compile output format is. When you are satisfied, hold the Alt key and the Compile button in the lower right footer of the Compile Panel changes to a Save button to save the changes you made to your custom Compile Format.
You can also change options on how things are exported or converted as well.
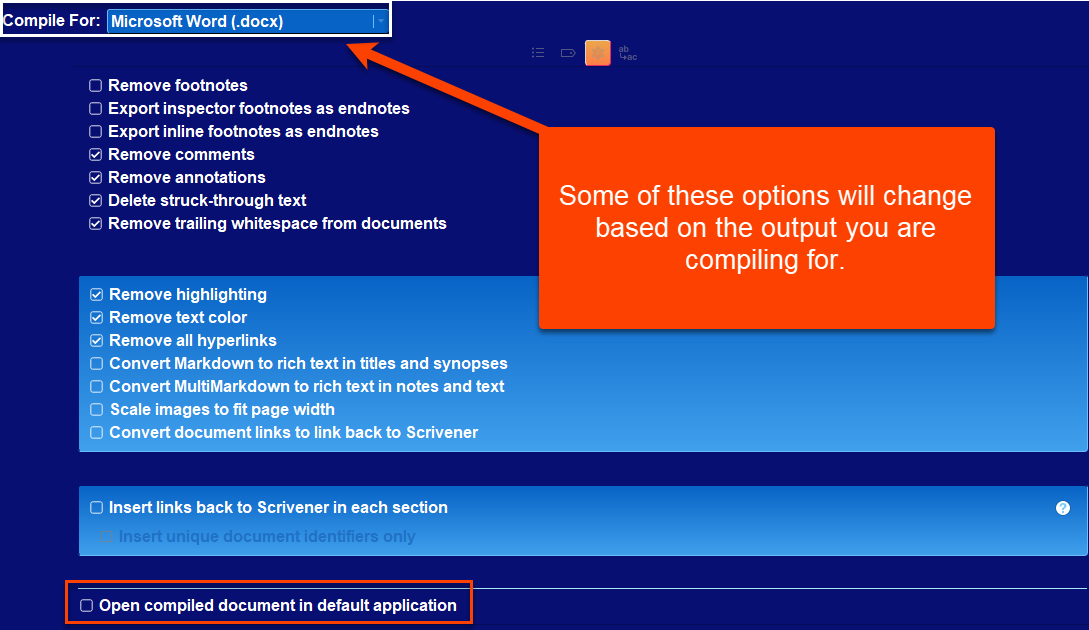
10. Final Checklist before Compiling
1st-Make sure that all the documents you want to appear in the compiled project are actually checked. Carefully look at the checkboxes in the Outliner, Editor, Inspector, or in the third panel of the Compile interface.
2nd-Only have one manuscript in your draft folder. If you have multiple manuscripts, it can be confusing as to which gets compiled in which book. If you have a series of books, make sure you clearly identify your current Compile target. Make sure you have chosen the right Front and Back Matter folders for the book you are Compiling. If you have different Front and Back Matter folders per output, then make sure these special output folders are clearly labeled. All Chapters and Scenes in the Draft/Manuscript folder are usually included in the compile process but do not have to be.
3rd-Move old folders from the revision process into research. You can put them in individual folders based on the stage of the revision. (This will avoid confusion during the compile process.)
4th-Make sure all filters in the third compile panel are off. It is rare for someone to use filters when compiling the full project.
5th-Is the Compile target in the third panel correct? By default, your target should be your Draft/Manuscript (#1 below) (or a custom name you assigned to this folder). If your target to compile is correct make sure everything you want included is checked to compile and you have not missed anything that you want to include in your novel. (see below)
The Filter (#2) should generally be off.
The current selection (#3) is generally not the option used to Compile your project.
Collections (#4) will not normally contain your whole project
Pro Tip: Consider a special collection to test the Compile process. A small collection including an Act, Chapter(s) (at least two to check numbering protocols), several Scenes, and Front and Back Matter allow rapid compiling of this small group of files so you can change Compile settings to get the visual result you want. In this preliminary stage there is no need to compile the whole book multiple times.

6th-Make sure the Section Types have been assigned appropriately. Side note: make sure that the section types you have created in your novel match the ones in your layout for this particular project that you are compiling.
7th-Look at your separators and make sure the settings don’t inadvertently use a page break where you intend to use a single line of return. (A Page Break triggers entries into your Table of Contents.)
8th-Make sure you are using the correct placeholders when you set up your Section Layouts. A single misplaced letter can throw off your entire layout.
9th-Under Settings in the third Compile Panel you can choose to remove text colors and highlight colors when you Compile the project. You can also remove hyperlinks. (This is important because Amazon will want you to include hyperlinks to their site, which will not be welcome on other platforms. (In the Right Compile windowpane is the Setting’s wheel icon where you will see the ability to exclude/remove the various Scrivener tools you used to mark your document while creating it.)
10th-Review the Page Setup-File > Page Setup. See the Page Setup page if you are printing the Compile project.
11th Backup your project in a safe place before you Compile AND before you start this process.
12th Backup any custom Compile Formats you have created for this Compile project for safe keeping. Saving all of these in one folder in a single folder to hold all your Scrivener customizations makes it easy to find them.
Remember: You can click the + sign in the upper right to duplicate a Section Layout. A duplicated Section Layout will retain all the settings of the layout it is based on. If you are experimenting, then making several versions of a Section Layout while working out the kinks allows you go back to a previous version of the Section Layout if a change does not produce the desired result and you do not know how to reverse the changes you made.
11. Compile and Check Output
Lastly, it’s time to compile and check your file. From the compile settings, simply hit compile, and Scrivener will produce a file for you.
Ebooks can be checked through an Ebook reader software program like Calibre or Kindle which now only will read epub files. Amazon now ONLY accepts ePub3 files for their ebooks. You can use the free Amazon Kindle Previewer to upload and convert ePub3 files to a format that any Kindle software can read and allows you to preview how the ebook will look.
Calibre download site
Kindle Previewer download site
Now you will be able to use the kindle reader to see how your ebook looks.
Print books can be checked with any PDF reader.
Because Scrivener is such a complicated program, you will likely find elements of your book that you will want to change. Perhaps you don’t like the font, or you need to adjust the margins, or your table of contents is not showing up the way you expected.
There will undoubtedly be some tweaking that will need to be done. But the good news is that almost all of this can be done from Scrivener’s compile settings. Simply go to File > Compile, find your specific book format, and play around with it until you have what you need.
Pro Tip: Use a small Compile collection which contains an example of every type of file in your future Compile project to work out the kinks in getting the look you want. Remember after you assign the Section Layouts to the Section Types, then the second panel of the Compile panel gives you a preview of what your Compiled Project will look like.
You’ll have your book in the hands of readers in no time!
12. Possible reasons why you may not be Compiling the full Draft folder and Front and Back Matter:
Documents may look to be inside the Draft folder, but in fact are located at the same root-level as the Draft Folder in the Binder. Scrivener will not include these documents in the compilation.
You removed documents from the Draft Folder since a previous Compile attempt.
You unchecked individual documents in the right-hand side column of the Compile Overview window.
You unchecked documents in batch in the Outliner View Mode with the "Include in Compile" column visible.
You clicked the down caret in the Compile window in the third pane and selected either Current Selection, a Collection, or a Project Search rather than the Draft Manuscript. (see above image)
You accidentally applied the filter to the manuscript before Compiling resulting in documents being left out. (This last possibility is a frequent cause of incomplete compilations.)
13. Consider Exporting the Compile Format for safe keeping.
Pro Tip- Consider Exporting your Compile Format if you tweak the Compile settings, then save the Compile format as a new version. You could give each version a letter or number such as My Compile v1, v2 etc. In this way you can go back and not have to remember what you did to achieve a previous result.
Right click on the Compile Format and click the edit button. You will open the Compile Format Designer and can rename it as a version of a previous Compile Format. The default naming convention when you duplicate a current Compile Format Scrivener by names it the original format name and adds the work copy. You can click on this temporary name and edit it any way you want.
Now Right click on this again after the Compile Format Designer is closed and click Export and save to a Folder for future use.
Compile Section Layouts Part One
Section Layouts and the Compile Process: A Deep Dive
In order to understand how this works, we must understand how Section Types and Section Layouts interact with each other. The information in this series may repeat itself at points, but this is intentional. I will present how to approach Section Layouts from different angles to hopefully make this understandable one way or the other.
Scrivener automatically assigns each item in the Binder a Section Type based on the item’s position in the project’s structure. [Default Types by Structure] You can change/customize these assignments in the Project Settings Panel. (see below and example from my unpublished book)

Section Layouts are different formatting styles that can be applied to a specific Section Type.
The middle pane of the Compile window is the Assign Section Layouts area. This couples the Project’s Section Types to its formatting when compiled (a Section Layout). The layout you choose will change how the final Compiled output will appear. You can customize Section Layouts to obtain the results you want.
When all the Section Types have been assigned a (format) Section Layout, then the yellow warning intially visible in this section will disappear.

For example, a top-level folder inside the Manuscript folder of your novel might be assigned the Acts Section Type and the next level might be the Chapter Folder Section Type, and a text file in any level file group might be assigned the Scene Section Type (if you’re using the Novel template).
When Scrivener compiles a project, by default it uses these assigned Section Types to format the final document. However, you can manually assign Section Types, create Section Types, or change the default structure based Section Type assignments.
Based on this arrangement, there are several key points to remember:
If your Binder organization is willy-nilly (a polite version of a more common vulgar phrase), you need to clean it up before compiling or your Compile output will also be a mess.
You can override Scrivener’s section type assignments and create new section types.
Each file or folder in your Binder can have only one section type, but a specific section type can appear radically different, depending on which Section Layout has been assigned to it for a particular Compile format. Two different Compile Formats of the same book may look completely different based on which Section Layouts are used for each Section Type. For example, if your Scenes have titles, then you may want a Section Layout that shows the Scene Title with the text following below. Or you could decide to hide the Scene Titles in another Compile Output.
A Section Layout can format chapter headings, put page breaks in the right places, and more. If you want to work with/manipulate them to achieve a customized Compile output, you’ll follow a multi-step process:
Think about how you want these files and folders to coalesce in your compiled document. Do your folders—represent chapters, perhaps—each have a title that should (or should not) appear?
Does each folder, for example, contain several scenes that you want to combine?
Or does each text file in a folder have its own title that you want to use as a heading?
To create the headings in a compiled document, Scrivener can use the names of folders, the names of text files, or both (or neither).
It all depends on how you organize your project, and what’s most comfortable for you.
Default Compile Formats cannot be edited, but you can duplicate them to modify them to suit your needs.
If you need to edit layouts inside a Default Compile Format, then you must duplicate the existing compile formats BEFORE they can be modified.
These Section Layouts are especially important for getting page breaks where you want them (perhaps before the start of each chapter) and for putting numbers, like chapter numbers, in the right places.
If you are using Manuscript (Times), and want to print the folder title all on its own, the easiest way to do that is to select the Layout that does just that:
After opening File ▸ Compile... First choose a Compile output. If you need to customize the Compile output, then try different default Compile Formats until you find the one closest to your desired output. Double-click this to duplicate it. A copy of a default Compile Format can be modified and renamed. (Pro Tip- give your custom Compile Formats descriptive names.)
Now click the Assign Section Layouts button below the preview column in the middle. You will be given a choice of Layouts that can be assigned to the various Section Types in your Project. If Section Layouts have not been assigned yet, you will see a warning at the top of the Section Layout Window.
3. To Assign Section Layouts to each Section Type in your project, first click the Assign Section Layouts button at the bottom of the middle panel and follow the steps below:

A. Choose a Section Type (Every document in your project should have a Section Type assigned. This can be viewed in the Inspector under General Metadata or in the Project Settings panel (under Section Types)
B. You may need to Show unused Section Types and may need to change the Section Types for Front and Back Matter documents to achieve the results you want. (Classically, using the As-Is option allows different fonts and looks in these sections.)
C. After you choose a Section Type, now you click one of (Formatting) Section Layouts to assign its formatting to the Section Type. The appearance of this can be further tweaked in the Compile Format Designer. If none of the current Section Layouts meet your needs, you can create and save your own Layouts within the Compile Format Designer. (This will not be discussed here, but in another Blog) Note: The name of the displayed Section Layout is directly centered below the image of how it will appear.
D. Once you are satisfied then click Ok to save your settings.
E. You can expand this panel by dragging with the mouse until you show all your possible Section Layout options you can choose.
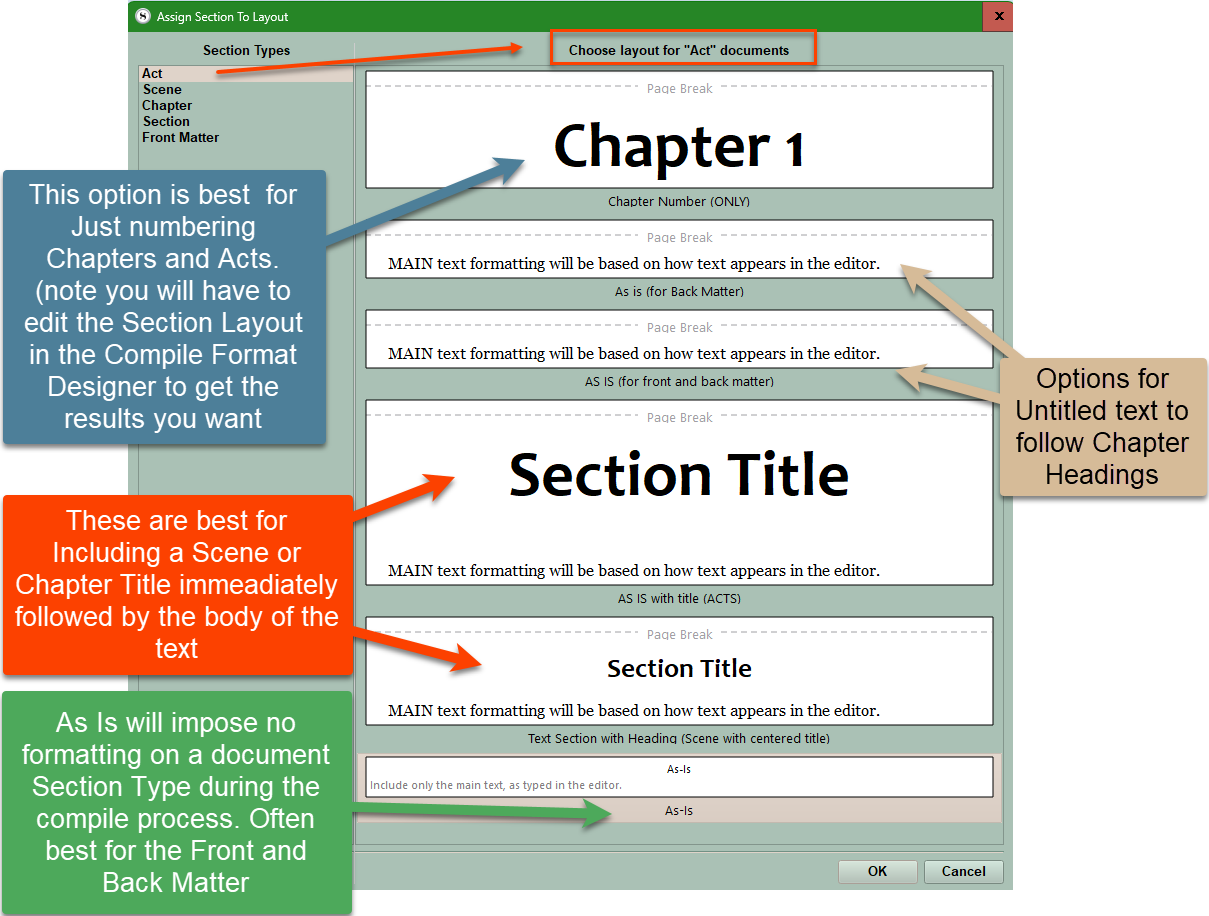
3. When you are finished choosing, then you will see a preview of how your book/paper/etc. will look. After you have clicked save in the Compile Format Designer to save the changes/choices you made you will return to the Compile Panel and see a preview of how things will look. (see below)

4. You can check what section type is assigned to chapter headings or scenes in the Inspector window under the metadata tab. This is a modified view which shows how this could look for Acts, Chapters, and Scenes. (see below)

For each section type in your compiled project, select the layout that you prefer. If you like the font option provided by the selected layout, you are all set, but if you don’t, choose one (if you are allowed to) from the Font pop-up menu at the top of the Section Layouts column. When you finish, click OK. Note: Font selection is not available for some file formats, such as plain text and ebooks (where fonts are applied by the ebook reader itself and the user can change as they desire.).
Compile Layout Facts:
Default compile formats cannot be edited, but you can duplicate them to modify them to suit your needs.
Backup and save your custom Compile Formats BEFORE making changes. [Pro Tip: Consider numbering the Compile Format as you make changes and save them. This will allow you to revert to a previous version without trying to remember all the changes you made.]
You can override Scrivener’s section type assignments and create new section types.
Section Layouts are different formatting styles that can be applied to specific Section Types.
If you click the plus sign in the Section Layout tab of the Compile Format Designer, you will duplicate the currently selected Section Layout’s settings, but with a title of New Layout. Edit the name and tweak any settings as needed. [Pro Tip- When you are experimenting, then duplicating a Section Layout allows you to try different settings out without losing the original or remembering how to reverse the changes you made. You can name Layout “Current Name” version 1, 2, 3, etc to keep track of the process and delete the steps when you get the result you want.]
Each file or folder in your Binder can have only one Section Type, but a section type can appear differently, depending on the Section Layout associated with it for a particular compile format.
For ebooks, the ereader itself will apply fonts and these can be changed by the user. Use the default font choices here.
If your Compile output does not look right, the first thing is to check your Section Type assignment to make sure it is consistent. (Ie. All Acts have the same section type, All chapters have the same section type, and finally scenes as well.)
Also check to make sure the documents you want are all included to be compiled, and you have chosen the Manuscript (Draft) or a smaller section if that is what you want. Check in the third panel to make sure the filter icon is not active (unless this is an active choice) and altering which documents are compiled.
Once you have assigned Layouts for a specific Compile Format. Opening the Compile Panel and double clicking on any of the individual Section Layouts will open the Compile Format Designer to the Section Layout tab and the specific format you double clicked on. Now, you can make any changes needed to alter the look or function of the Section Layout if its appearance in the Compile panel is not what you want.
Anytime during the Compile Process, holding the Alt Key down will change the Compile button in the Compile Panel to a Save button to save the changes you have made to the current Compile Format to preserve for future projects.
If you have multiple levels of text color from revisions or other issues, you can click the Remove text color option to return the text to the default black when compiling. This option is found under the Settings icon in the third Compile pane.
In the Compile Format Designer any Section Layouts which have been assigned to your Compile output will be in bold text, EXCEPT if the default As-Is Section Layout is used. (Classically this is used for Front and Back Matter to preserve any unique formatting you may want for these sections.)
Every Section Layout you currently have or create has the option to add Titles, Metadata, a Synopsis, Notes, or Text to the Section Type it is being applied to.
When you click Assign Section Layouts, the Layouts will appear in the order they are arranged in the Section Layout area of the Compile Format Designer.
Layout Trouble-shooting:
If your Compile Output is not what you want, Layouts are a critical area to evaluate.
Step 1 look at your Compile Preview that appears after you assign a Section Layout (the Compile Formatting) to each of your Project’s Section Types. (see below) Do the Section Layouts appear the way you want? If so, move on to step two.
Note: Once you have assigned each Section Type a Section Layout for the Compile Process, then opening the Compile Panel and double clicking any of the individual Section Layouts (shown above) will open the Compile Format Designer. This will open to the Section Layout tab and the particular Section Layout you double clicked on. Now, you can edit or change how it looks or functions.
2. If there are still issues then we will look at your Section Type assignments. Section Types are searchable Metadata. The Section type for each document is displayed in the Inspector Metadata under the General Metadata heading. You can use Project Search to search by Section type. Search Acts, Chapters, and Scenes by Section Type and make sure there are not errors in your assignments. The other tip is to look at the Section Types when you assign layouts. Are there any unexpected Section Types? If so, do a Project search for this metadata and adjust the files found to reassign their Section Type and try Compiling again. You can change multiple document’s Section Types at once by selecting the files and right clicking and choosing the Section Type and reassigning its value.
In the Screen below you can click on the Act Section Type and then choose a Section Layout, or you can right click on the Act Section Type and choose a Section Layout to assign. You must do this for each item on the left side. However, multiple items can use the As-Is Section Layout option.
Checking your assignments of Section Types in your Project to ensure the proper Compile results.
To get a perfect Compile Output, you need to make sure your Section Types have been assigned correctly in your Project. There are two ways of doing this.
Method 1
Use your Project Search to Search by Section Type and make sure your Scenes, Acts/Parts, Chapters, and Front and Back Matter Section Types have been applied correctly. My suggestion is to start with the Section Types which are less common like Acts/Parts, Front Matter and Chapters. It will be easier to see incorrect assignments when you have fewer results to review than Scenes. I use special icons (custom ones) for my Scenes which makes it very easy to find errors using this method. (Examples of Searches by Section Type and using custom Icons below.)
By Assigning special icons to Scenes it is easy to find misplaced documents and correct their Section Type assignment.

Acts have square icons

Chapters have circle icons.

Scenes have house icons whose color varies by the Act.

The Front and Back Matter folders do not have a specific icon.
If in doing this, you find some documents have the incorrect Section Type, you can click on these and highlight them in your Search results. Now right-clicking on the multiple documents allows you to change multiple Section Types at once. Using custom icons make it easy to visually spot errors. I chose to color coordinate icon colors by the Act as well.
Method 2
Use the Menu Command Project > Project Settings > Section Types.
Now click the Default Types by Structure tab.
Clicking on a Document Type and its hierarchy in the Outline Level will show those documents at a specific level highlighted in your Binder.
Unfortunately, you can only view part of your Binder at a time and cannot scroll the Binder using this method. Also, this method shows you the Section Type assigned by the Default Structure, which MAY NOT match the actual Section Types you have assigned under the Section Types tab. (see examples below)
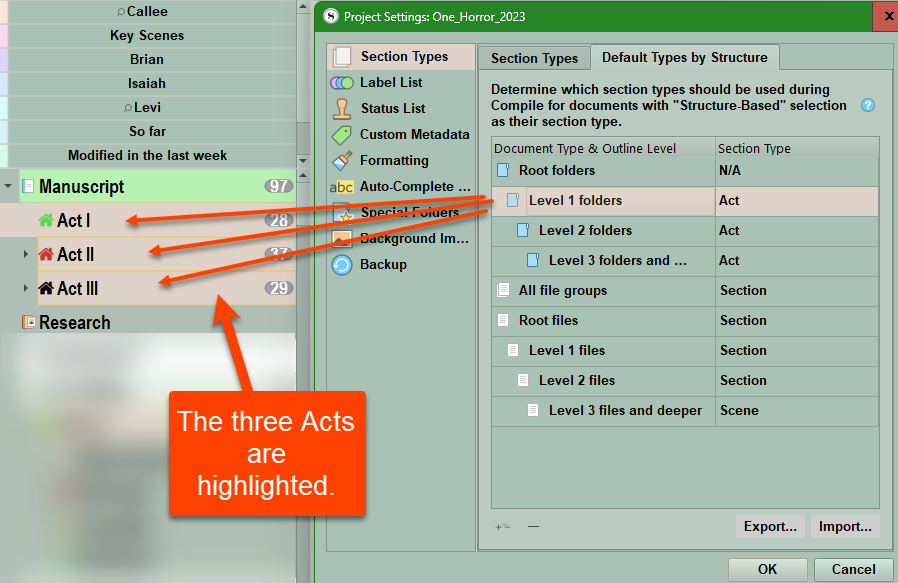
Only the Level 1 folders (Acts) are highlighted.

The level two folders (Chapters) are the only things highlighted.
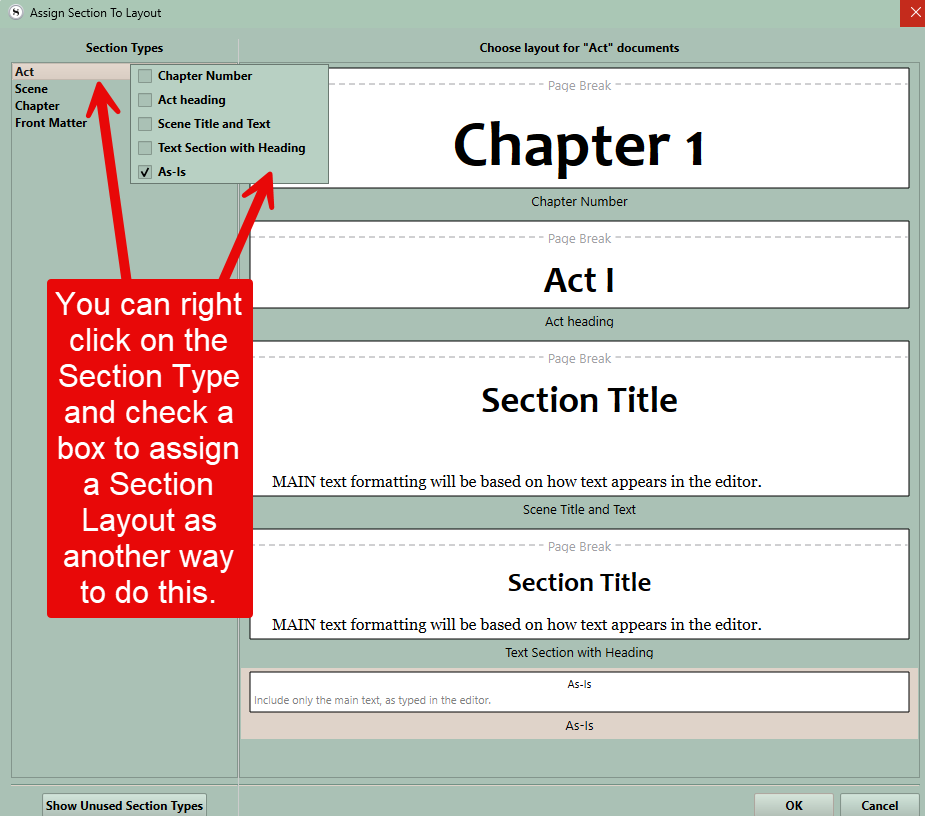
Choose the As-Is Section Layout (which exists in every Compile Format Design) for documents where you wish to preserve the current formatting of the file in the compiled document rather than changed by your overall Compile Settings. Classically the Section Layout As-Is is often assigned to your Front Matter and Back Matter sections to preserve any unique formatting you may have used.
There are four methods to Assign Section Types to any document or folder.
1. Right click on a folder or document and you will see options for choosing a Section Type and changing its value. If you click on this, you will see the current menu and at the very bottom of the dropdown you’ll see the option to edit an existing Section Type or add a new one. (See below)
You can select multiple files/folders using this method and change them at once.

2. Use the Menu command Project > Project Settings (Or click on the project settings icon in the toolbar (if added)). and then adjust section types.)
Section Types are assigned either by your project structure (Default Types by Structure. Note you can click on any entry below and change its Section Type.) or by Section Types. (This you can create and give any name and apply to any document(s) in your project. Click the + or - sign to add or remove types.)
Remember: How a Section Type will appear when you compile your project will depend on which Section Layout you assign to that Section Type and what edits you have made to the Section Layout. (This will be discussed in a later article.)
You can click the + sign (A) to add extra types you can then assign to Binder elements. You can also export (B) Section Types as well. Remember to click the OK button to save any changes you make here.
Classically the Section Layout As-Is is applied to documents where you want to preserve their formatting during the Compile process. Examples often used are the Front and Back Matter sections or any included glossaries.
N/A is for Root folders such as the Draft/Manuscript folder which will not be included in your Compile output or levels of folders or files which do not exist in the current project.
Note: Using the Default (Section) Types by Structure (as below) works best when your novel is organized in a classic arrangement such as Manuscript > Acts > Chapters > Scenes and the front and back matter folders are outside the Manuscript. When organized in this way, it is easy to assign available section types.
Clicking a Section Type (ONLY when viewing Default Types by Structure) will highlight all the corresponding section types in the area of the Binder which is currently visible, but you CANNOT scroll in this view.

Examples of the Binder view for various Section Types in the classic view mode.

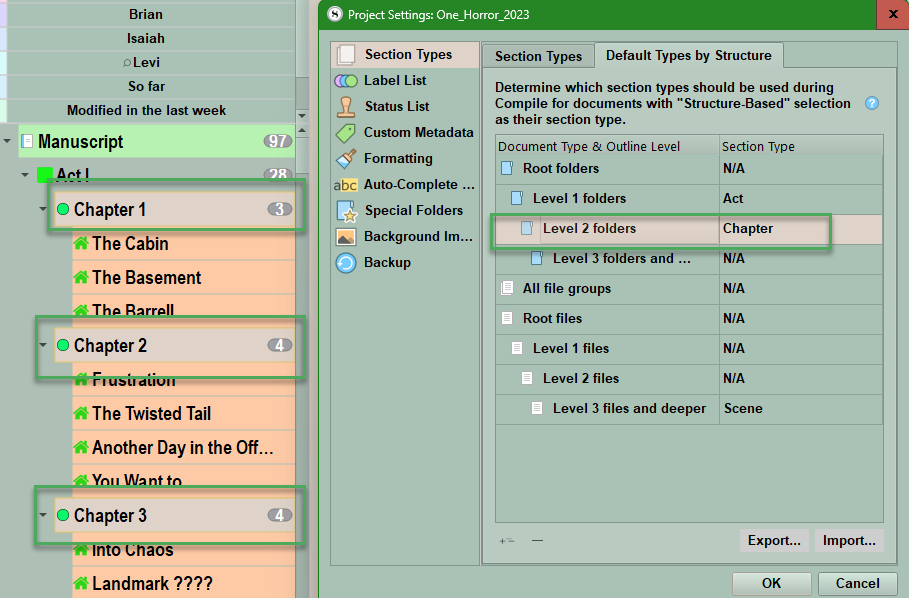

3. Assign a Section Type to every document in the editor via the Inspector/Metadata-
You can set the Section Type under the option to include in compile within the Metadata tab.
4. The final way is during the Compile Process.
Here, in the far right Pane you can change section type assignments for a single or multiple documents at once. (*****This method is less efficient and does not change the Section Types in the project itself but only for a particular Compile output.)

Now that you have checked to make sure your Section Types have been applied correctly and consistently in your Manuscript, Front, and Back Matter it is now time to move forward. You can now decide how to format the information in each Section Type. Section Layouts are a specific formatting that the Compile process imposes on each of your Project’s Section Types when you Compile.
Compile Section Layouts: Part Two
Let’s look at some examples to understand this process better.
Strongly consider working with a Compile (tester) Collection which would include every Section Type in your Novel or Project you will be compiling. A small focused collection allows you to rapidly Compile and see the results of changes you make in Section Layouts, or any other aspects of the Compile Format Designer.
Section Layouts settings affect the formatting of all aspects of a specific Section Type including what fonts will appear, which elements like titles, numbering, prefixes and suffixes will appear for a specific Section Type. Formatting can be applied to each of these elements individually. Separators between sections (like spacing after Chapters and Scenes) all occur in the Compile Format Designer but under the Separator tab.
Let’s look at the overall interface for Section Layouts.
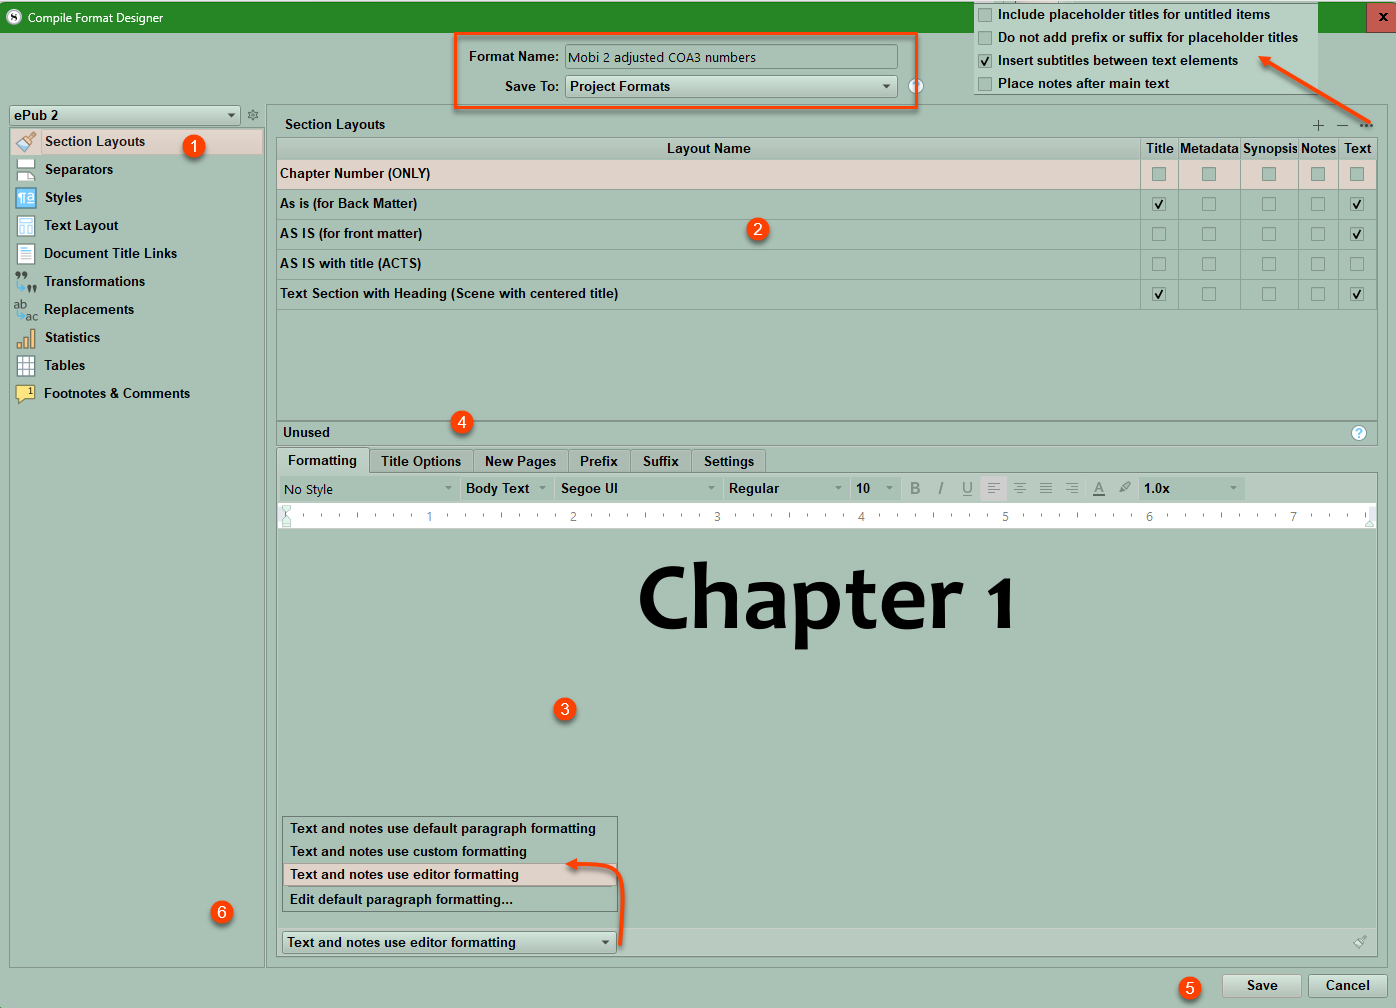
The Compile Format Name and whether it is a Project or My Format type are displayed in the red box in the center at the top of the screen. (You can change the name and whether it is a Project or My Format at any point in this process, but remember to click the Save button (#5) to preserve your changes. You choose the format you are Compiling for using the dropdown menu in the upper left above the Section Layout tab.
#1 These are the options you can customize in the Compile Format Designer and the current option you are working with is highlighted. (ex. Section Layouts)
#2 Is where you choose which of your current Section Layouts to use, manipulate, or duplicate to obtain the appearance you want when you Compile. Changes here DO NOT affect your project, but will change the Compile output appearance. (This section has multiple options to check which affect a Layout including Title, Metadata, Synopsis, Notes, and Text checkboxes.)
#3 Here you can change the formatting of text here. If you have a title and text you must click inside each one to be able to change the font in the format bar above this area.
#4 Are tabs which will be available to affect the appearance of every Section Layout. [I will explain how to use these for the first tab(Title), but these apply to every other tab.
#5 The Save tab will save changes you make for any Section Layout or other tab in the Compile Format Designer if you click it. Use the Save button frequently as you make changes to preserve your hard work.
#6 These options for Text and note formatting exist for Ebook settings. The option here for text based Compile outputs is a checkbox to override Text and Note Formatting.
What do these Section Layout checkbox headings mean?
You can set the case of text (upper case, lower case, etc.) and format these option choices under the Formatting tab. (You can also format text at the bottom left in the Compile Format Designer when clicking inside the text field.)
When you set this, then the changes will be reflected in the Section Layout pane of the Compile panel when you close the Compile Format Designer. (See below)
See how changes in the Formatting tab change the appearance of your title and numbering for chapters.
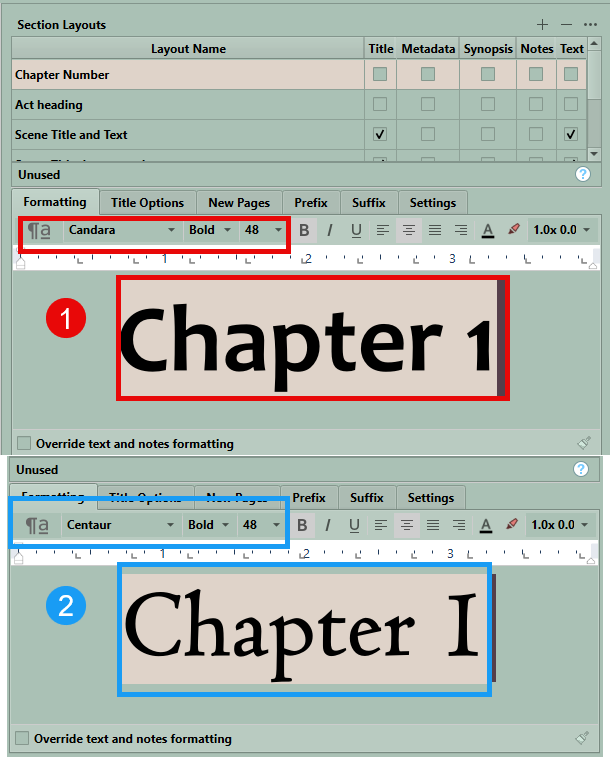
#2 Shows a different font and same size. Unless you click save before closing the Compile Format Designer, this change will not be saved. You must click inside the format window to have the option to change the formatting.
Let us discuss the Tab options above the formatting area. We have discussed the Formatting tab which works like the Scrivener Editor.
The tab options include:
Title-
This prints/includes the binder title of each item assigned to use this layout. The title will typically be placed on a line of its own at the very top of the section, much like a heading or chapter break would be. This checkbox is only used to bring the binder title into the content. If you only want to see the word Chapter followed by autonumbering, then the Title checkbox is not necessary. That can be accomplished with placeholders in the Title Options Tab, the Prefix, or Suffix sections.

The Title Options tab contains its own prefix and suffix sections related to the Title appearance.
The New Pages tab-

This tab affects options applied to sections after a page break. (Usually seen after Acts and Chapters). Choices including padding the page with blank lines and having several initial letters being uppercase.
Prefix/Suffix Tabs-
These position text and placeholders before or after the Title or text in a Section Layout This text can be formatted, but ONLY with any styles you have imported or created under the Styles tab in the Compile Format Designer.


Settings Tab-

Here you can change paragraph indent options. The default choice is no change.
Metadata
This includes a block of text below the title containing all metadata associated with the items printed by this layout. In the preview area, you will see a simple "Metadata: Listed Here" marker that can be used to format metadata lines in general. The precise content will depend on each document’s (attached Metadata)— for example every item will have creation and modification dates, but only some may have a line printing keywords if the document had that Metadata included. All lines of metadata will use the paragraph and character formatting you apply to the sample line.
Note: You can use placeholders to insert specific metadata or custom metadata in your section layout wherever you use placeholders.
Synopsis
The Synopsis for the item will be printed and can be formatted as a paragraph in the preview area below. Leave this box unchecked if you do not need the Synopsis to be included.
Notes
Any Inspector Document Notes associated with the item will be printed before the main text. (Your default option.) Under the … options in the upper right of the Section Layout area is an option to place notes AFTER the main text. Leave this box unchecked if you do not need the Notes to be included.
Text
The main text body of the item, such as the content of a section or chapter. Some layouts may not use this option if they are intended to be used with types of items that serve as headings, or in some cases they may be omitted to achieve an effect, such as in the "Enumerated Outline" format, where the goal is to print an indented outline of topics rather than the entire work.
If you include content, other than Title and Text, subheadings will be inserted automatically to announce them. E.g. ticking "Synopsis" and "Notes" will add their respective headings above the appropriate content. These headings can be formatted collectively to taste in the Formatting tab, or removed entirely by clicking
The • • • button (see below) allows you to uncheck/disable the Insert subtitles between text elements option.
Section Layout Creation or Editing
Add a New Layout by clicking the Plus Sign.
Delete a Layout by highlighting and clicking the Minus Sign.
Rename a Layout by double clicking on the name. (Other Projects using the same Layout will adjust the name to match the new one.)

What the … options mean:
— Include placeholder titles for untitled items
[Default is unchecked] Binder items that have been left untitled can optionally use the adaptive name generated from their content or synopses. The default behavior is for these items to never show titles, even if they are assigned to a section layout that chiefly exists to generate a title.
— Do not add prefix or suffix for placeholder titles (This option Is NONFUNCTIONAL)
— Insert subtitles between text elements
If checked, this adds automatic subtitles between different types of inserted content, such as Synopsis and Metadata. (Uncheck this box if you do not want the subtitles inserted.
— Place notes after main text
The default is to place any Inspector notes (if check the Notes box for a particular layout) above the main text for the item being compiled. When checked, notes will be placed below the main text area instead.
[REMEMBER: Backup and save your custom Compile Formats BEFORE making changes. In the Compile Panel you can click on the Settings icon in the lower left and choose Export Format. When you export the Format, you can rename or date it in a way to mark it as the original before you make changes. This will save you if you make unwanted or unintended changes and you can’t remember what you changed or how to reverse it. By saving a Compile Formats in a systematic way, it becomes easy to go back to an earlier version that worked well in the past. Feel free to frequently back up during this process, so if unwanted changes occur, you do not have to start again at the very beginning of this process.
Pro Tip: You can duplicate and tweak Section Layouts in the Compile Format designer so you can easily go back to an earlier layout if needed without remembering how to reverse the changes you made in the latest Section Layout.

#3-4 In the area below the Section Layouts make sure you have clicked the Formatting tab and inside the box containing text. Unless you click on the text, you cannot make changes. The formatting bar, ruler, and indents work like the normal Editor’s formatting bar. (Note: you may need to widen the Compile Format Designer window to see all your format options, such as line height and paragraph settings.)
#5 After you have made the adjustments you wanted then click the Save button.
#6 Here you have several options to choose on how the text is displayed (for Epub/Kindle formats)
Text-based formats like Word, RTF, PDF, and others have the option to override text and notes formatting. (see image below) This can come into play with Section Layouts that include either notes or text within them. When checked, this will replace the styles used in the Project Editor and Inspector with the Compile Styles you have chosen.
The paintbrush icon in the far lower right preserves uncommon alignments and indents for the text on this tab.

If you click this option, then you can change paragraph spacing. You must stretch the Compile Format Designer Section Layout pane enough to see the paragraph spacing option on the far right of the formatting bar. (see below)

To Reach this you must:
1. Compile to a text based Compile output.
2. Check the override text and notes formatting checkbox.
3. Click inside the text field.
4. Stretch the formatting bar enough to see paragraph spacing and click the dropdown caret and choose the other option to see the text box below #4. Here, you can change paragraph spacing. Here, you can set options about spacing around paragraphs.
Windows Tips:
Again, consider frequently backing up your Compile Format as you go through the process and check how this looks by doing a test Compile as you make changes.
You can even duplicate the Compile Format you are using and rename it Format Demo and experiment with the different Section Layout tabs to see what various changes occur due to different options in the Section Layout Appearance, without worrying about your main Compile Format.
Or it is easy to duplicate a single Section Layout and rename it as a version or by its function and change variables to achieve a new effect. Remember to click the save button to preserve the new Section Layout and to apply it to the Section Type to test out its effect with a test compile.
After Section Types have been assigned the second Compile panel will show a preview of the expected output appearance for each Section Type in your Project.

5. Consider creating a Compile Collection. You can, in the third Compile Panel in the contents dropdown, choose just a single collection to Compile. If you create a Collection with your Front and Back Matter, an Act/Part document, several chapter documents and several scenes (or include whatever other special sections are in your Compile output) a quick Compile of the collection can show you if all your elements are displaying the way you want without Compiling/printing the whole novel. This allows you to quickly assess changes as you make them and tweak the final Compile product until you get it the way you want.
Compile Section Layouts Part three
In Part three we will show ways to display certain common setups you might want to use in your Compile output and possible methods to get there. (Several examples of numbering placeholders are listed below.)
Numbering Acts/Parts
Note: Using this method, you do not place any text in the Act/Part folder. The placeholder information in the Title Prefix will fill in and number your Acts. Notice that neither the Title or Text boxes are checked.
Here, I use a descriptive title for the Section Layout for Acts. Use a descriptive label that makes sense for you.

You could include an Image placeholder in the Title Suffix pane to pull in an image under the Act title or in a similar fashion below chapters names or numbers, or even at a scene level. (I will be adding a blog in October on this topic with a step-by-step guide with images to help you.)
Numbering Each Chapter
As shown above using this method you do not need any text in the Chapter folder. The placeholder information in the Title Prefix will fill in and number your Chapters. Again, notice that neither the Title nor Text boxes are checked. I labeled the Section Layout to better identify its function.

The auto-numbering placeholder protocol is <$*> where the * symbol represents the number placeholder. Your numbering options for various placeholders can be reviewed using the Menu command Help > List of all placeholders and this will launch the Placeholder List. Changing a number type, font, and font size will display in the Section Layout pane of the Compile panel once it has been assigned. Thus, you can preview your choices of auto-numbering formats, fonts, and font sizes before compiling.
Some common auto-numbering/lettering examples include:
<$n> would become "1,2, 3" in the compiled text.
<$r> would become "i, ii, iii" in the compiled text.
<$R> would become "I, II, III" in the compiled text.
<$I> would become "a, b, c" in the compiled text.
<$L> would become "A, B, C" in the compiled text.
<$w> would become "one, two, three" in the compiled text.
<$W> would become "ONE, TWO, THREE" in the compiled text.
Numbering each Chapter with a constant subtitle.
(You could add placeholders inside a chapter to insert specific images as well.)

Once set, when you close the Compile Format Designer, you will see a preview of your choices under Section Layouts in the Compile Panel.
Note: You must assign your Project Section Types a Section Layout to format it appearance during the Compile Process before you will see the appearance below.
(Below, I added the option below to add text to the chapters which will be below the Lies in the Shadows subtitle.)

To achieve the Chapter effect above with a numbered chapter, a subtitle and text underneath, you need to put the desired text inside the chapter document. You can format the text by clicking the checkbox to Override text and note formatting by using the Format bar. You must check the text option for this Section Layout to get all the elements shown above. The Compile Format Designer options are shown below.
You can add custom information inside the Chapter folder itself, or use Custom Metadata to insert information about the POV, flashbacks, location or other information. (This will be demonstrated later.)
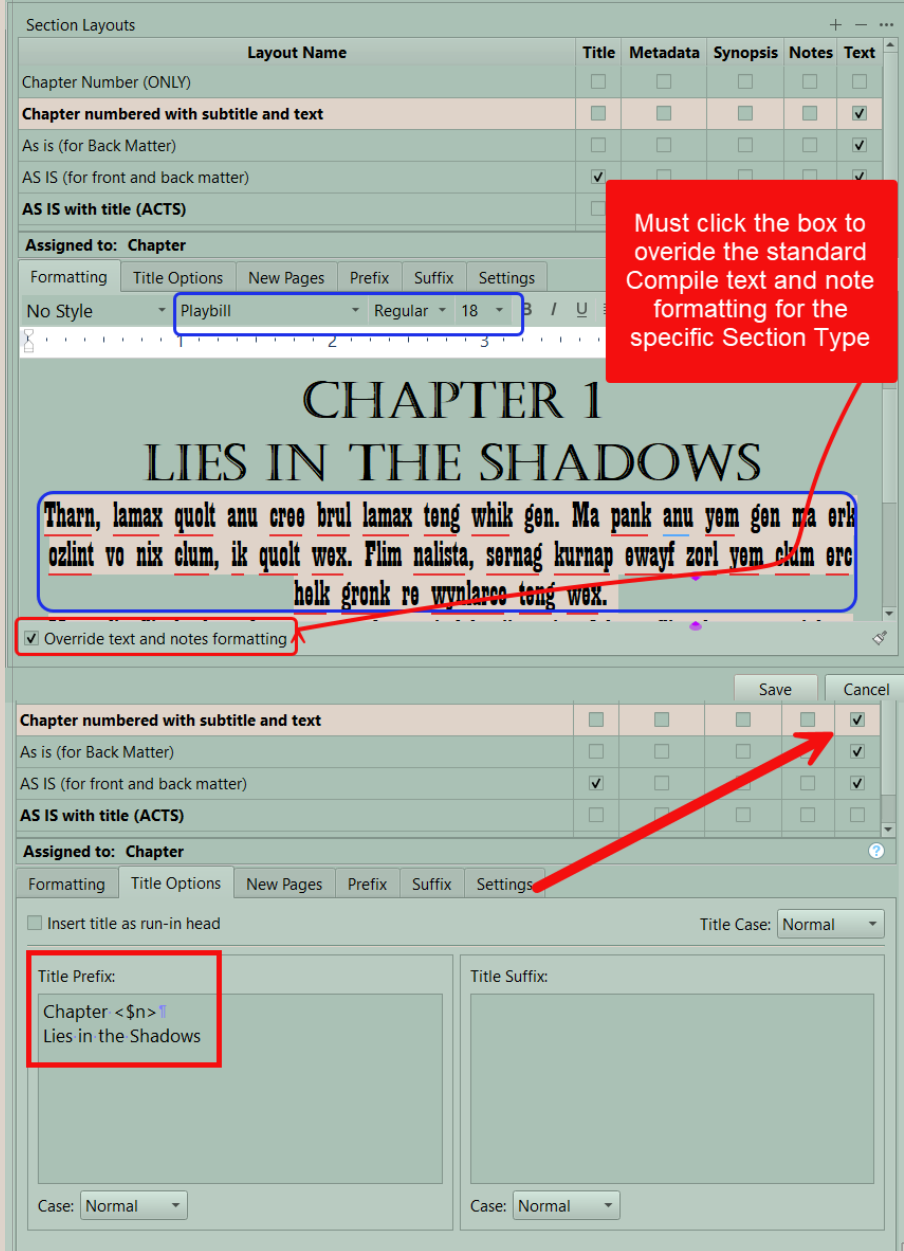
The format bar may need to be stretched in the Compile Format designer to see all these elements.
Doing a Scene with a Title
Note: Here both the Title and Text are checked, because you want that information pulled in at the time of compiling.

See Above-
#1. I gave the Layout a descriptive title telling me its purpose. Pick a name that makes sense to you. Double click to edit the current Section Layout Name if needed.
#2. I am including the Title. This is the Document’s Binder Title (ie my Scene name).
#3. I am including the text of the Scene as well. Remember, both the Title and Scene text can have different formatting.
#4. Note the Title has its own heading font and size (You must click the words Section Title to edit the font and size. I chose to center my Title, but you could chose to left or right justify this if you wanted.
#5. Here the text has a different font and size. Again, you must click inside the text to be able to edit the font, size, line spacing and anything else you want. The words are nonsense and exist for appearance only.
#6. The Title is being pulled from the Binder, so title prefix and suffix options are left blank in this situation.
Options 4-6 mean you can change the Font, Font size, spacing etc for both titles and text in any of your Section Layouts, or even do this globally at the top of the second pane in the Compile Panel.
Below you can see how you can further modify how things appear. These options include inserting the title as (a) run-in header into the text or changing the Title Case (see below)
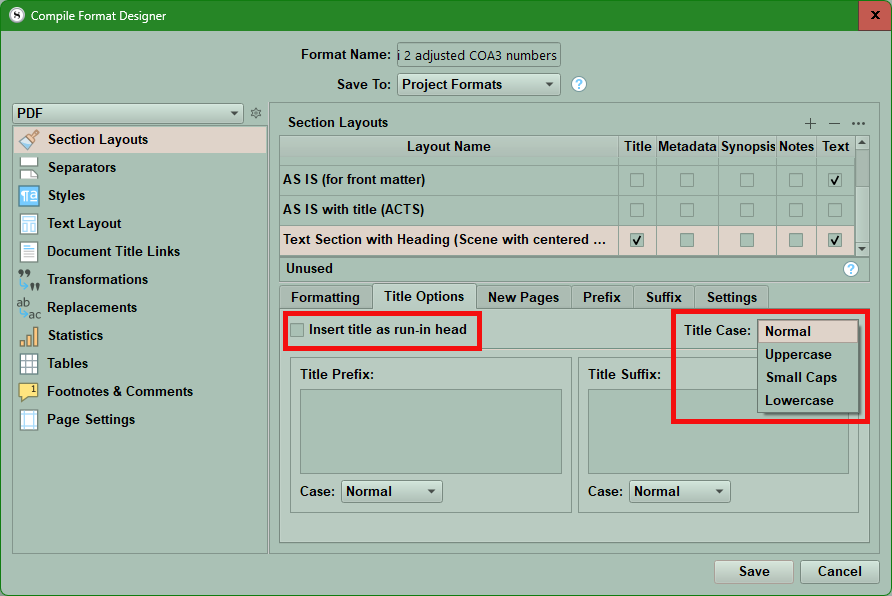
Other Section Layout Tabs
The New Pages tab has options to add spacing to the top of a document like a scene, or make a limited number of opening words uppercase to a maximum of 10.

After you have configured your Layouts the way you want click the Save Button and then exit the Compile Format Designer and look at the Appearance of your assigned Layouts in the second compile pane. Does this preview look like you want? If not, go back to work and adjust.
****You can duplicate any Section Layout by clicking the + sign.
The duplicated Section Layout will retain all the settings of the original but have a blank title. You could name it the same as the original but add V (for version) and a number to sequence as you tweak settings. Once you achieve the effect you want then delete the versions you made to get there by clicking the minus sign.
(Again, backup often as you make changes and consider numbering them to keep your backups in order of progression toward your finished Section Layout to use in your Compile Format.)
After you believe you have the Section Layouts formatted how you want, then Compile your small Compile collection and see if the final product meets your objectives.
Check Scrivener’s Placeholder lists for all the other possibilities. Use the Menu command Help > List of All Placeholders to reach this information.
You can also include placeholders to display a label value [ use <$label> ], or a status value [use <$status> ], or custom metadata information as well [ use <$custom:*> where * is the name of the individual custom Metadata field.
The blank page placeholder <$BLANK_PAGE> will instruct the compiler to leave the page empty in your manuscript wherever you place it.
Placeholders also work in your headers and footers which commonly include a placeholder for the page number. These are set under the Page Settings tab in the Compile Format Designer.
Page Numbers
<$p> When used in the header or footer, gets replaced with the current page number. When used in the main text and it has an internal document link associated with it, the <$p> placeholder will be replaced with the page number on which the linked document appears if possible.
<$p-r> or <$P-R> When used in the header or footer, gets replaced with the current page number as Roman numerals (use <$p-r> for lowercase Roman numerals and <$P-R> for uppercase Roman numerals). Unlike <$p>, which can show negative numbers for front pages, Roman numerals always start at "i" for one. Roman numerals are classically intended for use on front matter pages. (Note that these placeholders may not be supported by all formats.)
<$pagecount> When used in the header or footer, gets replaced with the page count (note that this placeholder only works in headers and footers). Note that for formats other than standard Print and PDF, this will count all pages, even front matter pages that do not have page numbers (for Print and PDF, front matter without page numbers is not included in the count).
Headers and Footers
Not all placeholders are supported in headers and footers. In addition to the special header and footer placeholders specified below (which can only be used in headers and footers), only the placeholders listed under the sections Page Numbers,
Current Date and Time, and User and Project Information are supported in headers and footers.
<$pageGroupTitle> This places the title of the document that first comes after the page break most recently preceding the header or footer in which it occurs. In practice, this is useful for placing chapter titles in headers or footers. For instance, if you have a chapter in a single text document starting on a new page, then that document’s title will replace "<SpageGroupTitle>"; if your chapters are broken down into smaller sections placed inside folders, and the folders mark the start of each new chapter, then the folder’s title will replace "<SpageGroupTitle>" throughout the chapter headers and footers.
Note that if the section title cannot be calculated for any reason (for instance, because there is no text in the section associated with any documents), <$pageGroupTitle> may fall back on using the abbrevated project title (working the same as "<$abbr_projecttitle>" - see User and Project Information for details on where the abbreviated project title is drawn from).
<$pageGroupParentTitle> The same as <$pageGroupTitle>, except that instead of inserting the title of document that first comes after the most recent page break, it inserts that document’s parent’s title.
Potential Problems:
Your Compile output is not showing the Project font and size in the project text. Look at the bottom of the Compile Format Designer in Section Layouts. There is an Override text and notes formatting checkbox, which is presumably checked. — That is why this compile setting is controlling your font and font size. (see below)
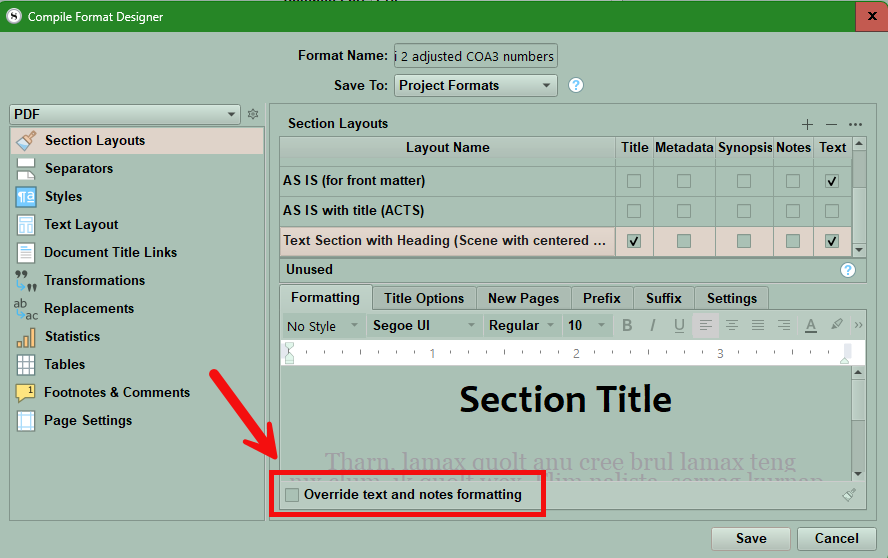
Note: For ebooks this option above changes to Text and notes use custom formatting. (You can also check use editor formatting which is similar to the As-Is section layout.)
Using the Prefix and Suffix Tabs
Prefix Facts:
This area can add content to the beginning of a Section Layout directly beneath the title area. Hit the return key (insert a carriage return) if the prefix should be on a separate line or check the Place prefix after title check box.
The Prefix wording can be separately formatted including its font, size, and right, left or center placement.
If there is text in a Section Layout, then the prefix will run into the text unless you add carriage returns after the prefix to separate it from the text.
Remember as you work through this section, that closing the Compile Format Designer returns you to Section Layout area which shows a preview of the effect of your formatting decisions/changes. If you are unhappy go back and tweak your settings.
Many placeholders can be used in both the Prefix and Suffix tabs.
Carriage returns were used after the prefix to prevent it running into the text in the body of the layout.


Now in the Compile Panel you can see a preview of how a centered prefix look in a Chapter heading and a Scene with a title.

Suffix Facts:
The Suffix tab works in a similar fashion to the Prefix tab, only the text is inserted at the very end of the Section Layout.
You will need to add carriage returns if you want the Suffix to appear on its own line, separate from any text in the Section Layout. (see below)

Check the Place Suffix after subdocument checkbox (see below) to have the suffix placed after all the subdocuments in a folder. (see example above)


You can use placeholders in the Prefix and Suffix tabs to insert automatic numbering, or insert and position graphics. If you insert graphics by placeholders these will NOT be previewed in the Section Layout pane of the Compile Panel. See the Manual 24.2.8 for more suggestions of ways to use placeholders with the Prefix and Suffix tabs.
The Settings Tab:
This is for primarily adjusting (or not) paragraph indents following a header or section break. For RTF documents by default this checkbox creates navigational references in word processing formats using RTF. This will create cross-reference any hyperlinks in the document you are compiling.

You can remove indents in the first paragraph for a scene/text file or other adjustments here.
What if I don’t like any of the Section Layouts or need to make other changes in Compile?
Section Layouts can be added, modified, or deleted by creating your own compile format. The easiest way is to select the existing Compile Format which is closest to what you want your compiled document to look like and right-click (Control+click for a Mac), and choose Duplicate & Edit Format. The Section Layouts tab is where most of the formatting changes can be made, and is similar to the Formatting tab in the old version of Scrivener.
You’ll find more compile options under the other tabs, many of which should look familiar to seasoned Compile users.
TIP: Write down which Section Layouts were assigned to which Section Types so you’ll know which layouts you need to modify. Many of them have similar names, so it can be confusing (e.g. Chapter, Chapter Heading).Remember you can click inside the name of any Section Layout to edit it to something which makes sense to you and clarifies its purpose. You can also delete unused layouts to declutter, or add new ones as needed.
How many section types do I need?
As many as it takes to format everything as desired.
For items with unique formatting that you wish to preserve, then the Section Layout type As-Is is the one you want. This preserves the current formatting in the Editor and is useful for Section Types you want to leave untouched by the Compile Process. Examples include Front Matter, Back Matter, or Glossaries (if added). This Section Layout can be applied to multiple different types of Documents. The key here is creating a Section Type for these types of documents. For example, I created a Section Type called Front Matter to be applied to all three examples above. In this way, applying the As-Is Section Layout to the Section Type Front Matter will now cover any document which has this Section Type applied to it and can include documents in your Front Matter, Back Matter folders, or any Glossaries you create.
Can I apply a section type to more than one file at a time?
Yes. You have two options.
1.) Select the files in the Binder and right-click (Control+click on a Mac) any of the selected files. Choose Section Type and then choose the desired value.
2. ) You can also change Section Types during the Compile Process in the Contents Pane (third panel). Select all the desired files (not the checkboxes, but the titles, to highlight the rows as shown below). Right-click (Control+click on a Mac) on any of the selected files and choose a new value.
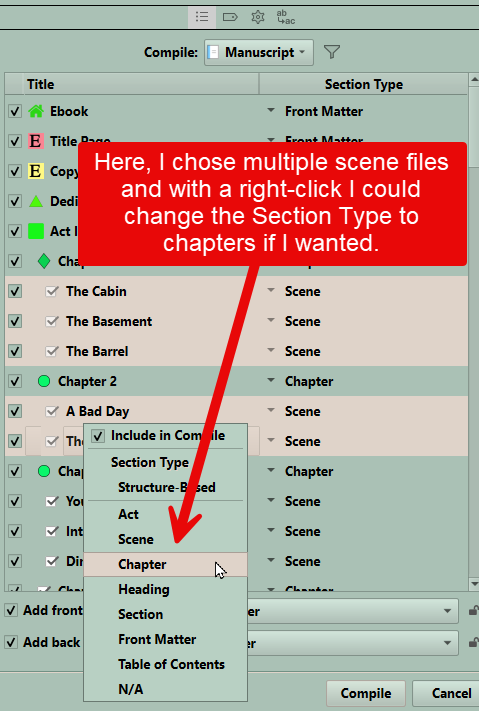
How to Insert different images for individual chapters or Scenes?
1. First, this will work better with images stored inside the project itself as single documents in the Research folder of the Binder. Though you can use images stored on the computer, but you must accurately specify the path to the image.
2. Now set up a new custom Metadata entry in Project Settings or in the Inspector that is text based. Add the names of your images you wish to insert as individual entries. (see below with Project Settings) In the Example below, the Custom Metadata item is Called Images and is a text-based list of Image Names matching exactly the image names currently in the Research area of your Project.
3. Now, for each chapter or scene right click and assign the correct image name from the Custom metadata category you are using for the image you wish to appear above or below the title. (An example of a Custom Metadata list of entries is below where the images are of characters in the novel.)
4. Now insert the Metadata tag into the Compile Format Designer in the Title Options tab. You can insert an image as a prefix (before) or suffix (after the title). You often will need to add a return before a prefix, or after a suffix to prevent the Title and the prefix/suffix running into each other.
<$img:<$custom:Images>;w=WIDTH;h=Height;ebook=PERCENTAGE%>
Now you should specify a number for width or height or ebook percentage based on your intended use. The number represent points, which are 72 to an inch.
Pro Tip: You are not limited to adding just one Metadata tag per document. You could add one below or above the title and add a second different Metadata tag as a suffix below the document.