Compile Section Layouts Part One
Section Layouts and the Compile Process: A Deep Dive
In order to understand how this works, we must understand how Section Types and Section Layouts interact with each other. The information in this series may repeat itself at points, but this is intentional. I will present how to approach Section Layouts from different angles to hopefully make this understandable one way or the other.
Scrivener automatically assigns each item in the Binder a Section Type based on the item’s position in the project’s structure. [Default Types by Structure] You can change/customize these assignments in the Project Settings Panel. (see below and example from my unpublished book)

Section Layouts are different formatting styles that can be applied to a specific Section Type.
The middle pane of the Compile window is the Assign Section Layouts area. This couples the Project’s Section Types to its formatting when compiled (a Section Layout). The layout you choose will change how the final Compiled output will appear. You can customize Section Layouts to obtain the results you want.
When all the Section Types have been assigned a (format) Section Layout, then the yellow warning intially visible in this section will disappear.

For example, a top-level folder inside the Manuscript folder of your novel might be assigned the Acts Section Type and the next level might be the Chapter Folder Section Type, and a text file in any level file group might be assigned the Scene Section Type (if you’re using the Novel template).
When Scrivener compiles a project, by default it uses these assigned Section Types to format the final document. However, you can manually assign Section Types, create Section Types, or change the default structure based Section Type assignments.
Based on this arrangement, there are several key points to remember:
If your Binder organization is willy-nilly (a polite version of a more common vulgar phrase), you need to clean it up before compiling or your Compile output will also be a mess.
You can override Scrivener’s section type assignments and create new section types.
Each file or folder in your Binder can have only one section type, but a specific section type can appear radically different, depending on which Section Layout has been assigned to it for a particular Compile format. Two different Compile Formats of the same book may look completely different based on which Section Layouts are used for each Section Type. For example, if your Scenes have titles, then you may want a Section Layout that shows the Scene Title with the text following below. Or you could decide to hide the Scene Titles in another Compile Output.
A Section Layout can format chapter headings, put page breaks in the right places, and more. If you want to work with/manipulate them to achieve a customized Compile output, you’ll follow a multi-step process:
Think about how you want these files and folders to coalesce in your compiled document. Do your folders—represent chapters, perhaps—each have a title that should (or should not) appear?
Does each folder, for example, contain several scenes that you want to combine?
Or does each text file in a folder have its own title that you want to use as a heading?
To create the headings in a compiled document, Scrivener can use the names of folders, the names of text files, or both (or neither).
It all depends on how you organize your project, and what’s most comfortable for you.
Default Compile Formats cannot be edited, but you can duplicate them to modify them to suit your needs.
If you need to edit layouts inside a Default Compile Format, then you must duplicate the existing compile formats BEFORE they can be modified.
These Section Layouts are especially important for getting page breaks where you want them (perhaps before the start of each chapter) and for putting numbers, like chapter numbers, in the right places.
If you are using Manuscript (Times), and want to print the folder title all on its own, the easiest way to do that is to select the Layout that does just that:
After opening File ▸ Compile... First choose a Compile output. If you need to customize the Compile output, then try different default Compile Formats until you find the one closest to your desired output. Double-click this to duplicate it. A copy of a default Compile Format can be modified and renamed. (Pro Tip- give your custom Compile Formats descriptive names.)
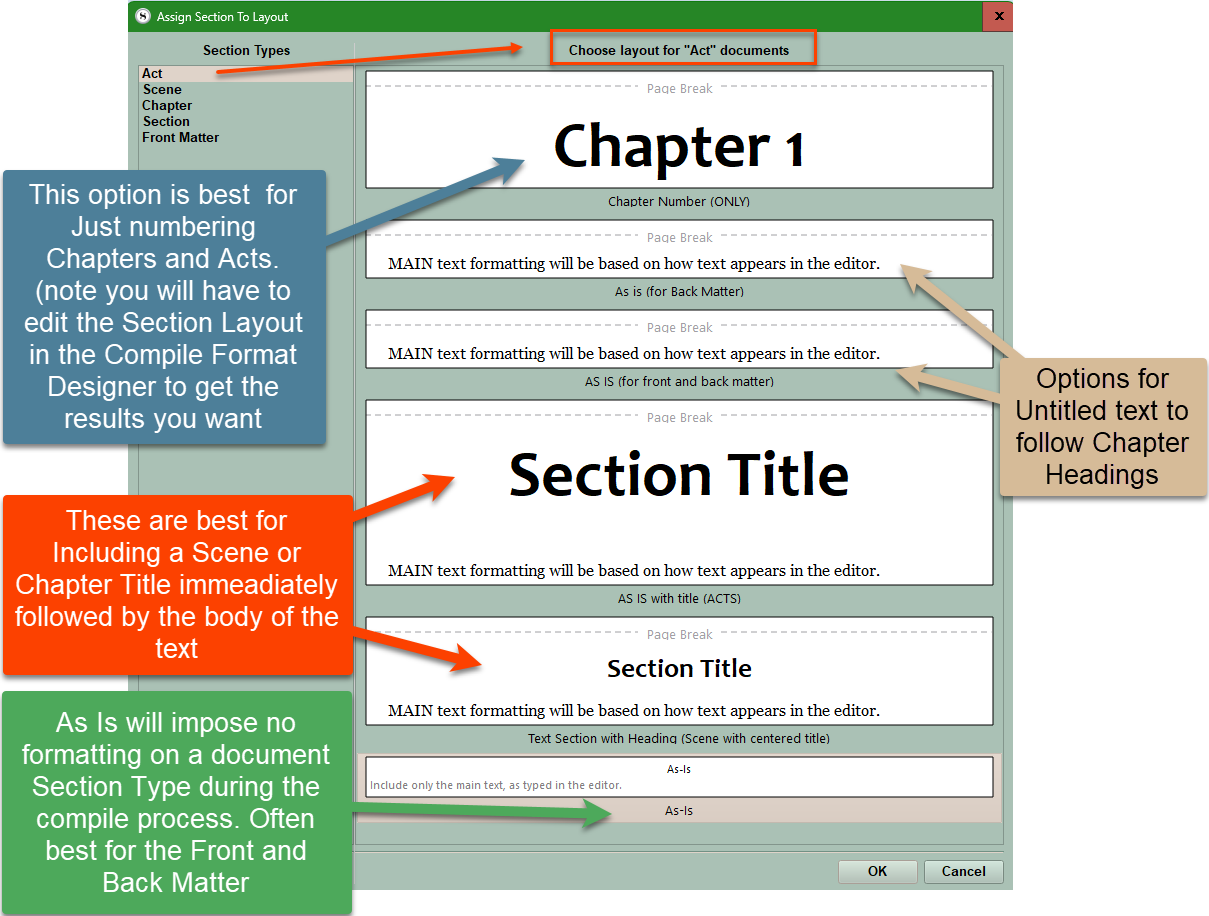
Now click the Assign Section Layouts button below the preview column in the middle. You will be given a choice of Layouts that can be assigned to the various Section Types in your Project. If Section Layouts have not been assigned yet, you will see a warning at the top of the Section Layout Window.
3. To Assign Section Layouts to each Section Type in your project, first click the Assign Section Layouts button at the bottom of the middle panel and follow the steps below:

A. Choose a Section Type (Every document in your project should have a Section Type assigned. This can be viewed in the Inspector under General Metadata or in the Project Settings panel (under Section Types)
B. You may need to Show unused Section Types and may need to change the Section Types for Front and Back Matter documents to achieve the results you want. (Classically, using the As-Is option allows different fonts and looks in these sections.)
C. After you choose a Section Type, now you click one of (Formatting) Section Layouts to assign its formatting to the Section Type. The appearance of this can be further tweaked in the Compile Format Designer. If none of the current Section Layouts meet your needs, you can create and save your own Layouts within the Compile Format Designer. (This will not be discussed here, but in another Blog) Note: The name of the displayed Section Layout is directly centered below the image of how it will appear.
D. Once you are satisfied then click Ok to save your settings.
E. You can expand this panel by dragging with the mouse until you show all your possible Section Layout options you can choose.
3. When you are finished choosing, then you will see a preview of how your book/paper/etc. will look. After you have clicked save in the Compile Format Designer to save the changes/choices you made you will return to the Compile Panel and see a preview of how things will look. (see below)

4. You can check what section type is assigned to chapter headings or scenes in the Inspector window under the metadata tab. This is a modified view which shows how this could look for Acts, Chapters, and Scenes. (see below)

For each section type in your compiled project, select the layout that you prefer. If you like the font option provided by the selected layout, you are all set, but if you don’t, choose one (if you are allowed to) from the Font pop-up menu at the top of the Section Layouts column. When you finish, click OK. Note: Font selection is not available for some file formats, such as plain text and ebooks (where fonts are applied by the ebook reader itself and the user can change as they desire.).
Compile Layout Facts:
Default compile formats cannot be edited, but you can duplicate them to modify them to suit your needs.
Backup and save your custom Compile Formats BEFORE making changes. [Pro Tip: Consider numbering the Compile Format as you make changes and save them. This will allow you to revert to a previous version without trying to remember all the changes you made.]
You can override Scrivener’s section type assignments and create new section types.
Section Layouts are different formatting styles that can be applied to specific Section Types.
If you click the plus sign in the Section Layout tab of the Compile Format Designer, you will duplicate the currently selected Section Layout’s settings, but with a title of New Layout. Edit the name and tweak any settings as needed. [Pro Tip- When you are experimenting, then duplicating a Section Layout allows you to try different settings out without losing the original or remembering how to reverse the changes you made. You can name Layout “Current Name” version 1, 2, 3, etc to keep track of the process and delete the steps when you get the result you want.]
Each file or folder in your Binder can have only one Section Type, but a section type can appear differently, depending on the Section Layout associated with it for a particular compile format.
For ebooks, the ereader itself will apply fonts and these can be changed by the user. Use the default font choices here.
If your Compile output does not look right, the first thing is to check your Section Type assignment to make sure it is consistent. (Ie. All Acts have the same section type, All chapters have the same section type, and finally scenes as well.)
Also check to make sure the documents you want are all included to be compiled, and you have chosen the Manuscript (Draft) or a smaller section if that is what you want. Check in the third panel to make sure the filter icon is not active (unless this is an active choice) and altering which documents are compiled.
Once you have assigned Layouts for a specific Compile Format. Opening the Compile Panel and double clicking on any of the individual Section Layouts will open the Compile Format Designer to the Section Layout tab and the specific format you double clicked on. Now, you can make any changes needed to alter the look or function of the Section Layout if its appearance in the Compile panel is not what you want.
Anytime during the Compile Process, holding the Alt Key down will change the Compile button in the Compile Panel to a Save button to save the changes you have made to the current Compile Format to preserve for future projects.
If you have multiple levels of text color from revisions or other issues, you can click the Remove text color option to return the text to the default black when compiling. This option is found under the Settings icon in the third Compile pane.
In the Compile Format Designer any Section Layouts which have been assigned to your Compile output will be in bold text, EXCEPT if the default As-Is Section Layout is used. (Classically this is used for Front and Back Matter to preserve any unique formatting you may want for these sections.)
Every Section Layout you currently have or create has the option to add Titles, Metadata, a Synopsis, Notes, or Text to the Section Type it is being applied to.
When you click Assign Section Layouts, the Layouts will appear in the order they are arranged in the Section Layout area of the Compile Format Designer.
Layout Trouble-shooting:
If your Compile Output is not what you want, Layouts are a critical area to evaluate.
Step 1 look at your Compile Preview that appears after you assign a Section Layout (the Compile Formatting) to each of your Project’s Section Types. (see below) Do the Section Layouts appear the way you want? If so, move on to step two.
Note: Once you have assigned each Section Type a Section Layout for the Compile Process, then opening the Compile Panel and double clicking any of the individual Section Layouts (shown above) will open the Compile Format Designer. This will open to the Section Layout tab and the particular Section Layout you double clicked on. Now, you can edit or change how it looks or functions.
2. If there are still issues then we will look at your Section Type assignments. Section Types are searchable Metadata. The Section type for each document is displayed in the Inspector Metadata under the General Metadata heading. You can use Project Search to search by Section type. Search Acts, Chapters, and Scenes by Section Type and make sure there are not errors in your assignments. The other tip is to look at the Section Types when you assign layouts. Are there any unexpected Section Types? If so, do a Project search for this metadata and adjust the files found to reassign their Section Type and try Compiling again. You can change multiple document’s Section Types at once by selecting the files and right clicking and choosing the Section Type and reassigning its value.
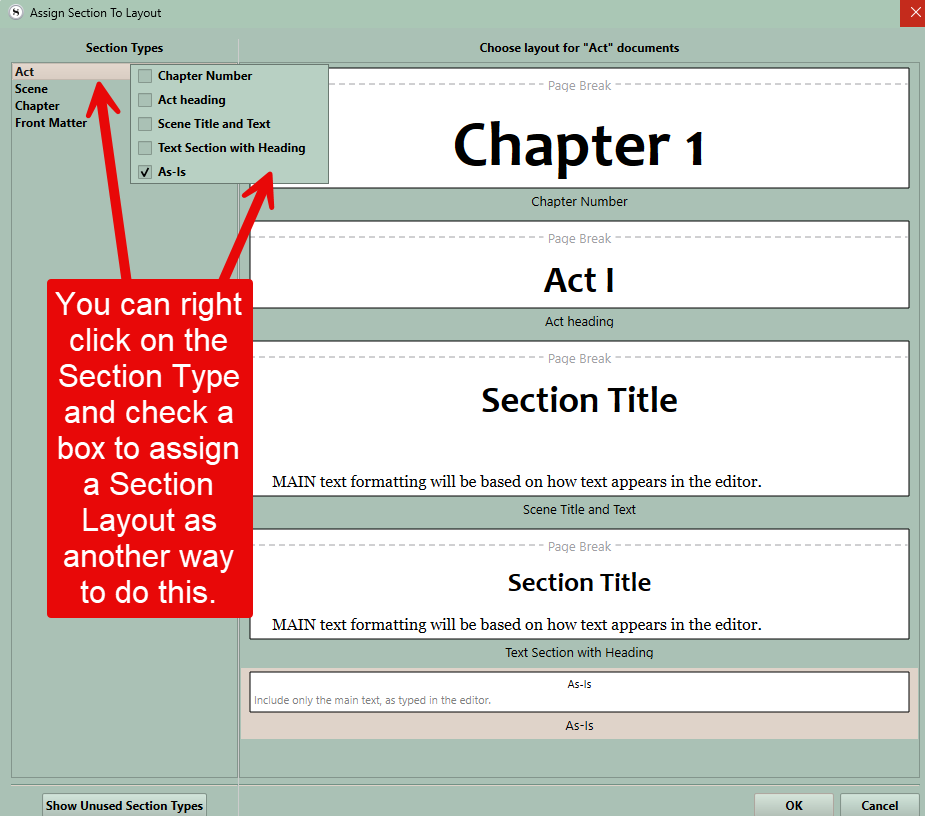
In the Screen below you can click on the Act Section Type and then choose a Section Layout, or you can right click on the Act Section Type and choose a Section Layout to assign. You must do this for each item on the left side. However, multiple items can use the As-Is Section Layout option.
Checking your assignments of Section Types in your Project to ensure the proper Compile results.
To get a perfect Compile Output, you need to make sure your Section Types have been assigned correctly in your Project. There are two ways of doing this.
Method 1
Use your Project Search to Search by Section Type and make sure your Scenes, Acts/Parts, Chapters, and Front and Back Matter Section Types have been applied correctly. My suggestion is to start with the Section Types which are less common like Acts/Parts, Front Matter and Chapters. It will be easier to see incorrect assignments when you have fewer results to review than Scenes. I use special icons (custom ones) for my Scenes which makes it very easy to find errors using this method. (Examples of Searches by Section Type and using custom Icons below.)
By Assigning special icons to Scenes it is easy to find misplaced documents and correct their Section Type assignment.

Acts have square icons

Chapters have circle icons.

Scenes have house icons whose color varies by the Act.

The Front and Back Matter folders do not have a specific icon.
If in doing this, you find some documents have the incorrect Section Type, you can click on these and highlight them in your Search results. Now right-clicking on the multiple documents allows you to change multiple Section Types at once. Using custom icons make it easy to visually spot errors. I chose to color coordinate icon colors by the Act as well.
Method 2
Use the Menu Command Project > Project Settings > Section Types.
Now click the Default Types by Structure tab.
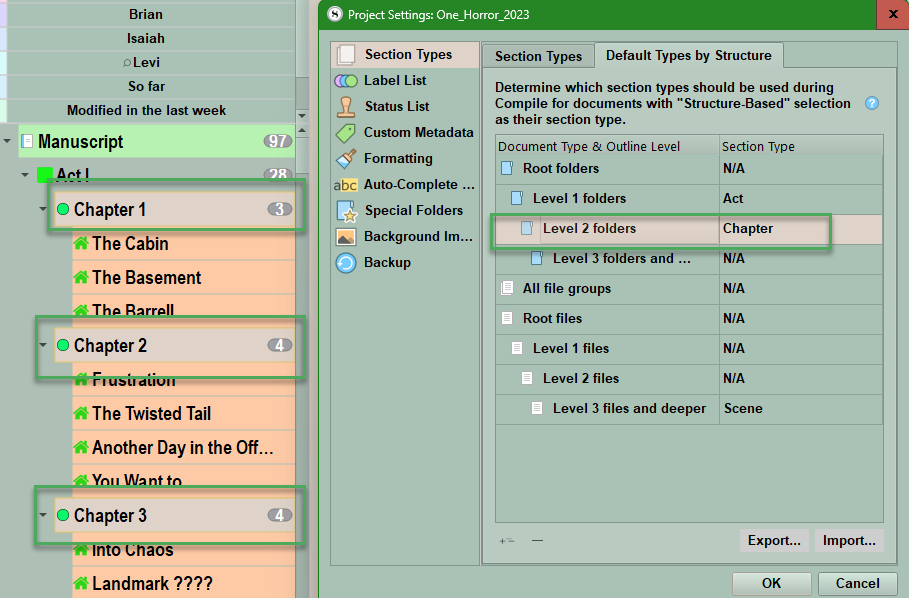
Clicking on a Document Type and its hierarchy in the Outline Level will show those documents at a specific level highlighted in your Binder.
Unfortunately, you can only view part of your Binder at a time and cannot scroll the Binder using this method. Also, this method shows you the Section Type assigned by the Default Structure, which MAY NOT match the actual Section Types you have assigned under the Section Types tab. (see examples below)
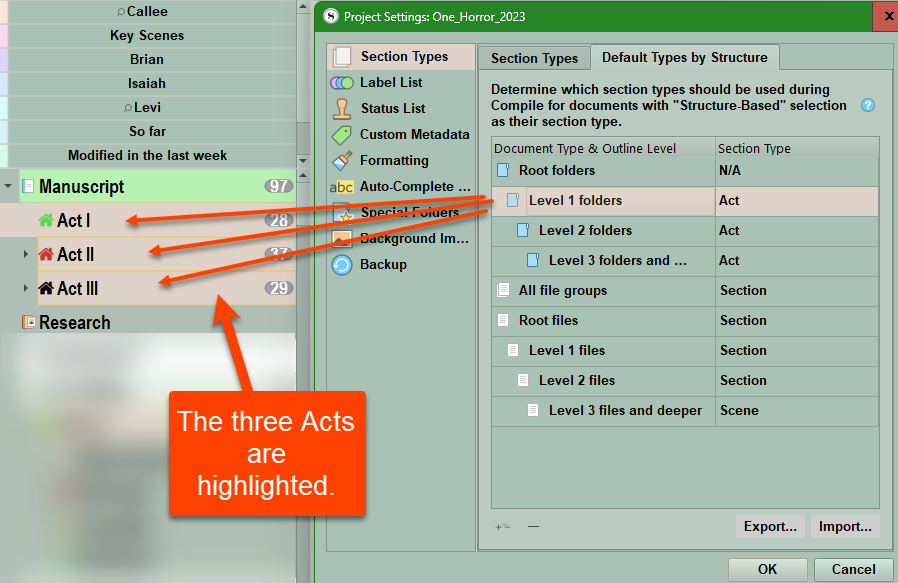
Only the Level 1 folders (Acts) are highlighted.

The level two folders (Chapters) are the only things highlighted.
Choose the As-Is Section Layout (which exists in every Compile Format Design) for documents where you wish to preserve the current formatting of the file in the compiled document rather than changed by your overall Compile Settings. Classically the Section Layout As-Is is often assigned to your Front Matter and Back Matter sections to preserve any unique formatting you may have used.
There are four methods to Assign Section Types to any document or folder.
1. Right click on a folder or document and you will see options for choosing a Section Type and changing its value. If you click on this, you will see the current menu and at the very bottom of the dropdown you’ll see the option to edit an existing Section Type or add a new one. (See below)
You can select multiple files/folders using this method and change them at once.

2. Use the Menu command Project > Project Settings (Or click on the project settings icon in the toolbar (if added)). and then adjust section types.)
Section Types are assigned either by your project structure (Default Types by Structure. Note you can click on any entry below and change its Section Type.) or by Section Types. (This you can create and give any name and apply to any document(s) in your project. Click the + or - sign to add or remove types.)
Remember: How a Section Type will appear when you compile your project will depend on which Section Layout you assign to that Section Type and what edits you have made to the Section Layout. (This will be discussed in a later article.)
You can click the + sign (A) to add extra types you can then assign to Binder elements. You can also export (B) Section Types as well. Remember to click the OK button to save any changes you make here.
Classically the Section Layout As-Is is applied to documents where you want to preserve their formatting during the Compile process. Examples often used are the Front and Back Matter sections or any included glossaries.
N/A is for Root folders such as the Draft/Manuscript folder which will not be included in your Compile output or levels of folders or files which do not exist in the current project.
Note: Using the Default (Section) Types by Structure (as below) works best when your novel is organized in a classic arrangement such as Manuscript > Acts > Chapters > Scenes and the front and back matter folders are outside the Manuscript. When organized in this way, it is easy to assign available section types.
Clicking a Section Type (ONLY when viewing Default Types by Structure) will highlight all the corresponding section types in the area of the Binder which is currently visible, but you CANNOT scroll in this view.

Examples of the Binder view for various Section Types in the classic view mode.


3. Assign a Section Type to every document in the editor via the Inspector/Metadata-
You can set the Section Type under the option to include in compile within the Metadata tab.
4. The final way is during the Compile Process.
Here, in the far right Pane you can change section type assignments for a single or multiple documents at once. (*****This method is less efficient and does not change the Section Types in the project itself but only for a particular Compile output.)

Now that you have checked to make sure your Section Types have been applied correctly and consistently in your Manuscript, Front, and Back Matter it is now time to move forward. You can now decide how to format the information in each Section Type. Section Layouts are a specific formatting that the Compile process imposes on each of your Project’s Section Types when you Compile.