Steps before Compiling Part two
In part two of the Steps before compiling, we will start with step 6 which is Assigning Section Layouts. The Section Layout pane of the Compile Panel will give you a preview of how the Compile Output will appear. If what you see is not the result you want, then you will have to go back to the Compile Format Designer and tweak the Section Layouts until you have the desired result.
6. Assigning Section Layouts

One important step before you compile is to assign Section Layouts. This area is quite different in Scrivener 3 than in previous versions.
At the bottom-center of the middle panel of the Compile interace is a button that says “Assign Section Layouts”. Clicking on this will open a new screen with a list of section types and the list of possible section layouts you can assign to each one. This is where you’ll select the design for each “section type” or element of your book. You will have different styling options that can be applied to Chapters or Scenes. So you can choose among different choices to get the look you want. Do you want Scenes with just text, or do you want a title with the text?
Think of Section Types as different parts of a your outfit such as a shirt/blouse, pants/dress, shoes/hats. Think of Section Layouts as the types of pants you could have including jeans, dress pants, short skirt, or a full length one. The Section layout gives different ways to present Acts, Chapters, Scenes, or other elements like the Front and Back Matter sections in your Compile output.
Each Section Type must have a single assigned Section Layout. However, multiple Section types could be assigned the same Section Layout such as the As-Is Section Layout.
**** Check to make sure Section Types have been applied consistently.
If all chapters are not the same Section Type, then this can lead to an inconsistent Compile output.
There are two methods to check this. Using Outliner columns or Project Settings. Both were discussed in Part one of this series. I will review the second method again to make sure it is clear on how you should use it.
An example is shown below showing Acts, Chapters, and Scenes. To see your whole novel to check for the proper structure, you will have to open the Project Settings Panel and examine the Binder in small chunks. In this view, you cannot scroll the Binder to evaluate the different sections. You must exit this view shift your position in the Binder and check again.

Now that you know your novel is properly structured, you can assign Section Layouts confidently knowing the layouts will be applied consistently when you compile. (The Front and Back Matter folders were not shown in this example. It may be easier to check the Inspector’s Metadata Panel when you only need to check a few documents. Below you see the Compile Status and the current Section Type of the document in the Inspector Metadata pane. Clicking the dropdown caret allows you to change Section Types right here.)

In the example below, each Section Type has been assigned a Section Layout (which is the format which determines the appearance of the Section Type). The appearance of a Specific Section Layout is adjusted in the Compile Format designer.)

For a fiction book, these sections are pretty standard. They include things like Chapter Headings, Scenes, Front Matter, Part Headings (Acts), Table of Contents, etc.
The nice things about Scrivener’s Section Layouts is that if you change the style for one element (Section type), it will change it for all matching Section Types. That means that all your Chapter Headings, for example, will look uniform AS LONG AS every Chapter has the same Section Type.
Make sure that each Section type has an assigned Section Layout. Simply scan through what they have and select what looks good. Then hit OK. Each Section Type will have several different Section Layout styles to choose from. Click Ok when you have decided. Hitting ok will show the three pane view of the Compile Panel. In the second pane (below), you will see a preview of how the arrangement you have chosen will look when you compile with each Section Type labeled.
If you are not happy the preview appearance, click the Assign Section Layouts button again and choose a different arrangement. If you add placeholders other than for Chapter and Act numbers, the placeholder will appear in the section layout in the position where the object will be placed. If a placeholder runs into a title, hitting the return key will change the position of the placeholder and will usually fix this issue. Remember to hit save in the Compile Format Designer when you make changes.

Pro Tip: You can duplicate a Section Layout in the Compile Format Designer. Doing so will retain all the settings of the original without a name. As you experiment to get the look you want you could duplicate existing Section Layouts and create new versions. Example, such as Section Layout Chapter Heading version 1, 2, 3, etc. This way it becomes easy to go back to an earlier version of the Chapter Headings Section Layout and experiment with a different look WITHOUT having to remember how to reverse the changes you made.
7. Review Front and Back Matter
Write your Front Matter (ex. Dedications, Copyright and Title Page) and Back Matter (ex. About the Author, Future Projects, Glossary if needed), and a cover photo which should be the first image in the Front Matter Folder.
Front and Back Matter

1. Click the Checkboxes to add Front and Back Matter.
2. Click the caret and you will see everything to be compiled included for the Front Matter at the top of the listed files, and the Back Matter at the bottom.
3. Click the Lock Icon to lock the settings to prevent any changes, if you are satisfied. Pro Tip: You could keep a series of books in one Scrivener project and have custom Front and Back Matter folders for each one, depending on your needs.
4. When you are satisfied, click and hold the Alt key and the Compile button in the lower right will change to Save. Clicking this will save any changes you made to the current Custom Compile Format.
This is why it’s important to have this setup earlier while you’re constructing your novel. If you’ve done this properly, all you need to do is select the appropriate folder. You can also have different Front and Back Matter folders based on what Format you are compiling to. For example, with Ebooks you have the option of including a cover image.
8. Back up and save your project in at least two different save locations BEFORE COMPILING or adjusting your Compile Format Designer.
Again, Compiling does not alter your actual Project, but it is best to always back up your project in at least two different locations before making significant changes, or doing anything you are not familiar with.
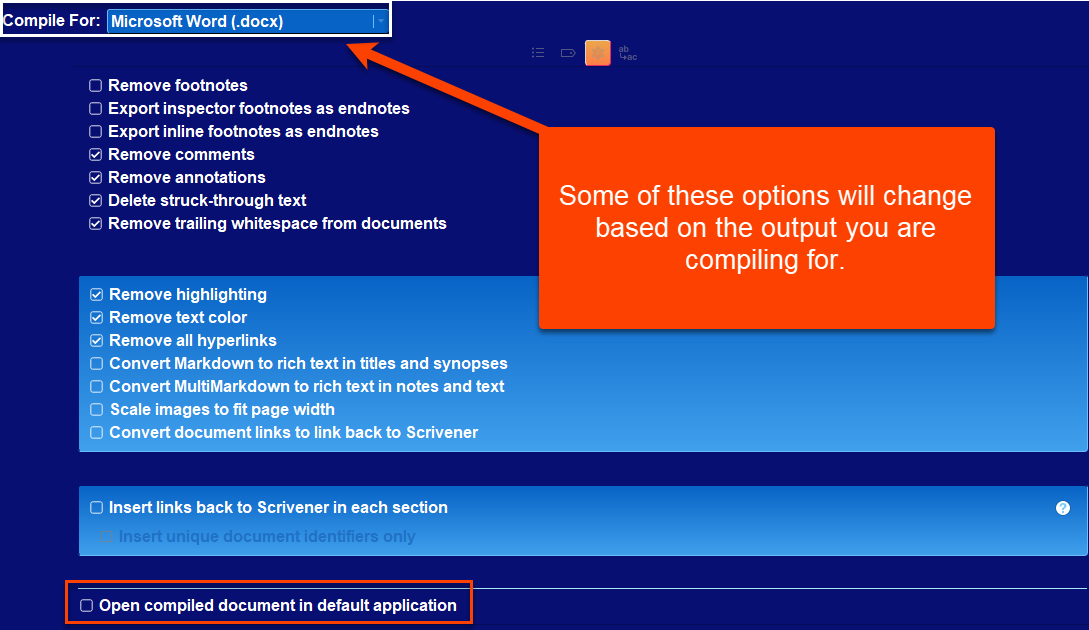
9. Look at the Settings icon in the third Compile panel.
Here you will decide what to include or not include when you Compile. Choices to exclude or include are Footnotes, Comments, Annotations, Highlighting, text color, hyperlinks, etc. Options on what to include or not vary by what your final Compile output format is. When you are satisfied, hold the Alt key and the Compile button in the lower right footer of the Compile Panel changes to a Save button to save the changes you made to your custom Compile Format.
You can also change options on how things are exported or converted as well.
10. Final Checklist before Compiling
1st-Make sure that all the documents you want to appear in the compiled project are actually checked. Carefully look at the checkboxes in the Outliner, Editor, Inspector, or in the third panel of the Compile interface.
2nd-Only have one manuscript in your draft folder. If you have multiple manuscripts, it can be confusing as to which gets compiled in which book. If you have a series of books, make sure you clearly identify your current Compile target. Make sure you have chosen the right Front and Back Matter folders for the book you are Compiling. If you have different Front and Back Matter folders per output, then make sure these special output folders are clearly labeled. All Chapters and Scenes in the Draft/Manuscript folder are usually included in the compile process but do not have to be.
3rd-Move old folders from the revision process into research. You can put them in individual folders based on the stage of the revision. (This will avoid confusion during the compile process.)
4th-Make sure all filters in the third compile panel are off. It is rare for someone to use filters when compiling the full project.
5th-Is the Compile target in the third panel correct? By default, your target should be your Draft/Manuscript (#1 below) (or a custom name you assigned to this folder). If your target to compile is correct make sure everything you want included is checked to compile and you have not missed anything that you want to include in your novel. (see below)
The Filter (#2) should generally be off.
The current selection (#3) is generally not the option used to Compile your project.
Collections (#4) will not normally contain your whole project
Pro Tip: Consider a special collection to test the Compile process. A small collection including an Act, Chapter(s) (at least two to check numbering protocols), several Scenes, and Front and Back Matter allow rapid compiling of this small group of files so you can change Compile settings to get the visual result you want. In this preliminary stage there is no need to compile the whole book multiple times.

6th-Make sure the Section Types have been assigned appropriately. Side note: make sure that the section types you have created in your novel match the ones in your layout for this particular project that you are compiling.
7th-Look at your separators and make sure the settings don’t inadvertently use a page break where you intend to use a single line of return. (A Page Break triggers entries into your Table of Contents.)
8th-Make sure you are using the correct placeholders when you set up your Section Layouts. A single misplaced letter can throw off your entire layout.
9th-Under Settings in the third Compile Panel you can choose to remove text colors and highlight colors when you Compile the project. You can also remove hyperlinks. (This is important because Amazon will want you to include hyperlinks to their site, which will not be welcome on other platforms. (In the Right Compile windowpane is the Setting’s wheel icon where you will see the ability to exclude/remove the various Scrivener tools you used to mark your document while creating it.)
10th-Review the Page Setup-File > Page Setup. See the Page Setup page if you are printing the Compile project.
11th Backup your project in a safe place before you Compile AND before you start this process.
12th Backup any custom Compile Formats you have created for this Compile project for safe keeping. Saving all of these in one folder in a single folder to hold all your Scrivener customizations makes it easy to find them.
Remember: You can click the + sign in the upper right to duplicate a Section Layout. A duplicated Section Layout will retain all the settings of the layout it is based on. If you are experimenting, then making several versions of a Section Layout while working out the kinks allows you go back to a previous version of the Section Layout if a change does not produce the desired result and you do not know how to reverse the changes you made.
11. Compile and Check Output
Lastly, it’s time to compile and check your file. From the compile settings, simply hit compile, and Scrivener will produce a file for you.
Ebooks can be checked through an Ebook reader software program like Calibre or Kindle which now only will read epub files. Amazon now ONLY accepts ePub3 files for their ebooks. You can use the free Amazon Kindle Previewer to upload and convert ePub3 files to a format that any Kindle software can read and allows you to preview how the ebook will look.
Calibre download site
Kindle Previewer download site
Now you will be able to use the kindle reader to see how your ebook looks.
Print books can be checked with any PDF reader.
Because Scrivener is such a complicated program, you will likely find elements of your book that you will want to change. Perhaps you don’t like the font, or you need to adjust the margins, or your table of contents is not showing up the way you expected.
There will undoubtedly be some tweaking that will need to be done. But the good news is that almost all of this can be done from Scrivener’s compile settings. Simply go to File > Compile, find your specific book format, and play around with it until you have what you need.
Pro Tip: Use a small Compile collection which contains an example of every type of file in your future Compile project to work out the kinks in getting the look you want. Remember after you assign the Section Layouts to the Section Types, then the second panel of the Compile panel gives you a preview of what your Compiled Project will look like.
You’ll have your book in the hands of readers in no time!
12. Possible reasons why you may not be Compiling the full Draft folder and Front and Back Matter:
Documents may look to be inside the Draft folder, but in fact are located at the same root-level as the Draft Folder in the Binder. Scrivener will not include these documents in the compilation.
You removed documents from the Draft Folder since a previous Compile attempt.
You unchecked individual documents in the right-hand side column of the Compile Overview window.
You unchecked documents in batch in the Outliner View Mode with the "Include in Compile" column visible.
You clicked the down caret in the Compile window in the third pane and selected either Current Selection, a Collection, or a Project Search rather than the Draft Manuscript. (see above image)
You accidentally applied the filter to the manuscript before Compiling resulting in documents being left out. (This last possibility is a frequent cause of incomplete compilations.)
13. Consider Exporting the Compile Format for safe keeping.
Pro Tip- Consider Exporting your Compile Format if you tweak the Compile settings, then save the Compile format as a new version. You could give each version a letter or number such as My Compile v1, v2 etc. In this way you can go back and not have to remember what you did to achieve a previous result.
Right click on the Compile Format and click the edit button. You will open the Compile Format Designer and can rename it as a version of a previous Compile Format. The default naming convention when you duplicate a current Compile Format Scrivener by names it the original format name and adds the work copy. You can click on this temporary name and edit it any way you want.
Now Right click on this again after the Compile Format Designer is closed and click Export and save to a Folder for future use.