Scrivener organizing Tips part two
For Metadata create a Metadata Usage Folder:
Decide what information you need to track, either in the writing or editing process.
Here you could list what you want to track for each scene and chapter, such as Characters used, locations, Time of day, Themes, Backstory, Key objects for the story (a Magic sword), foreshadowing, Romance, Conflict, Friendship, even a character’s last scene. What is important to track is something you decide and may change as the story evolves.
You can even have Keywords, or labels for the editing/revision process such as Critique Partner, Beta Readers, Editor review, reviewed with software like Prowriting Aid, or Grammerly. These can be used to create Collections of scenes as the editing/review process unfolds without having to put these in separate folders. You could list a key for how you will use Keywords in this project.
You drag multiple Keywords into a document so you can ulitilize keywords in different ways for the Project. You are more limited with Custom Metadata, Status, Section Types, or Label values. You can capture images of these and paste these those inside a Metadata useage folder using the Windows Snipit and Clipboard tools, or image capture software like Snagit.
1. Open the Project Settings Folder.
2. Choose a setting to capture. Now expand the Project Settings Panel by dragging with the mouse to expose your complete list.
3. Use the Windows keyboard shortcut- Windows Key + Shift + S to take a Snip.
4. Open the Clipboard Viewer- Windows Key + V
5. Click an open space in a Scrivener document and then click the image you want to paste into Scrivener and the image is transferred into Scrivener. (See examples below.)

A list of current Label values.
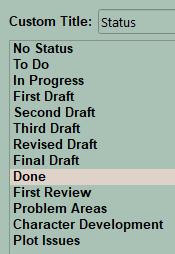
A list of the current Status values.
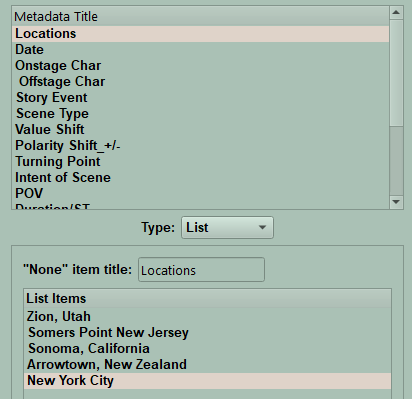
A list of Custom Metadata Entries.

Another Custom Metadata entry with a lot of values.
In this way, you can capture the custom metadata lists you have created, status, labels to have the information in one place to be consistent as you apply this going forward. If you change values, then just capture another image to update your information.
This way when you finish doing a first draft scene, you have tagged with keywords, custom metadata, taken a snapshot, and jotted down in Inspector notes what needs to be done with rewriting, editing, and linked pertinent Document/Project Bookmarks. This information will be a crucial tool during the editing process. Even a character’s last scene can be a useful link. Decide what things to track such as your point of view character, minor characters, locations, elements such as foreshadowing, time of day, story elements such as romance, conflict, goals. Choose those crucial to your story. You may want to mark your story by plot points depending on the plot model you’re using. If you consider these points ahead of writing your novel, then Metadata can be added proactively, rather applied afterwards. You will not foresee every need, but the more you anticipate, the easier the process will be.
Metadata is divided between visual information like labels (and to a certain extent Scrivener default icons and your own custom icons, semi-visual items like keywords which can be visualized in the Corkboard and Outliner views depending on options you choose, or non-visual like Status, Section Types, and Custom Metadata. Their limitation is one value per document, while multiple keywords and comments can be added to any one document.
The beauty of Labels (visual) and Status (non visual) is their optional values can change during the writing and editing process. You can only apply one value per document, but you can have large lists of these in order to shift values as your needs change. Follow characters, plot points, themes, foreshadowing, editing revisions, beta readers, etc.
Static Collections provide another way to organize files and folders either for research, or alternate arrangements of your story to explore the best way to present your novel.
The Outliner and its columns are a great way to display custom metadata, keywords, and labels. You can change which columns are displayed based on what information you want to review. Think of the Outliner like Scrivener’s version of Excel. Layouts can be set up to display different Outliner column arrangements. Changing a layout can be used to view different sets of Outliner columns to view your novel with a single click.
The Corkboard gives you an overview of what you have written by displaying Index Cards which have images or a brief description (Synopsis) on them. [See below]
The View Menu has a lot of options that affect Scrivener’s Appearance. Spend some time playing with these to decide what best suits your needs.
Understand the Inspector:
It presents five panes of information which are available for each document/scene in your novel.
Synopsis/Note Pane:
The Synopsis area will be visible in the Inspector note pane. Classically, this is used to give a brief scene description to show a big picture view of your novel that can be viewed on Corkboard Index cards or in the Outliner view to give you a bird’s eye view of the story. Filling in the Synopsis allows brief scene notes to be at your fingertips. The Note Pane which sits below this in the Inspector allows you to have much more detail including questions for each scene or other important notes to remind you what you want to write or even dictate. Unfortunately, you cannot visualize this Note Pane the way you can the synopsis.
The Corkboard’s Index Card has limited space and if you exceed this you will see … to indicate more text is available but not seen. How much of the Synopsis is seen is based on the font size in the Synopsis and how you space the Index cards. You can adjust the Index Card appearance by clicking this icon in the footer and adjusting settings on the panel below.

Corkboard footer icon
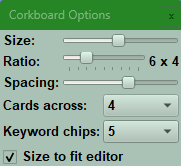
Corkboard options in the footer
The Corkboard has a Freeform Mode to move Index cards around WITHOUT changing the Binder order. This allows you to experiment with alternate ways to construct your story. Click the Icon below in the footer to activate this choice and see an example below.

Corkboard Freeform Icon in the footer
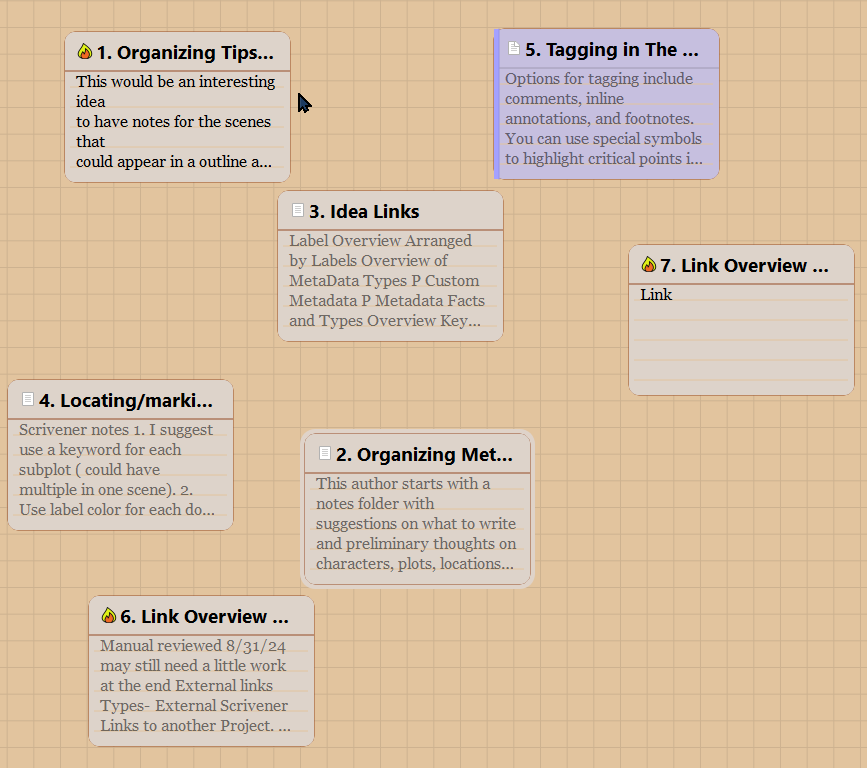
Corkboard Freeform View
Bookmarks:
(see below and see this link)
Metadata:
(This was discussed earlier and see this link.)
Snapshots:
Snapshots are backups of a scene (document) at various points in the writing process. These can be untitled or titled. A title can describe why it was saved.
Comments:
Comments can be used to highlight specific important text points in the scene to make them easier to track when you’re reviewing. These can connect to or follow a character arc. Comments can help you be consistent with descriptions or character actions throughout the story. You highlight text and add a comment in the Inspector about why you highlighted the text. These can have unique colors. Maybe you will want to come back and expand on an element when you rewrite, or add more sensory details.
Other non-Inspector features include:
Become familiar with the Scrivener Scratchpad Scrivener which is essentially a floating sticky note. Here you can add all kinds of information independent from individual projects but system wide. This could prevent a computer or desk becoming covered with post it notes.
Layouts:
These allow quick switches between various arrangements of the Binder, a single Editor window/split view, or Outliner or Corkboard views. You can actually have different Outliner views in the layouts displaying different columns of information for each different layout. This can allow you to switch between two different ways of viewing data on your project without having to manually rearrange Outliner columns. Scrivener has presets, but you can create your own personal layouts as well thru the layout manager.
Utilize Scrivener themes:
These can create a colorful, soothing pallet to create your novel with.
Scrivener Zoom:
For the visually impaired, or older users (Is there a difference? {at 69}) you can adjust the zoom level to make text easier to see.
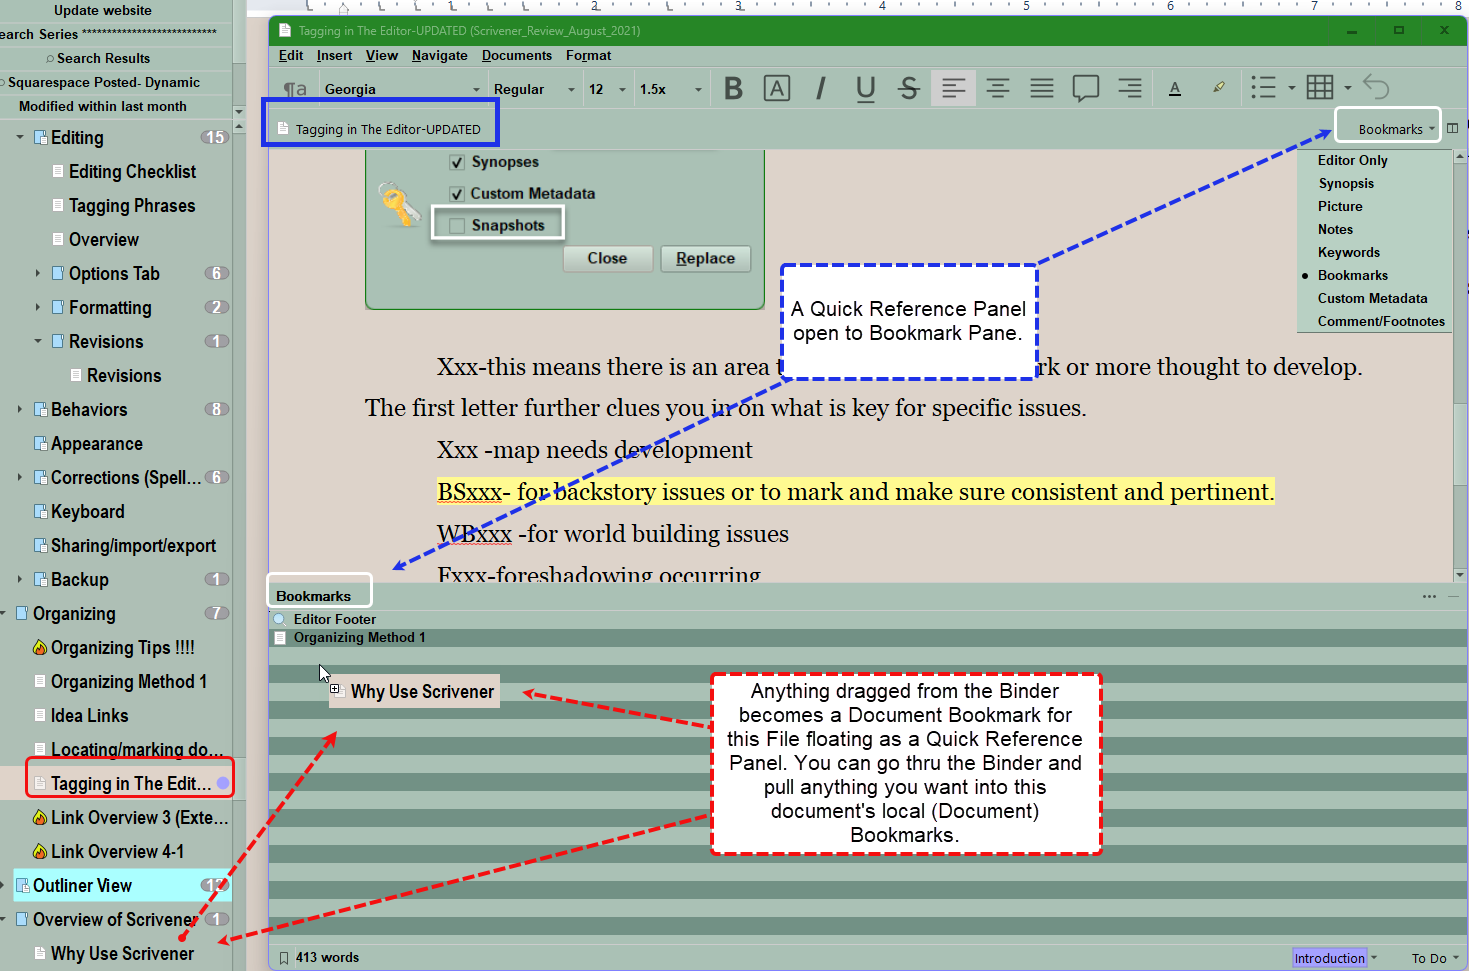
Bookmarks:
Bookmarks allow you to have data which is important for your scene (document) at your fingertips to review. This could be world building info, maps, character bios, their last scene, critical research, or more. The option panel allows you to choose how the Bookmark opens (Options include, opening in the Current Editor, other Editor, Quick Reference Panel (QRP), or copyholder). The ability to open bookmarks inside a QRP (a floating window) allows you to view the information you’re looking for without having to leave the current scene/document you are working on. You can drag information from the Binder into the Bookmark section of the QRP. Note: Bookmarks added here can only be Document Bookmarks. This option works best for multi-monitor or large monitor setups. Document Bookmarks are for those Bookmarks crucial to the current file. Project Bookmarks are available to every document and can include Bookmark Link files. (What I call a file with a list of links to all your main characters, locations, or crucial world-building information.). Having Bookmark Link lists in your Project bookmarks allows a few Link Lists granting access to large groups of helpful resources to be available to any chapter or scene in your novel. Use the Keyboard shortcut Ctrl + 6 to switch between the Document and Project Bookmarks.
Note: Clicking on a Bookmark will display the Bookmark below the Inspector’s Bookmark list in an arrangement similar to the Synopsis and Note fields.
Collections:
Collections can be very helpful here. You could have Static Collections with groups of files organized by character, location, and Worldbuilding for example. So if you had a Scene involving POV #1 then the collection might have the Character Card for the POV, backstory info, info on skills, strengths, and weaknesses. These files could be dragged into the QRP’s Bookmark section so the relevant information is readily available when writing. You can delete an item in a static collection without affecting the original source material as a Collection is a group of shortcuts to the actual files.
(See an example of this in action below.) Now this floating panel can sit on the computer and any document in the Binder can be dragged in to create a Document Bookmark to refer to for this file. (see below)
Learning/Editing Projects:
For the editing phase I open my editing project which contains useful information I have gathered on the process of editing, grammar rules, overused words, show not tell words, and lists of previous problem areas in other books.
Consider creating a project for learning Scrivener, so you can organize information about Scrivener as you use the software, learn information on the Scrivener forums, or read articles. Save articles/Information showing interesting ways to use the software. This serves as a handy personal reference organized in a way which makes sense to you. Also consider a writing project to save information about writing, plotting, character development, world-building, editing, and anything else you need to improve your writing. If you use this approach, then strongly consider organizing as you add information to the project. Choose logical, descriptive titles for the information you gather and organize in folders. Consider Metadata tags, or links to related information. Failing to do so will leave a overwhelming jumble of unorganized information. If you organize as you go, then vast amounts of information can be at your fingertips.
AI resources:
Free and pay AI tools available on the Internet can help create pictures of locations, characters, homes, etc. These tentative images can make your imaginary worlds more vivid as you work through your story. These are tools to aid human writing which can give visions to your imagination if you have limited artistic talent (me).
Plotting:
Study plot models which can be helpful if you are a planner, but can also help you if you are a pantser when you need to put more structure and thought into your novel. The major plot points can even be made into keywords and tied to scenes as well as you go along either as a pantser or a planner.
Document Templates:
These are reusable documents stored in a special folder you designate. These can be anything you want such as a character questionnaire, scene planner, or a blank Scene template with preset word targets, and note questions to help guide your writing. You could have a Chapter template with built in Scenes to add if you need additional Chapters as the story evolves. For starting a new novel consider using a custom Project Template which uses the framework of how you work. Document Templates can be added anywhere you need in the Binder and can mimic anything you can put in a normal document in your manuscript, including tables, lists, and images. These eliminate repetitive copy and pasting. For example, you could have a simple scene table to focus your writing attached to every scene like this. You can assign a compile status, or even a different Status, Section Type, or Keyword to make these easy to find/isolate or remove if needed. They could even have a special icon to distinguish from other parts of the Manuscript. (If you include Scene Creator templates which are working notes for the Scene, then this would be set to NOT include in your Compile output.)

Example of Scene Organizer Template.
Research Folder:
This is where you can directly store media, images, pdfs, and web page research for your novel.
The Template Folder must be stored in the Research Folder.
Tagging :
Options for tagging besides Metadata include Comments/Footnotes, Inline Annotations, and unique letter/symbol combinations.
You can use symbols (!!!, ###, or ***) or unique letter groupings (Pxxx, Mxxx, WBxxx)to highlight/tag critical points in text. Using symbol or letter combinations not found normally when writing take advantage of Scrivener’s Project Search function to find exact text locations.
I could insert a text tag where I am having problems with my plotting (Pxxx) If you do a Project Search of text for Pxxx you will find all the areas you marked that needed work on the plot. As you correct these and delete your tag, then these areas would disappear when searched for or if you use a Dynamic Collection to find specific problems. You can create a system for multiple issues this way. If you do keep a master key file and add it to your Project Bookmarks or your Scratchpad.
You could do special tags (A phrase or letter combinations) to look for character, plot or location issues
A text search will quickly highlight these issue areas, allowing you to fix different individual story elements at once.
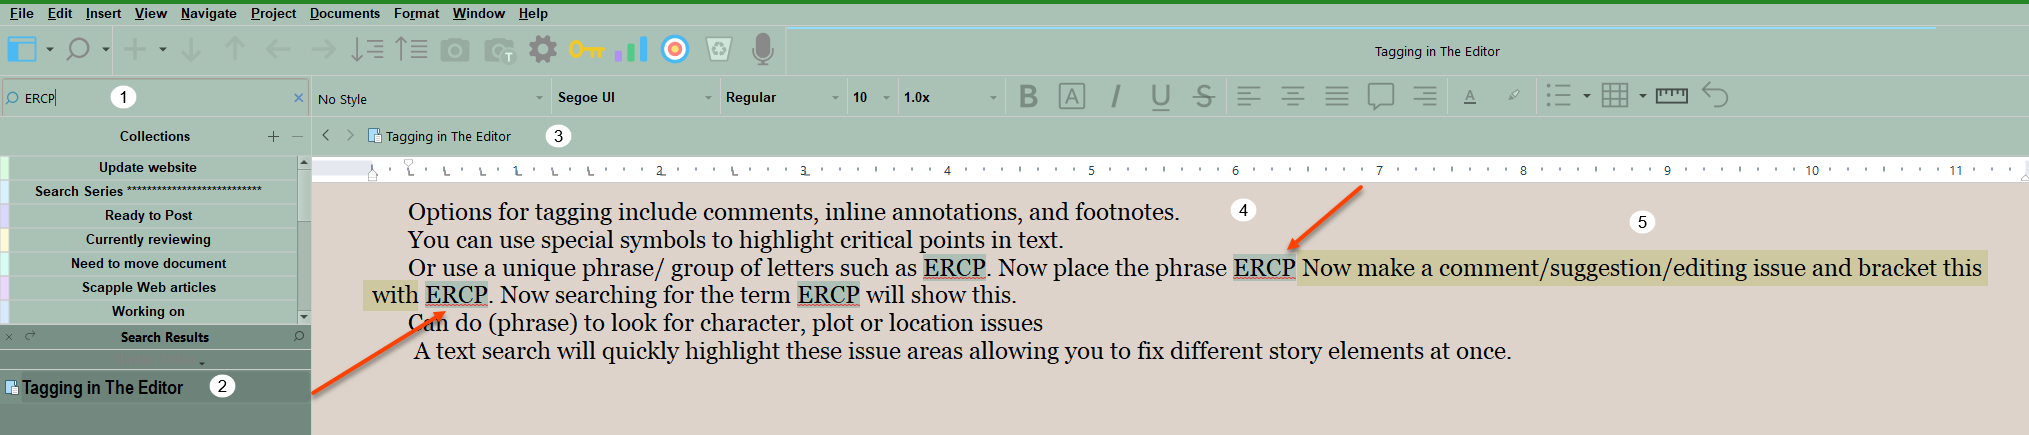
ERCP is the unusual letter combination tag in this example.
1. Put the unique phrase in the Project search text window.
2. See a list of documents which contain the tagging phrase.
3. Click on a document in your search list and see the document displayed.
4. Inside the document, the phrase will be highlighted adjacent to the text with the issue. As you fix the issue, then delete the tagging phrase.
5. Above is a tagged sentence next to the tag phrase (ERCP). The tagged text would not be highlighted by this process, but was done for illustration purposes.
When you are done with this process, use the Project Replace function to clean up any residual tags. To do this seamlessly you want the tagged phrase removed without leaving excess spaces. Replacing the tagged word with NOTHING, will not leave empty spaces behind.
!!!!!!!!!Two Key Points:
#1. Make sure to uncheck the Snapshots box from this process in case you want to reverse the process by rolling back to the snapshot with the tags in it.
#2. Back up your project before doing Project Replace for any reason, in case this causes unexpected results.
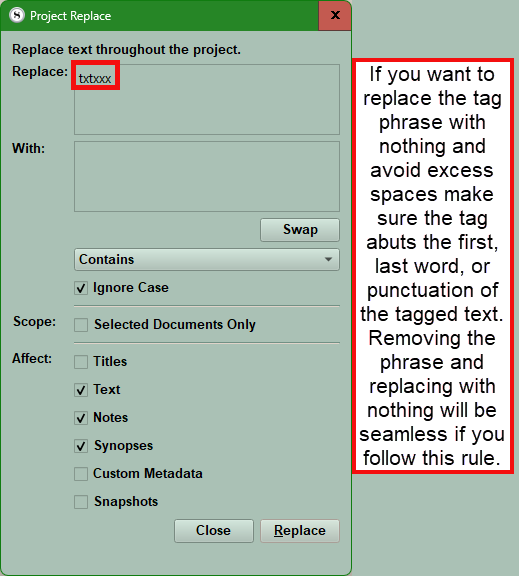
Consider excluding Snapshots which are scene backups.
Examples of Tagging Phrases:
You can tag issues as you write or edit that need to be addressed. I would use these tags for "error" codes for issues that need to be fixed and as you fix them you delete the tag. If you created a Dynamic Collection based on searching for the phrase, then as the issues are fixed the Collection shrinks.
Below is list of possible error codes consisting of letter combinations which would not occur in your normal writing process.
Xxx-this means there is an area that needs additional work or more thought to develop. The first letter(s) identify the specific issue that needs to be addressed. These combinations of letters would not normally appear in a novel.
Mxxx -map needs development
BSxxx- for backstory issues or to mark and make sure consistent and pertinent.
WBxxx -for world building issues
Fxxx-foreshadowing occurring
FFxxx foreshadowing failing/needs work
Charxxx- character needs more development. Since there are many possibilities, you could list the specific issue in the Inspector note panel
Sxxx-set/location needs work
Pxxx- plot needs development
SPxxx- subplot needs development
Thxxx- theme needs work or tagging
Cxxx-conflict needs work
Dxxx-dialogue needs work
Wxxx word choice issues
Note Punctuation can be a tag as well. Examples include !!!, ***, ###, or any other symbol which you would not normally use in your project.
Delete the tags as issues are fixed. This can easily be searched before your final compiling for any remaining issues. You can create Dynamic Collections searching for these tags which will shrink as you fix the issues and delete the tag phrase.
Snapshots as a Scene Backup:
Scenes with possible alternate construction. You could use titled Snapshots for each possible choice and then use Letters, a unique icon, Label color, Keyword, or even a Status could locate/highlight a scene with multiple options saved with snapshots. You can review these options and decide which choice is the best way to go.
Project Templates:
Once you begin understanding how Scrivener works and how you work best with it, you can then create a Project Template that saves a novel structure you like, with additional binder folders like scraps, notes, characters, locations, world-building, and includes useful templates. These are easy to create by using the Menu command File > Save as. This creates a separate backup copy of the current Project you like. This COPY is separated from the original and changes to the copy have NO effect on the original. Now name this with a name for your Template like "Fiction Template 2025". Now you can manipulate this copy. First, strip out all the text leaving the structure behind. I have a book template which has a three Act Structure with chapters and scenes which each scene having a Scene Creator Template. Once you have removed the novel/project specific text and left the organization, labels, keywords, custom metadata, and icons behind then use the Menu command File > Save as Template to create a novel Template you can use to start new projects with a structure that fits your work process. This will change over time as well.
Use Scapple (or another Mind Mapping Software like Simplemind Pro):
This is Scrivener’s free-form mind map companion. This offers a different way to visualize data to help stimulate your writing and keep your facts straight. Character and Location Templates (See link above) can be a way to organize information and keep it consistent as you write. I add details that are created as the story evolves in a central location on the Mind Map so I can refer back to this and keep details consistent.
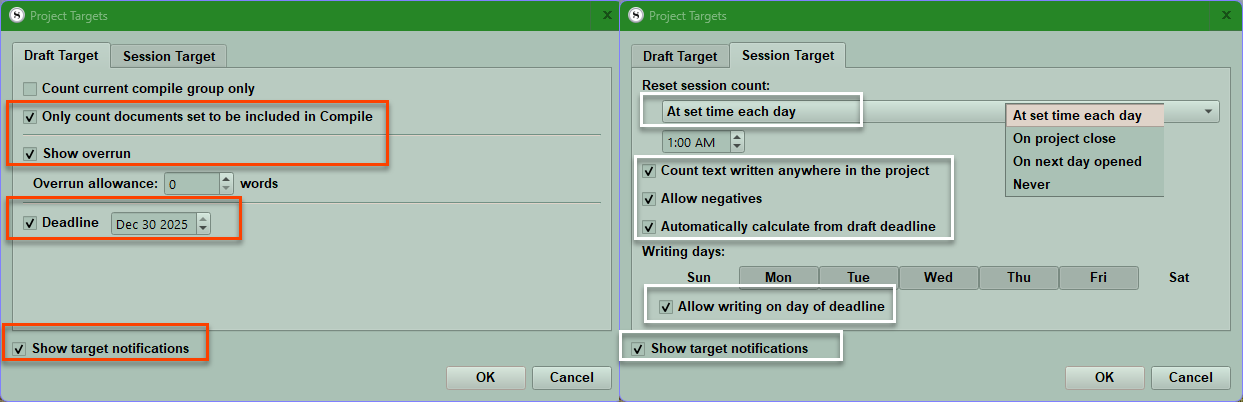
Project Targets:
You can reach by the Menu command Project > Project Target and set a word count for your Project and a Session Target based on how many days a week you write and your projected finish date. These can be set by clicking the options button on the Project Target Panel. Setting these goals can give you the incentive and drive to finish your novel.
Composition Mode:
This enables a stripped down writing experience to limit distractions, but many tools are still available in a disappearing toolbar. (for more information click here)
Speech Mode:
Use the Menu command Edit > Speech or a Toolbar icon to have Scrivener read your novel to you to experience what you have written in a different way.
Build a Compile Collection:
This small group can help you quickly tweak your Compile output. Compiling does not affect the material in your project. A Compile Collection should include all major elements of your novel. For Example, for a novel this mights include an Act folder, two Chapter folders (to assess numbering schemes), several scenes, front and back matter folders. Make a Collection with these and use this to practice Compiling. Doing this allows you to rapidly Compile and tweak things as you go to get your final output to look the way you want. I have a collection of articles on Compiling on this site.
Again, Scrivener’s beauty is its flexibility. Start simply and treat it as a simple word processor and add some or all of the elements discussed above as you become comfortable with the program. This is just a suggested way, and the key is to use the program in a way comfortable for you. Add elements as your knowledge or needs advance. As you become more familiar with the software, how you apply it will change.
I hope this information shows you new tools to help you write your best novel. Enjoy your writing journey.