Composition Mode
Composition Mode is best when all you want to do is to write and want to eliminate distractions.
Composition Facts:
You can view any text document (or a group of documents in a Scrivenings session) in Composition Mode. This shows a virtual page appearance on a customizable background. This will block out the rest of your computer and the Scrivener default interface.
The Composition Mode toolbar remains invisible until the mouse hovers over the bottom of the screen. This toolbar contains a slimmed down Inspector panel, Zoom controls, Keywords, Typewriter scrolling, and a quick navigation option to pull up any other text document in your project without leaving Composition Mode.
The current active selection in the Editor will appear when entering into Composition Mode.
If you choose a Corkboard or Outliner folder/container with subdocuments, then these documents will be loaded into the Scrivenings View when opened in Composition Mode.
There is NO Page View in composition mode.
Paper fade in the lower right of the Composition Mode toolbar DOES NOT work if the document you are viewing is in Scrivenings mode. However, if you do not view the documents at full width, paper fade will fade the background as you move the slider, but not the document.
If you do not choose to add an image or texture for your Composition Mode Background in either the Project Settings Background tab or from your Appearance settings (Composition Mode > Colors > Screen Background) in the Options Panel, then Paper Fade becomes Background Fade. Using the Paper Fade slider will fade the background color allowing you to see the computer screen behind the paper and text without affecting the document itself. This works for a single document or in Scrivenings view.
If the Composition mode view is on a different Monitor screen then the Scrivener Project, then after Composition Mode is active, you can navigate freely in the Binder with zero effect on the document(s) currently being viewed in Composition mode.
The 3 ways to enter Composition Mode.
1. Use the Keyboard shortcut F11.
2. Click the Composition Mode Icon (Found at the far right of the main toolbar next to Inspector)

3. Use the Menu command View > Enter Composition Mode
The 3 ways to exit Composition Mode.
1. Hit the Keyboard shortcut F11 again.
2. Hit the Escape key if this option has been enabled in the Behaviors tab of the Options Panel. (see below)
3. Hit the far right Composition Mode Icon on the Composition Mode Toolbar to escape. (see below)

Composition Mode Options in the Options Panel under the Behaviors tab.
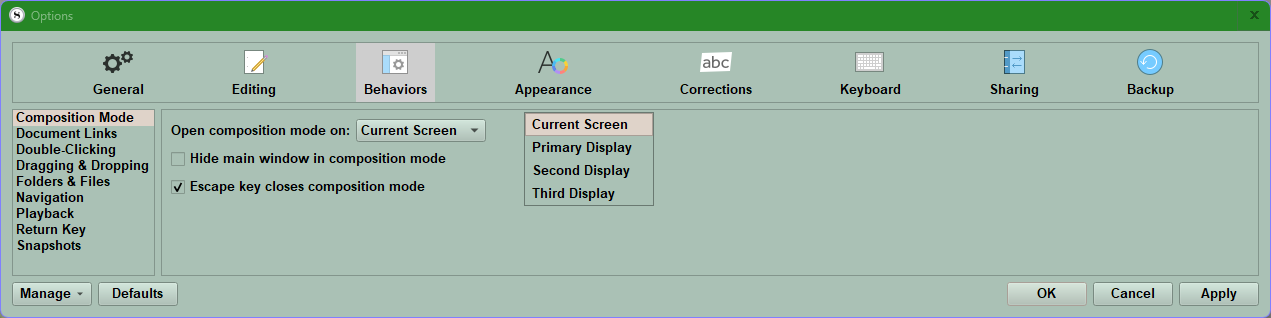
If your screen flashes when you exit the Composition Mode, you can eliminate this by unchecking the Hide main window in Composition Mode option found in File > Options > Behaviors (see above).
With Multi-monitor screen setups, you can determine which screen your Composition Mode opens up on by using the Options Panel shown above.
How to Load Multiple Documents into the Composition Mode:
You must first be viewing multiple documents in any of the three group modes, and you must be clicked inside the one of these documents for this to work. You can enter Composition Mode by the same three ways as you do for a single file.
However, when in Scrivenings mode, the paper fade option for Composition Mode does not work when the screen is viewed at full width. If the Composition Mode document is less than the full screen width, then the background texture chosen in Files > Options > Appearance > Composition Mode will fade as you adjust the slider. As the opacity of the background drops, you will then see the computer screen behind the documents in Composition mode.
If an image has been chosen as the background in the Options panel, then the background image remains solid while the paper fades for a single document you are viewing. In a Scrivenings view then paper fade in this situation will NOT work.
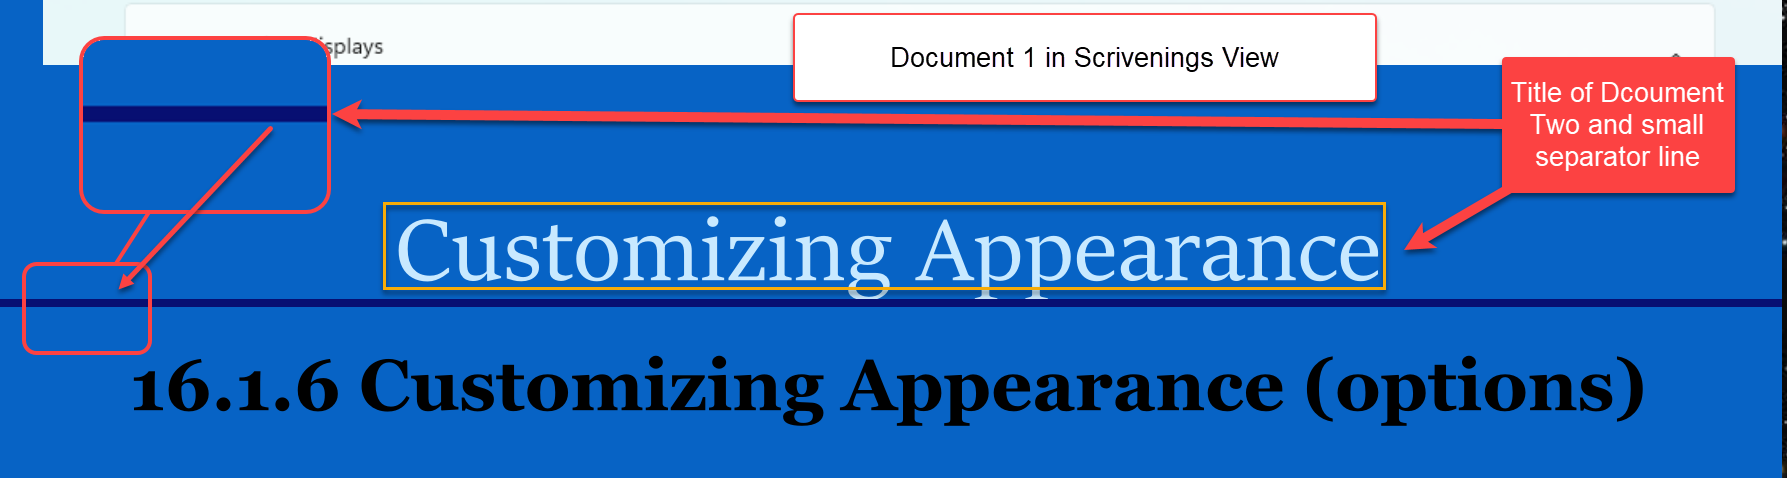
The files will have a visible separator between documents in this view. (see below)
The Control Strip
(Focus mode is a Mac only option.)
The control strip is a slide-away panel along the bottom of the screen that appears when you hover the mouse pointer over the bottom of the screen. Leaving the mouse at the screen bottom keeps the control strip open as you type. It contains various controls for changing visual settings, and providing navigation & reference tools without having to leave the comfort of Composition Mode.
The controls, in order from left to right:

1. Text scale/Zoom
This operates in an identical fashion to the text scale zoom in the standard editor, BUT the Composition Mode stores its own scale setting, independent of the current editor settings which is saved when you exit Composition Mode. Any future documents will be viewed at the same zoom level until you change it again.
2. Paper Position
Use the slider to adjust where the column of text should be horizontally placed on the screen. (Center/to left/to right) This only works if your paper width is LESS THAN 100% of your current screen’s width.
3. Paper Width [or Height while holding the Alt Key]
Use this slider to change the width of the text, with the widest setting filling the entire screen. (Again, if the paper width is 100%, then no change of paper position is possible.)
You MUST HOLD the ALT KEY AND CLICK ON PAPER WIDTH to access this optional slider to adjust the height of the paper in Composition mode. This setting can shorten the paper height down to just several lines. If you want to only focus on a few lines at a time, this is a good way to do it. While holding the alt key, adjust the height slider, when you release the Alt key, you again see the default option of paper width, but your height adjustment persists.

4. Mini Inspector Panel
Clicking the Inspector I brings up a floating Inspector panel for the current file/(or files if in Scrivenings mode).
As with the main project window, you can use the Keyboard shortcut Alt + Shift +I to toggle its visibility. In this floating panel, you see the every Inspector option available via dropdowns EXCEPT Snapshots. This panel can be moved to another monitor screen if you are in a multi-monitor setup.

When clicking the caret, you will see the dropdowns and options you can choose (except Snapshots).
5. Go To
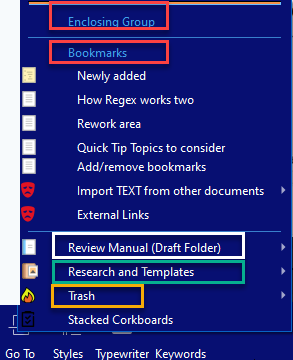
Operates as a handy navigation tool, and functions similarly to the main Menu command Navigate > Go To > submenu.
This allows you to go to other documents in your project/novel without leaving the composition mode.
However, when viewing multiple documents using Scrivenings mode, this button will switch to showing only the items within the current session the first time you use it. Once you have navigated to other sections within the current Scrivenings view, you can use the standard history shortcuts (Ctrl [and Ctrl ]) to navigate to and from documents you’ve visited while in Composition Mode.
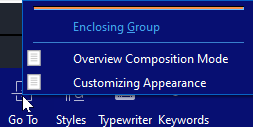
Here in Scrivenings view, the Go To menu at first only shows the files/folders in the current Scrivenings session. If you shift around in this, then the Go To view reverts back to the standard view seen seen for a single document which is identical to the normal Go To menu except there are no options for the next or previous documents as shown below.
The controls, numbered in order from left to right:
6. Styles
Clicking this displays the Styles selection menu, which can also be accessed by right-clicking on text you select in the editor. (Note: There are multiple other options when you right-click on text in the composition mode which are the same as right-clicking on plain text in the editor.)
Use if you want to apply a style to text, including accessing the styles panel.
Styles Icon displays the Styles Panel to change your text appearance.

Your Right-click Menu in Composition Mode (showing the Style Menu and option to open the Styles Panel from here.)

7. Typewriter (Scrolling)
Toggles a feature that keeps the currently edited line of text at a set position on the screen, much like typing on a physical typewriter. This setting is specific to each split editor, as well as in composition mode which has the feature enabled by default.
8. Keywords
Clicking this brings up the project keywords panel. This can be used in conjunction with the floating inspector to assign keywords to the current document.
Statistics & Scripting Controls
The middle portion of the control strip changes depending upon your editing mode. In standard editing mode, this will display the word and character count for the document. Clicking the mouse on the number brings up a more detailed analysis in the same manner as with the standard editor. You can also display the counts for any selected portion of the whole document’s text, in the format of X words selected out of the total number.

In scriptwriting mode, this area will display Enter/Tab hints as well as the element selection menu (You can also use the standard keyboard shortcut, Ctrl + \, as well).
9. Paper Fade/Background Fade
Using the slider adjusts the opacity of the document’s background (Paper Fade) or the area behind the document’s edge (Background Fade). Remember, the amount of background that you see is dependent on your paper position, width, and height options you pick in the control strip). This could be useful if you want to refer to material in other applications (or the main project window) in the background whilst remaining in composition mode. A better solution is possible if you have a multi-monitor setup. You can have Composition Mode appear on a different monitor then the one your program is on.
Scenarios: Using Paper Fade
Project Settings: A Background Image from your computer or the project itself has been chosen for Composition Mode- Paper Fade affects the opacity of the paper your text is on, but NOT the background image. The background image will be shown preferentially over any textured background you may have already chosen in the Options Panel. (If you change the Background Image while in Composition Mode, the background will not change until you exit and reenter Composition Mode.)
Options Panel: A texture background image for Composition Mode has been chosen from the Options Panel with no Image option chosen in Project Settings- [Chosen in Options > Appearance > Composition Mode > Colors > Screen Background and choose a texture (image which will repeat).] In this setting, the paper fade option affects BOTH the background texture (image) AND the paper the text is on. Ultimately, this will reveal whatever is on the monitor screen behind BOTH the background texture and the Document text revealing the underlying background with the text floating over it. When making changes with the slider, there can be a slight delay before the change occurs.
Scenario: Using Background Fade
You will only see this option if BOTH:
A.) The Screen background for Composition mode in the options panel is a solid color and not a texture.
B.) You chose the NO background option for Composition Mode in Project Settings. In this situation when you narrow the paper width; you see the solid background color you chose in the options panel. The slider has changed its name to Background Fade and moving the slider left will fade the solid color background and reveal the Monitor screen underneath.

See Paper Fade is now Background Fade.
Small Notes:
The Ruler
If the Ruler is visible in the Editor window, then it will also be in Composition Mode. You can toggle this off with the Menu command View > Text Editing > and unchecking the Ruler. (The keyboard shortcut Alt + Shift + R will also toggle the ruler off and on.)
Composition Mode history
This is separate from the main editor history—it will not add to it, and when you first start using the composition mode, your history will be empty. Once you have looked at several documents when viewing documents in Scrivenings View, you can use keyboard shortcuts to go back and forth in history. (Ctrl + [ or Ctrl + ]). There are no other options to view previous documents in this mode.
Scaling Text-
You can increase the zoom to make a font easier to read. Each Editor split and composition mode preserve their OWN independent Zoom Setting which will be the same the next time you enter Composition Mode.
Page View is NOT available in Composition Mode.
Focus Mode exists in Mac only, but you can approximate this in the Windows interface by adjusting your window height to cover only a small area of screen such as one or several lines of text, see above)
For a Windows workaround you can use the Menu command File > Options > Appearance > Composition Mode > Highlight current text by clicking the checkbox. This will show the current text line highlighted in Composition Mode. (See below.)

Opening Composition Mode on different screens with a multi-monitor setup.
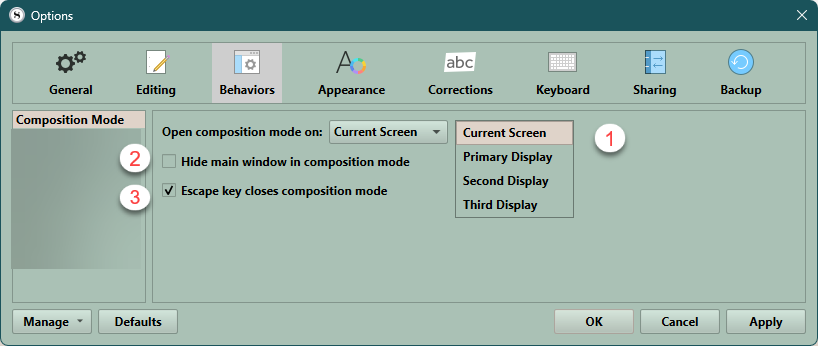
You can choose the Current Screen (#1), (Which is the default one your project opens on- see above.) or you can choose a specific screen in multi-monitor setups. (see below)
You do have the option to hide the main window when in Composition Mode (#2 above).
You can check the option for the Escape key to end Composition Mode (#3 above)
The current/default option is to use the CURRENT Screen that your Scrivener Project is open in.
To Identify each display monitor number and position (for multiple) right-click on an open area on your desktop and then choose display. This will show your current monitor arrangements and number assignments.

Now you can go back to (#1 above in the Options Panel) and choose which screen to display Composition Mode on.
With a multi-monitor setup, it is possible to use Composition Mode and see your project at the same time. To do this, do the following-
1. In the Options Panel go to Behaviors > Composition Mode. Now, uncheck the box Hide main window in composition mode option. (#2 above.)
2. In the Same area, change the how Composition opens. The default is to open on the current screen you are viewing your project on.
3. Change the screen Composition Mode opens on to a secondary or tertiary display option.
[If Composition Mode is displayed on a secondary screen, then the Scrivener Project can remain visible and accessible on the main screen while you are in Composition Mode.]
4. To do this, you MUST UNCHECK the option to hide the main window when in Composition Mode (#2 above). This allows the Scrivener project to be visible on the primary screen, while Composition Mode is open on the other monitor screen.
You can change views, documents, etc. WITHOUT affecting Composition Mode. So you can use the project to view the information you need to continue writing in Composition Mode.
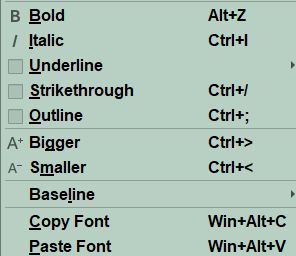
Formatting and Highlighting text while in Composition Mode.
You can use Keyboard shortcuts in Composition Mode to apply your current highlighting color (Alt + A) [You cannot change color inside this mode], and certain formatting effects (see below common commands)
Potential Composition Mode Issues:
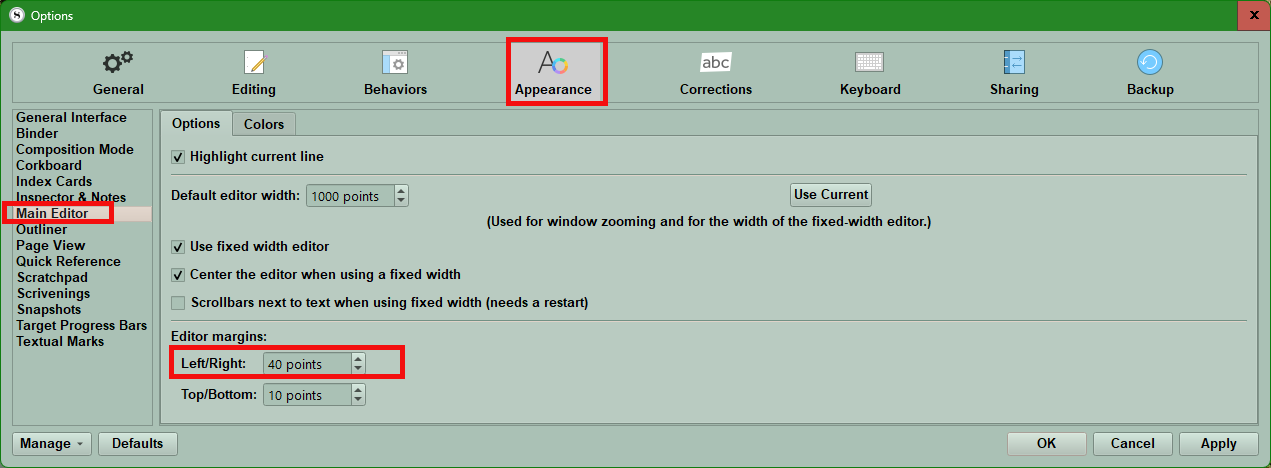
There can be issues with Composition Mode where part of it will disappear under the scrollbar on the right side of the screen. This can occur if the Editor margin it is too small. The default setting is twenty points but consider. increasing this to forty points to avoid this issue.
Use the Menu command File > Options > Appearance > Main Editor
There can be issues with the Composition Mode backdrop depending on what you choose. If that is an issue, then use the Menu command Project > Project Settings > Background Images and choose the no backdrop option under Composition Mode.
Occasionally, depending on the colors you choose for Composition Mode there can be display issues. You may have to go back and set these back to the default colors that were associated with that theme. The settings can be adjusted and changed using the Menu command File > Options > Appearance > Composition Mode > Colors. You will have to try changing some of the various colors back to the default mode to see which one may be causing the problem if you are having display issues.