Scrivener Styles Overview Part Two
Scrivener has an implied Style for “Normal” or “Body” text, called “No Style”, so any unstyled text is given your default formatting.
Setting Your Default Formatting:
Open up any document in the Editor and use the format bar to set your font, font size, line height, etc and paragraph indents. Note: setting a paragraph indent is best set with the Ruler visible and the classic indent is .25 inches.
Once you are satisfied with your formatting, type some text in the Editor.
Now highlight the text you just formatted and choose one of the three methods below to set this as your default formatting which Scrivener calls No Style. Pick a style that is comfortable for you to work with. You can also adjust the zoom level to make reading the text easy for your eyes. Doing it this way allows the no style text to be changed to any other font style at the time of Compiling.
Your three options for setting a Default Format are:
A. Select the text you've written, then use the Menu command Format > Make Formatting Default.
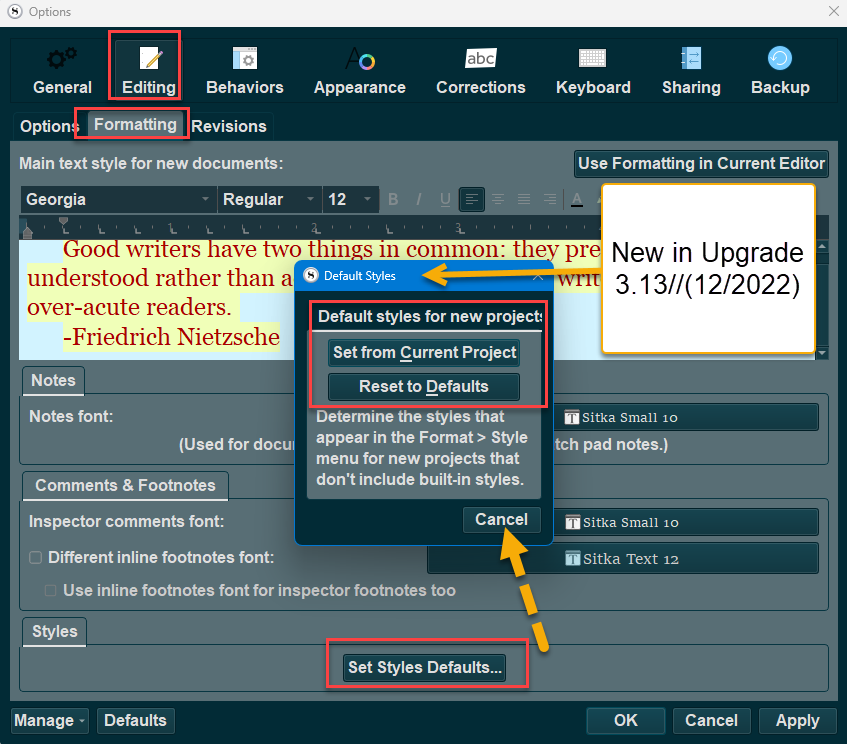
B. Use the Menu command File > Options > Editing > Formatting. Note: The formatting settings applied here now affect ALL projects you create or have created in Scrivener, unless you have checked the Use different default formatting for new documents in this project box under Project > Project Settings > Formatting. This maneuver creates a unique default formatting for a specific Project.
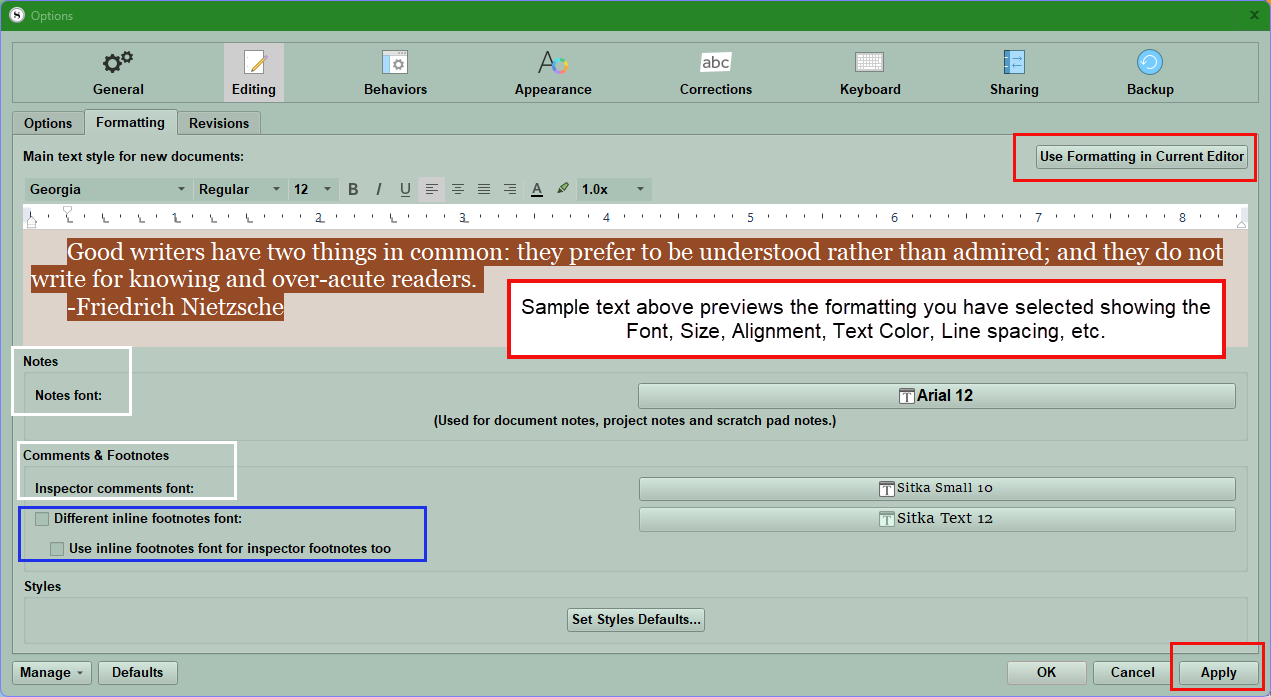
The text will be displayed as it will appear using the sample text in the center window. This will apply to all documents going forward.
1. Click Use Formatting in Current Editor
2. Click Apply.
If you use the Menu command Project > Project Settings > Formatting, formatting done with this method is Project Specific.
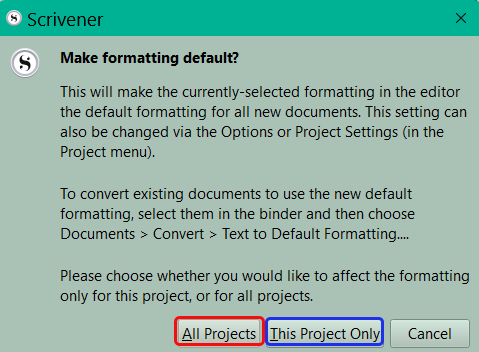
Before these changes occur, you will be asked whether you want the formatting to be used in all of your projects going forward, or just the one you are currently working on. Select your preferred option to continue. (see below)
That's it! Now all new documents you create in the project will be set to use the same formatting. If you ever want to change your default formatting again, you can follow these same steps, or use the alternative method outlined below.
Converting Existing Documents to Default Formatting
Note that setting your default formatting will only affect documents you create from that point forward. If you have existing documents in the project that you would like to convert to your new default formatting, select those documents in your Binder and use the Menu command Documents > Convert > Text to Default Formatting. A pop-up window will appear, giving you the option to select which elements of the text to convert, and which to preserve.
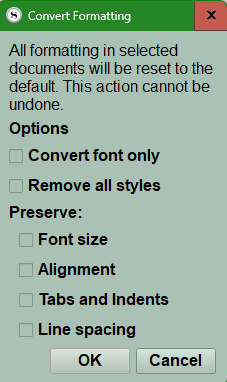
If you do not select Remove all styles, then any text with a style assigned will not be converted to the default formatting. Additionally, text that has been selected where the box Preserve Formatting was checked will not be altered by the conversion, much in the same way that the Compiler will leave them alone.
Setting Formatting for Linked Notes (Comments/Footnotes) and Inspector Notes

Below the main text area in this panel, you can set the Notes Font (white box) and Comments and Footnotes Fonts (white box) for FUTURE notes as well. You have the option to choose a different font for Inline Footnotes (blue box).
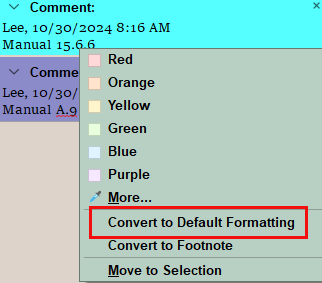
Updating the existing Comment and Footnote styles:
To update existing Comments and Footnotes (Linked Notes) to the new defaults you have established using the above interface, now select the Comments/Footnotes you wish to convert and use the right-click menu. You will see the option to Convert to Default Formatting. (see below)
These default formatting changes apply going FORWARD.
To change existing documents:
A. Use the Menu command Documents > Convert > Text to Default Formatting (to change multiple old documents to the new formatting)
B. Use the Keyboard command CTRL + 0 (zero) to also bring up the interface to convert documents to a new default formatting.
To set the Default Formatting for a single Project:
Open up a document in the Editor and use the format bar to set your font, font size, line height, paragraph indent, etc.
Once you are satisfied with your formatting, type some text in the Editor. Note if you import a document with the formatting you want, you can select this document as the text you want to make default.
Select the text you've written, then use the Menu command Project > Project Settings > Formatting to change the default formatting for this Project ONLY.
Using the Menu command Format > Style > Set Default Formatting also brings you to the Project Settings Panel.
Text Color can also be set this way. Holding the mouse button over the text color icon will reveal the option to choose a text color. The first swatch with a red line drawn through is “the remove color option” choosing this one will erase any color in the selection and return the text to default and it will automatically adjust when you change from a light to a dark theme in Scrivener.
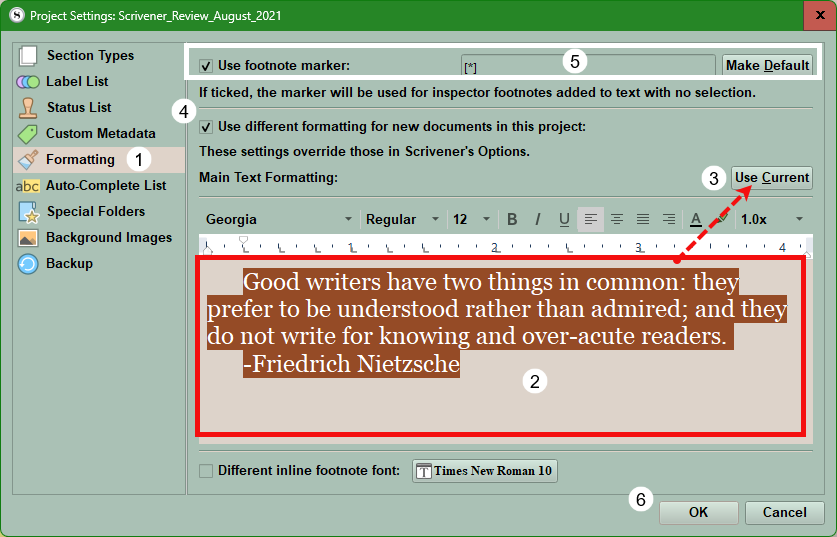
Follow these steps in the Project Settings Panel:
1. Choose the Formatting Pane.
2. Review the selected sample text in the window whose formatting will match the currently selected text in your document.
3. If satisfied, then click the Use Current button and click the okay button (#6) to set the Default Formatting for this Project ALONE and not system wide.
4. If checked, then this option will use the different formatting for new documents in this project only. This method can set special formatting for this Project only.
5. Normally you highlight a word(s) for a footnote, but you can insert a custom marker at the current cursor location when you add a footnote to be less intrusive. (In the image above the combination of symbols [*] is used to represent a footnote instead of highlighting one or more words.) Hitting Make Default will make this the symbol for every footnote. Once you choose this option, then if the cursor is inside a word, then the symbol is inserted inside the word and would appear like this. Ex. project [* ].
Note: Deleting this marker deletes the footnote. If under Options > Appearance > Textual Marks > Options you click decorate Comments and Footnotes anchors as links, then the marker will be underlined and colored to match the current link color you have for your project.
Using a custom Footnote marker may make Footnotes less intrusive.
6. Click Ok to leave Project Settings.
However, if you use the Menu command (or any of the above methods) to change the formatting, you will be asked whether you want the formatting to be used in just this project or all of your projects going forward. Select your preferred option to continue.
That's it! Now all new documents you create in the project will be set to use the same formatting.
If you ever want to change your default formatting again, you can follow these same steps, or use the alternative method outlined below.
Note: Setting your default formatting only affects documents you create moving forward.
Converting Existing Documents to Default Formatting
If you have existing documents in the project that you would like to convert to default formatting, select those documents in your Binder and use the Menu command Documents > Convert > Text to Default Formatting. A pop-up window will appear, giving you the option to select which elements of the text to convert and which to preserve.
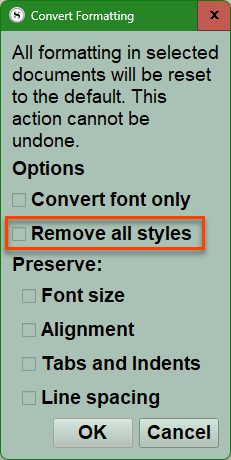
If you do not select Remove all styles, then any text with a style already assigned will NOT be converted to the default formatting. Additionally, text that has been marked with Preserve Formatting will not be altered by the conversion, much in the same way that the compiler will leave them alone.
To Preserve Formatting follow these steps:
1. Select text to preserve its formatting.
2. Use the Menu command Format > Preserve Formatting and check the box and this text will be highlighted.
Note: To unselect, reselect the same text and use the same menu command and uncheck the box.

Where To Find Your Formatting Settings
Your default formatting can also be adjusted using the Menu command File > Options > Editing > Formatting. Note that these formatting settings here apply to all projects you create in Scrivener, unless you have checked the box Use different default formatting for new documents in this project. This if found using the Menu command Project > Project Settings> Formatting. When you do this, formatting set up in your Preferences/Options will be overridden by whatever formatting you have set in Project Settings for that particular project. This means Formatting changes made under Project Settings override Formatting changes made in the Options Panel under Editing and Formatting sections.
You can create a personal Default Style rather than use those built into the project already as default styles for every NEW Project. Note once you have a Style you like to use when working with Scrivener Projects, you can either include this in your Custom Project Templates or Import into the Styles Panel of your current Project from another Project. (discussed below in this blog)
Using Styles as a Search Tool:
Styles that do Nothing (but can be searched for):
An example would be using a highlight color for italics for a specific character’s thoughts. You could name the style for the Character’s name and searching for this text style would show examples of the character’s thoughts throughout your project, but this highlighting option like a different text color and strike-through and highlighting can all be removed at the time of compiling by checking options in the third Compile Panel under settings. Using this method a character’s thoughts could be assigned a highlight color and name (for example) Bob’s Thoughts. This highlighting style can be searched for AND removed at the time of Compiling. Below is an image of what can be removed at the time of compiling.
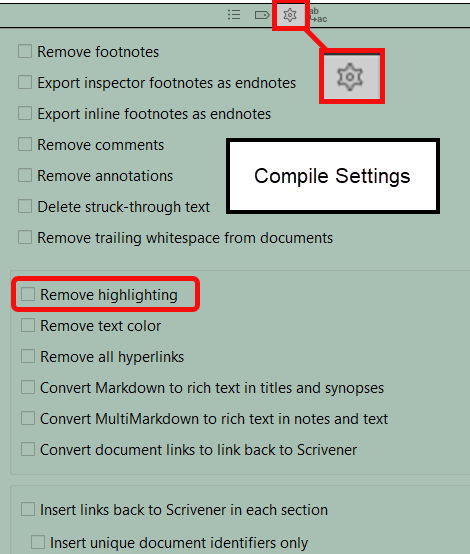
The Third Compile Panel
Importing Styles:
Ways to import Styles:
1. Use the Menu command Format > Style > Import Styles …
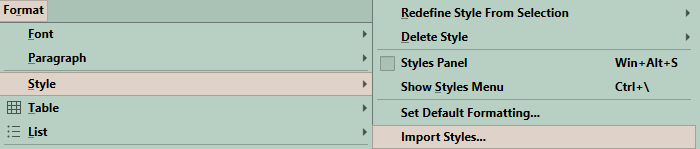
2. Use the Styles panel to Import Styles (This can be reached by using Menu command Format > Style > Style Panel, or the Keyboard shortcut- Windows key + Alt + S
The panel is divided into a Paragraph Style section which includes Paragraph and Paragraph + Character styles.
Below this is the Character styles which can be applied directly to text even inside a single paragraph or across several paragraphs.
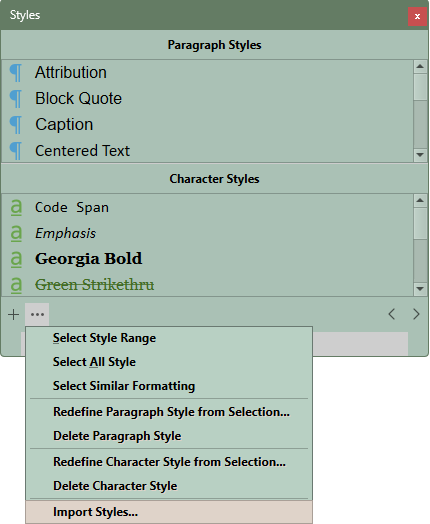
The … options give multiple choices you can use to refine the appearance of your project as you work.
When you click Import Styles, then the Windows Explorer window opens and you navigate to where your full Scrivener Projects folders are saved and click the one folder you want to import Styles from.
You import Styles by choosing the PROJECT FOLDER ITSELF not a specific FILE within the current uncompressed active project folder. Once you choose the project folder you want to import the Styles from, then those styles will be added to the Styles panel.
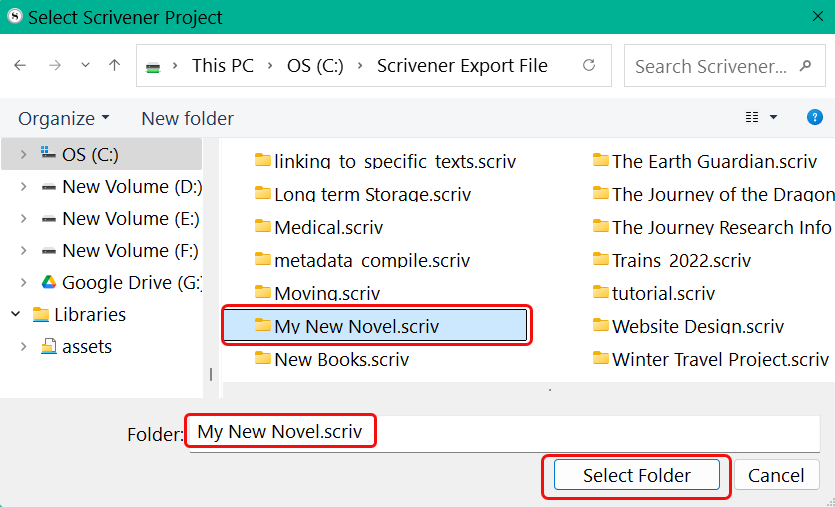
When you need to copy a stylesheet from one project to another, you must first locate its project folder (ending in “.scriv”) in the Windows File Explorer. Use the Select Folder button to designate the specific project you want to import the styles from and choose the whole Project Folder itself.
Remember when importing styles:
— Styles that are identical in both name and formatting will be ignored.
— If the project you are importing from contains styles that have the same name but different formatting, you will be asked how to handle the import:
The Only 3 Options for handling Imported Styles include:
– Keep Existing Styles: No styles as defined in the current project will be modified. Only new styles will be imported.
– Replace Existing Styles: The formatting for existing styles will be updated to match the project you are importing from. This can be useful if you want to bring two different projects into parity with one another, or to update an older project with refinements made to newer ones.
– Add Imported Styles: This is the safest option. The conflicting styles will be imported as new styles (Scrivener will add a number to the style being imported with the same name as the existing one to keep them separate). You can then choose to keep them or discard them, or manually merge select styles while leaving others alone.
Why do Formattting Errors occur when importing text from outside sources?
How to avoid the formatting issues when importing text from outside Scrivener?
Formatting goes wrong if/when you import text from elsewhere (eg Word) because the text brings with it its own formatting information.
To avoid this situation, always use Paste and Match Style.
Two Methods to get there:
1. Use the Menu command Edit > Paste and Match Style.
2. Use the Keyboard shortcut: Ctrl + Shift + V.
Three Methods to Highlight Text:
Click the Highlight Marker in the Font Bar and click the box in the upper left corner to stop highlighting
Use the Keyboard shortcut Ctrl + Shift + H. (If you customize the shortcut for this, then this new shortcut will appear on the Format menu. Below the custom Keyboard shortcut became Alt + A.)
Use the Menu command Format > Highlight to add color or remove color (see below figure 1) from text. (The other method use the Format Toolbar and the Highlighter icon if added. Here you choose the remove color box as shown below in figure 2)
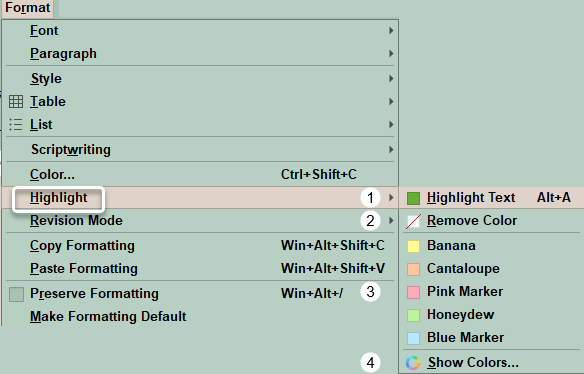
Figure 1
For Figure 1-
#1. This shows the current highlight color in Scrivener.
#2. This is the option to remove the highlight color going forward until you highlight text again.
#3. These are the five default colors included with Scrivener, but if you click Show Colors (#4) you can customize colors.
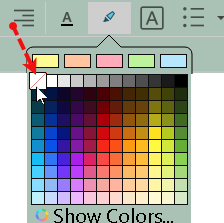
Figure 2
Two Methods to show invisibles:

1. Click on the (show invisibles) icon above if added to the Main Toolbar
2. Use the Menu command View > Text Editing > Show Invisibles
With the same Menu command View > Text Editing will show multiple things which can be displayed by clicking their checkboxes including:
(the) Format bar
(the) Ruler
Page view
Hiding Markup
Various Scrivening appearance options
Line numbers
Typewriter scrolling
Among other things
Document Template Formatting:
How can I give templates their own default text formatting? If you want the template to have a different formatting than the project’s default one, simply add a small amount of placeholder text into the document template. Now format it the way you want and new text placed here will have the same formatting. Leave the placeholder text selected; since formatting from the text selection is copied to the new item, you’ll only need to type over the placeholder text, rather than manually selecting and deleting it every time or select then use the command Paste and Match Style (Ctrl + Shift + V)
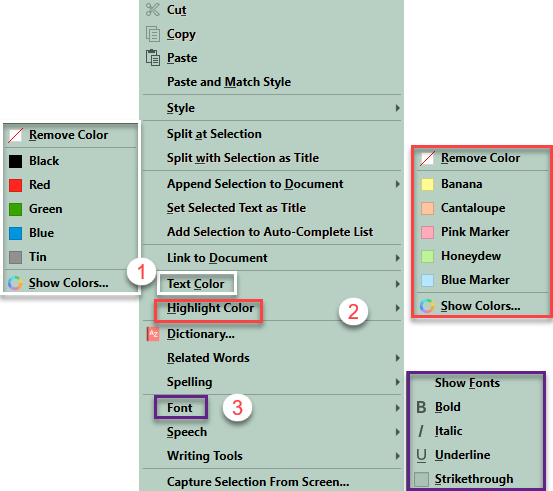
Right-click Editor Styling Text options:
Right-clicking on text while inside the editor will reveal multiple options inside the Editor including:
Choices for changing text color (#1), highlights (#2), and font effects (#3) (see below):
Compile settings options for text formatting removal include:
Hopefully, this blog will help you approach styles with more confidence and have new ways to use this tool when you write.