Importing in Scrivener part one
Media files cannot be imported into the Manuscript Folder and must be stored in the Research Folder.
File types which can be imported into the Manuscript/Draft Folder include:
Microsoft Word (Docx, doc) which is the main format in the writing industry.
ODT (open document text) which is the format of Open Office and LibreOffice.
TXT (Plain Text). If this is imported as gibberish, then copy and paste from another program that can open the file.
RTF (rich text format) files, including TXT, RTF, ODT (Open Office DOC, DOCX.
Google files can not be imported directly but must be converted to RTF/TXT/DOCX/ODT/ or md. files first. Inside google docs use the menu command File > Download > and then choose a desirable format. You should now be able to import the converted Google Doc. If the format downloaded will not import, try one of the other download formatting options.
If you run into problems, either with speed or quality, using the more complicated .doc/x conversion process, then try converting the document to an RTF format.
Importing Scrivener Projects:
When importing an entire Scrivener Project, the selection point for the import will be ignored and the Scrivener Project will be imported into the root level of the Binder. The full binder structure of the project will be imported into a folder named after the Project.
All of the text, notes, and synopses will be imported with most of the metadata as well.
*** Scrivener Tip: Importing a corrupted project into a new blank project may enable recovery of corrupted project data files.
Once imported, any changes to the imported material WILL NOT SYNC with the original project source material.
Remember when importing text:
1. If rich text formatting is not critical, it is recommended that you copy and paste using the Menu command Edit > Paste and Match Style (or shortcut Ctrl+Shift+V). This method should ensure that text pasted from other applications is cleaned and usable within Scrivener.
2. If there are still problems, then try pasting the text into the program Notepad first. This program converts text into a RTF format and then you can import this converted text into Scrivener which should “clean” any problematic formatting. Recent Windows versions of Notepad have added basic formatting (bold, italics, etc.) and Markdown support, but these are applied within Notepad and require saving the file in the .md format to preserve these changes, otherwise, they convert back to plain text when saved as a .txt document.
In essence, think of Notepad as a raw text editor that reads characters and saves them without the extra styling information found in files from programs like Microsoft Word or Google Docs
File types that can ONLY be imported into the Research Folder:
Web Pages (HTML)
PDFs, media files, and images.
(Note: Images can be placed inside text in the Manuscript Folder, but can not be directly imported as an individual image file.)
Other formats such as Fountain, Plain Text Screenplays, and OPML formats found in Outlines and Mindmaps.
.mm (Mindmap) files which are the primary format of Freemind.
Most Image and Audio formats. Scrivener supports the main image file types (TIFF, JPG, GIF, PNG, BMP etc), as well as the main audio/visual formats (WMV, AVI, MPG, WAV, MP3 etc)
You can import any type of file into the non-draft areas of your binder. Although Scrivener cannot view every format natively, it can host those files and keep them organized together with the rest of your research.
File types unsupported by Scrivener will be opened in compatible external viewers using the Menu command Navigate > Open > In External Editor (Keyboard shortcut Windows Key + Alt + Shift + O).
*** Scrivener Tip: This command allows you to import anything. If you import an unsupported file type, it will appear in the editor as a link. Clicking on the link will open the file in the program associated with it on your machine.
Each imported image should be its own document in the Research folder. This allows you to bookmark images, and use image placeholders when writing and compiling.
Scrivener Tip: If you are having trouble importing documents from another software like Google Docs, Microsoft Word, etc then try creating a new blank test project. Import the text and experiment with the various ways Scrivener can convert documents to the formatting you want. These include (simple Paste (Ctrl + V), Paste and Match Style (Ctrl + Shift + V) and the Menu command Documents > Convert > Text to default formatting. As mentioned previously, you may need to import into Notepad to clear embedded formatting before importing into Scrivener. Once you have figured out how to convert the documents, use this solution in the original project and delete your test project.
Scrivener Tip: For large files consider importing these as Research File shortcuts to limit your project’s size. (This will be discussed later in this blog.)
Importing Facts:
I will not discuss importing Final Draft, Markdown, or Script/Screenplays documents here.
When you use the Menu command File > Import > Files for the Manuscript, then this will open the Windows Explorer, but ONLY those file formats which can be imported will be visible in Windows Explorer.
If you cannot import a file into Scrivener’s Manuscript/Draft folder, then check its file type. Are you trying to import non-text files into the Manuscript/Draft folder? (This is not allowed) Only text documents can be directly imported into your Manuscript/Draft Folder. (You can copy and paste images inside these text documents.)
Importing text documents of any kind may incur data loss depending on the original format.
Importing files from your computer does not remove or alter the original files in any way.
Any Imported File will be inserted in the Binder below the currently active Binder document when you use the Import file command.
To Reset Paragraph Formatting of an Imported document.
a.) Select a single imported document, or all of the imported documents in the Binder.
b.) Now use the Menu command Document > Convert > Convert to Default Formatting to apply your current default formatting to all the selected documents.
Ideally import text files using the rich text format. (RTF).If the document is saved as a RTF file, then this will preserve footnotes, comments, or images. This is best used for complex files. When importing or pasting a RTF file that has been styled, the style information itself will be removed from the text. The formatting will remain intact in most cases, but the link tying that formatting to a specific style will be severed. This can include complex formatting found in Excel. Here you may consider saving an image of an Excel table to use to save the data.
If a document’s rich text formatting is not critical, it is recommended that you copy and paste using Edit > Paste and Match Style (or Ctrl+Shift+V). This method will ensure that text pasted from other applications is clean and usable within Scrivener, in much the same way that pasting text into Notepad and then back out again would “clean” it of all formatting.
When you import files, you will see a message from Scrivener that says that imported files will be converted to RTF files for editing. This warning also notes that if it is a text file, then it may lose footnotes, images and their proper positioning when it is converted to RTF formatting.
Scrivener can import Docx files directly. If you run into problems, either with speed or quality, using the more complicated .doc/.docx conversion process then try importing the material in a RTF format.
Individual Documents or groups of Documents from another Scrivener Project are imported where you drag them with the mouse into the Binder. (Remember: Media and non-text files must go into the Research Folder.)
However, when importing an entire Scrivener project, the selection point will be ignored. Such items will be imported into the root level of the binder (Which is at the bottom of the Binder in the Trash folder). Once in the Project, you can then drag them anywhere you want. (Following the rules laid out earlier.)
Importing files as Research Shortcuts lets you view the files without adding substantially to the overall Project Size. The shortcut will be broken if the file is moved or its name is changed. If you share a cloud folder between two computers, EACH computer must establish a link to the file you import as a File Research shortcut. This is because the WHOLE path to the file will be different on two computers.
Importing
There are three ways to import documents from other programs:
Drag and Drop. In File Explorer, select the files you wish to import and then just drag them straight into the Binder, Corkboard or Outliner views. When dragging folders, all of the contents of that folder will be added recursively, and the file structure on your disk will be recreated in the Binder. This also works when importing documents from other open Scrivener Projects.
The Menu command File > Import > submenu (various options)
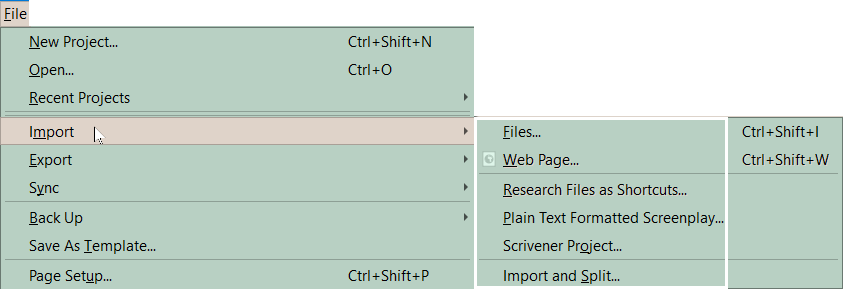
The Import submenu includes the ability to directly import from the Web, if you have the URL. The type of file being imported will determine some of the import options offered by Scrivener.
The Import and Split Process:
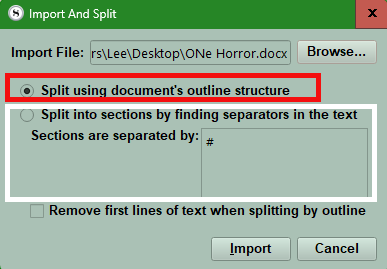
NOTE: In the cases where the imported material has some sort of innate or defined structure, the File > Import > Import and Split… command will attempt to convert that into an outline hierarchy. Items including Word processing stylesheets, Markdown style headings, Final Draft and Fountain slug-lines, and text with manually supplied splits (for example, inserted hash tags) can all be split automatically using this command.
1. Use the Menu command File > Import > Files
2. Click the Browse button and use Windows Explorer to browse to the folder where you stored the file you want to import.
3. Click open and the dialog box will appear with options on how to split. The file will be imported and split below the current document in the Binder.
4. You will see the Import and Split panel. (see below) You will have the options to import via Outline Structure, or by a separator which you insert where you want the document to split such as at scenes or chapters. The default symbol is # but this can be anything you choose, like ***. Your choice should be something that will not normally appear in the Novel as it currently exists.
You can try importing using both methods to see what comes closest to what you want.
3. Copy and paste.
This third method will nearly always work in a pinch and will often be the easiest or best way to get small bits of information (or even large chunks if you prefer) between different programs. Use the Keyboard shortcut Ctrl + Shift + V to paste and match (the) style (of the current Scrivener document). If the result is not what you want, then use the Menu Command Edit > Undo and try the simple copy and paste (Ctrl + V) to see if this produces a better result.
Scrivener Tip: You may find a combination of methods may work, using the simple paste command to import the document and then formatting parts of the new document.
Note: When using the Paste and Match Style keyboard command, the copied text is treated as plain text, so all formatting such as font weight and style are lost, as are hyperlinks. I have also found this process can delete spaces from some text.
How does Scrivener handle imported files?
For importing Text Files into the Manuscript/Draft Folder:
When importing text documents of any kind, these are internally converted to a format Scrivener can work with (This has no effect on the original file data or structure when you import it.). Some formatting or even data may be lost in the translation, such as documents with complex embedded information, like Excel spread-sheets.
** An alternative that will preserve hyperlinks and font weight and style is to copy and paste your text, then select a segment of text from within any document with the formatting you wish the newly imported text to match and select:
1. Format > Copy Formatting
2. Then select the newly imported text and click Format > Paste Formatting.
If you are using this method for large amounts of text consider adding these functions to the Format Toolbar (Use the Menu command View > Customize toolbars). You can add both the Copy and Paste Formatting icons to the Format Toolbar.
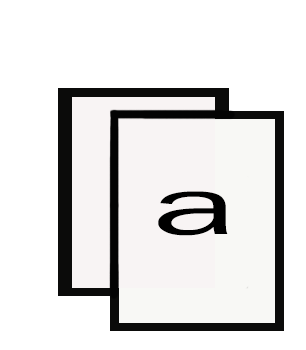
Copy Formatting Icon
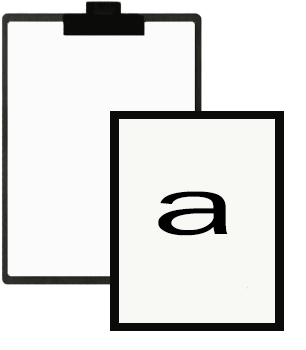
Paste Formatting Icon
Use the Menu command File > Import > submenu to import other file types into the Research Folder:
Beyond the supported formats, including text files, you can import any file type into the non-draft/Research areas of your binder. Although Scrivener cannot view every file format natively, it can at least host these files, keeping them organized together with the rest of your research, where they can be opened in external viewers with the Menu command Navigate > Open > In External Editor (Keyboard shortcut Windows Key + Alt + Shift + O)
If you have any formatting issues where the text lines up on the right page margin, this could be a formatting issue. If you set indents manually, remember that the Right indent is measured from the left side and NOT the right. So, for example, if you set a left indent of 1cm and a right indent of 1cm, the software is just going to give up and do the best it can (one letter per line) because you’re asking the text to start and stop at the same point on the page. 1cm (left) and 15cm (right) might be more useful (For an A4 page layout as an example.).
Specific File Type imports:
Importing Web Pages into the Research Folder can use four different methods:
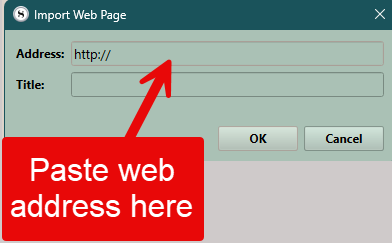
1. Use the Menu command File > Import > Web Page (enter URL) and a full web page is downloaded and archived. Scrivener will also convert this page to Rich Text, but attempt to keep the page layout close to the original. You will be able to access this information offline, but the web page will not be updated going forward. It is an archived personal copy.
2. Use the Menu command Documents > Convert > Web Page to Text to convert an imported web page into a text file.
3. Use the Keyboard Shortcuts Ctrl + A to select whole the Web Page online and Ctrl + C to copy the web page and choose one of two ways to paste the page into Scrivener. Using the Keyboard Shortcut Ctrl + Shift +V will paste only text from the Web Page into Scrivener. This shortcut will import the text and match Scrivener’s current default formatting. If you paste the Web Page using Ctrl + V will preserve web images, but includes a lot of extraneous information as well. This can be edited inside of Scrivener.
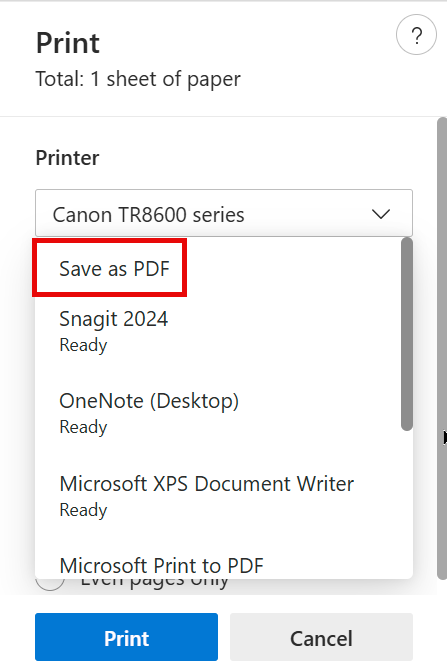
4. Import the page as a PDF copy. Click the Print option on a Web Page in a browser. Then using the Print options menu, choose the print destinations and select Save as PDF. This newly created PDF of the Web Page can then be imported into Scrivener as a PDF inside the Research Folder. This will save the web page at a point in time and will not update.
Importing Word Documents:
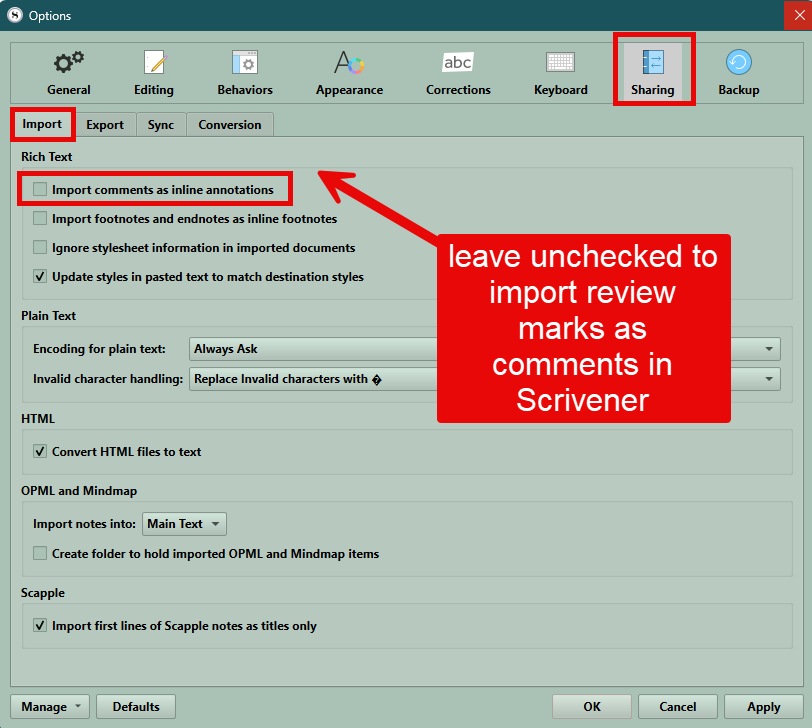
Options Settings should be as below. File > Options > Sharing > Import
Importing Word Document Facts include:
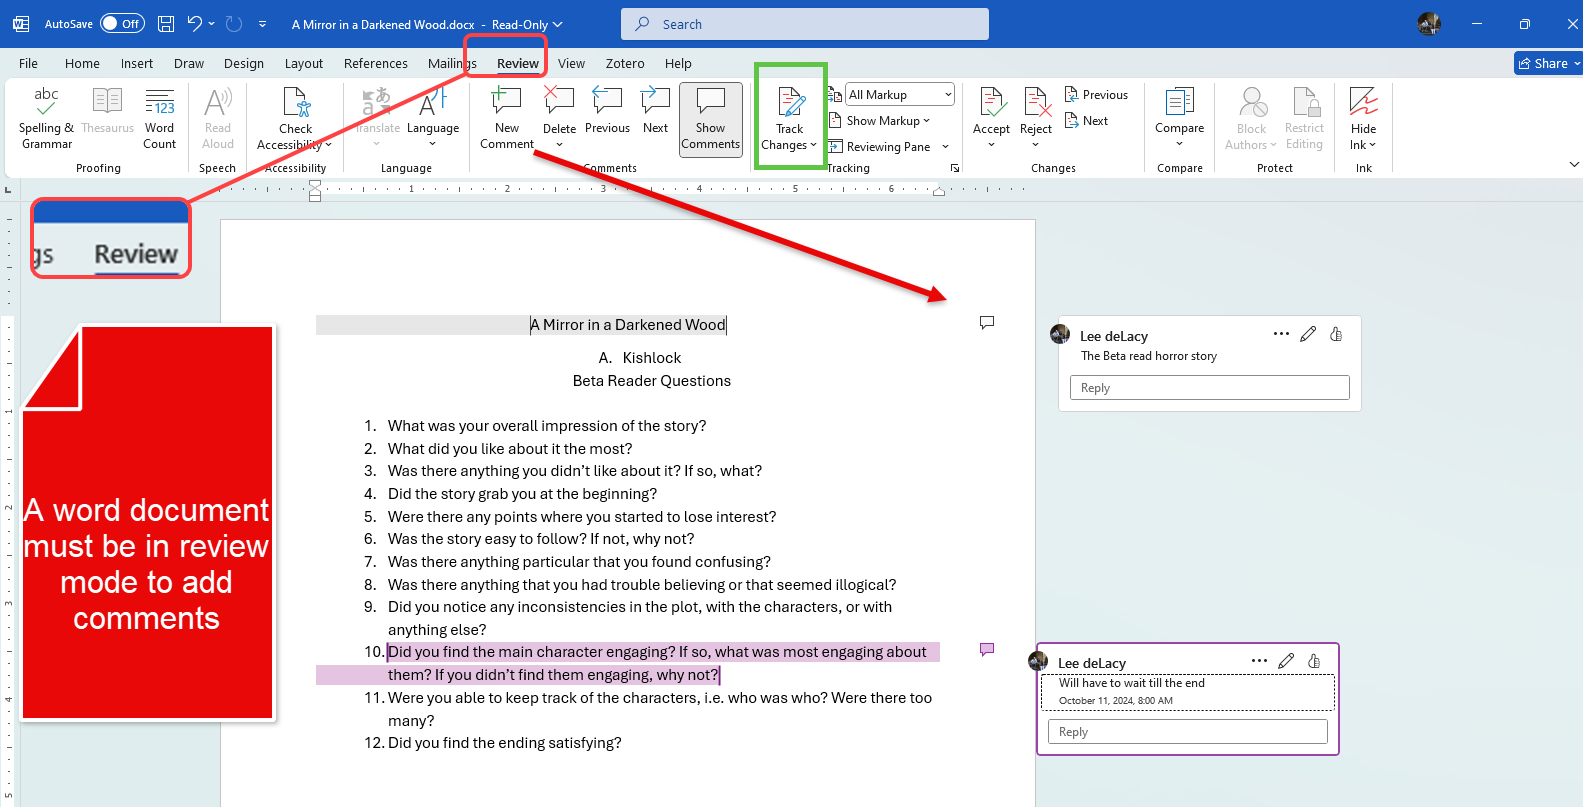
Comments in a Word Document should import as Inspector Comments when you remove the tick from the option tab to Import Comments as Inline Annotations. (see above)
If you are having trouble seeing comments when importing, you can drag the file into the Scrivener Binder and convert at that time. You can drag a novel in as one whole file and manually split using the right-click options of Split at Selection Or Split with Selection as Title.
In a personal attempt with a document, this did work. I did not see markups for deletions and insertions, but comments were visible. (Or using copy and paste works as well.)
If you open a Word document and Select All (Ctrl + A), copy (Ctrl + C), you then use Paste and Match Style import inside a scrivener file (CTRL + SHIFT + V) but this command will strip out images and any formatting code that may have been in the document. Using simple Paste (Ctrl + V) will often include embedded images.
If the results when using one of the above importing methods do not give the desired results or appearance then you can try another method.
Importing other Program’s Exported Files:
Export from a Note taking App and Import the exported file.
The app and export options include:
Apple Notes exports in PDF or Markdown formats.
Obsidian natively exports as a PDF, but available plugins allow exporting in a variety of formats.
Notion exports in PDF, HTML, or Markdown.
Bear options, include Markdown, RTF, PDF, and others.
Evernote can export notes in its own ENEX format, which some note-taking apps can import, but it can also export notes in Markdown as .txt files.
OneNote exports notes as PDF or DocX.
Microsoft Word documents can be directly imported into Scrivener and split with the Import and Split function. Available export formats besides DocX include PDF, TXT, RTF, Web Page (HTML), ODT, XML.
Google Docs exports in a wide range of formats, including RTF, DocX, PDF, ODT, TXT, Markdown and Epub. RTF is the easiest format to add to your Scrivener project. Google Docs can not be imported directly into Scrivener.
Scrivener Tip: Consider exporting Google Docs as DocX which can be then imported into Scrivener.
Web Pages If you select the web page you can use the Menu command Documents > Convert > Web Page to text. (See discussion above in the blog for more details.)