The Editor-Using the split view
The Editor’s Split View:
The chances are that from time to time you are going to want to split the editor so that you can view two parts of the same document, two entirely different documents , or a document with a group view in the other window (Corkboard or Outliner View) at the same time. Comparing two files or a file and a group of files at the same time helps with writing or editing. Another option if you have multiple monitors is to using Quick Reference Panels to open a file or folder in a larger view to compare to the current editor. There is no limit to the number of these you can have open.
We will discuss various ways to utilize this split view while working in the Editor. Pick the method(s) which best work with work flow.
Remember in the Split View.
When you first create a split view, both sides of the split will be the same binder document.
Each split also has its own persistent history for what has been previously viewed
Each split can have its own view modes, zoom settings, Outliner columns and so on.
You can adjust the relative size of the splits by dragging the strip in the middle that separates them.

To reset the splits to be of equal width or height, double-click the splitter bar symbol (see below) with your mouse when the symbol appears when hovering over the split bar.
You can load a binder document directly into the inactive split by holding the ALT key and clicking on any binder document.
You can clone a split window by dragging its Editor Icon onto the other header bar in the split view.
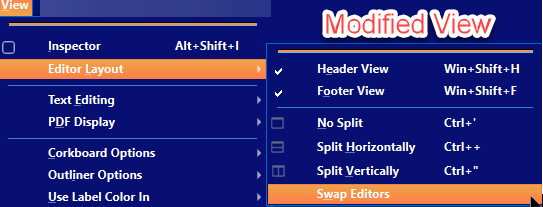
Swapping Sides in Split View-
View > Editor Layout > Swap Editors will flip the editors as well as each window’s history and settings.
This allows you to alter the side or top or bottom location of your active window in the Split editor view.
How to display the Split Editor View
There are three simple ways to achieve this split view in the Editor window:
1. Method One.
The first is within the editor window itself.
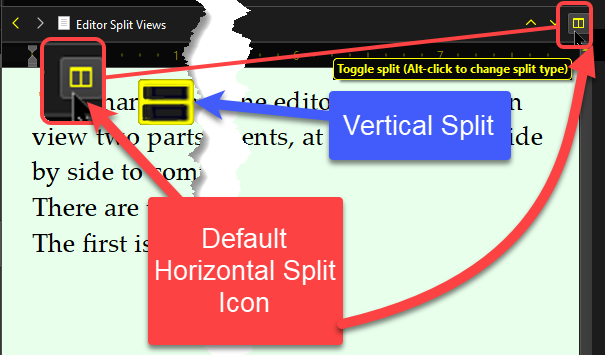
Go to the Header Bar at the far right and you will see an icon to split the editor into two panes either horizontally or vertically. Clicking this will split the editor into two vertical or horizontal panes. You can change the orientation by holding the alt key and clicking the symbol again. In the Split View, clicking Horizontal/Vertical Split icon again reverts to the current actively viewed file/group view only in one window. Scrivener will remember the last split view, either horizontal or vertical.

2. Method Two.
Use the Menu command View > Editor Layout

Use the menu options to choose your preferred split view. (Note: In this menu you can decide whether to show the Editor’s Header and Footer or even swap editors.)
3. Method Three.
Use a keyboard shortcut. (see the associated shortcuts above) Note for the horizontal and vertical keyboard shortcuts you must also press the shift key to get the + sign or " sign with the Ctrl key to make the command work.
The Active and Target Editor in Split views:
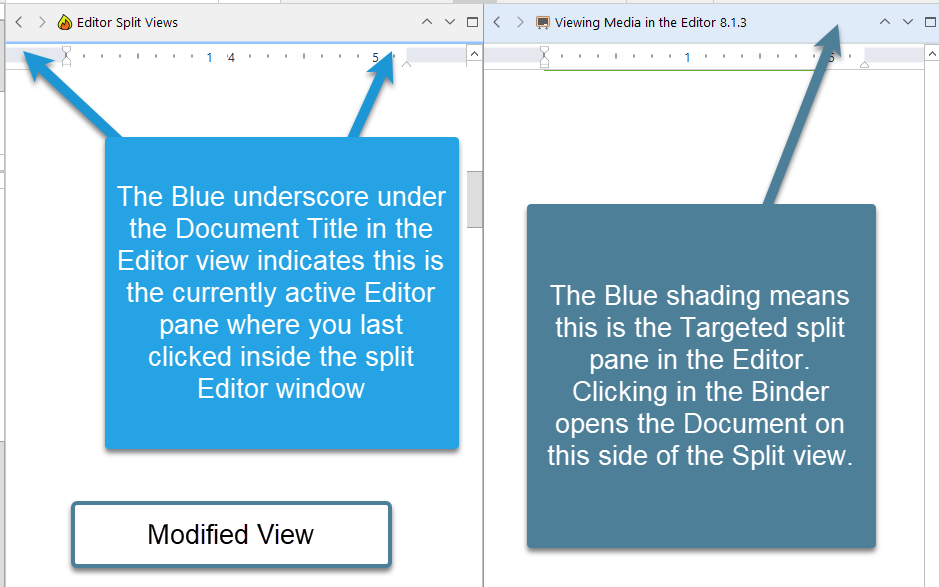
— Targeting: the split that is targeted will have a blue background and blue underline (see below). (Depending on the Scrivener theme, this appearance may vary.) Any Binder document you click on will load within this active split window.

— Active: This is the split view pane you are currently working in/last clicked in. The active split is indicated by a blue underscore along the bottom of the header bar.

— By Default, the Targeted and Active Editor window in the split view are one and the same, though this is not always true. (see below)
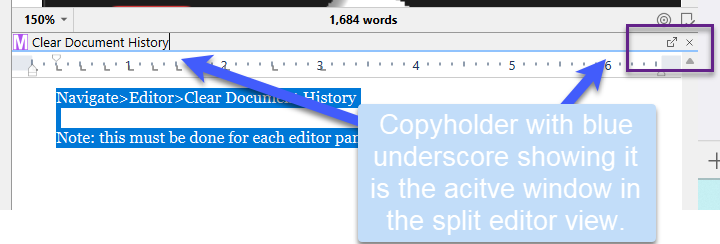
Note: A Copyholder window can be active as well and will have the blue underline.
The header bar will use a background color (theme dependent) to indicate different states.
The header by default is always gray when the Editor is not split.
The header in a split view will be blue, indicating it is the active split and any Binder Document you click on will open here.
Red indicates the current pane is locked and clicking in the Binder will not open any Documents in this Editor Window [Either Pane]. (A Scrivener theme can affect the appearance of the various states.) However, you can drag Binder Documents into the non-locked pane to view them in the Editor.

Binder Selection choices for the Split Editor View
These control what happens when you click on a specific file/folder in the Binder.
The Other Editor is whichever pane is not currently active/targeted.
The First Editor equals the bottom or right editor window depending on the split orientation.
The Second Editor equals the top or left editor window depending on the split orientation.
Both Editors will open the same file/group of files in both panes. Most helpful if use two different Group views to look at both panes. (ex Scrivenings view and the Outliner.)
If you choose none, then clicking on a Binder document will have no affect on the Editor.
Open Non-group items in the other Editor will open single files/folders in the non active window. (Can load group items into this window by clicking on a Bookmark for a group of items for example.)
If Select the Second editor, then the Left Editor window (in the vertical view) will be the active window and underlined in blue in the header bar and clicking on the Binder will open an item in this view.
How to open files into the inactive window in various situations?
A.) From the Binder using the Keyboard
IF the scenarios below do not perform as discussed next then look at your Binder Selection Effects. (This should be set to the Current Editor.)

1.A If you are already in a split view, then holding down the Alt key when clicking on items in the binder will load that file/folder into the inactive split, leaving you free to continue in the primary split.
1.B Holding the Alt key and clicking binder items while the Editor is in a single Editor view will split the Editor and open the selected Binder file in the inactive pane.
B.) Using Right-Click Options when choosing a Binder Document:
Right-clicking any Binder item will display an Open > in Other Editor option. This button may also read “In Bottom Editor (for Horizontal)” or “In Right Editor (for Vertical)” depending on how you have your two Editors aligned.

C.) From the Quick Search List
A.) Hold down the Alt key and click an item in the Quick Search List to open it in the inactive window of a split view.
B.) Highlight an item in the Quick Search List by hovering the mouse over it and now click the enter/return key to open it in the inactive split window.
Either method will split the editor into two views and load that file/folder in the inactive split. This leaves you free to continue as you were in the primary split. Or in the single editor window view, open a split view with the file in the inactive window.
D.) From the Bookmark Panel (and NOT from the Inspector Bookmarks)
Holding down the Alt key when clicking on items inside the Bookmark Panel will load that file/folder in the inactive split, leaving you free to continue as you were in the primary split. Doing this while the Editor is in a single Editor window view will split the Editor and open that file in the inactive pane.
Keyboard options for Editor navigation
Left clicking on a Binder item and hitting the space bar opens the document in a Quick Reference Panel.
Left clicking on a Binder item and then Alt + Shift + O place the document in the active window of the Editor in split view. (Or will create a split editor view to do this if the editor is currently in single view.)
Left clicking on a Binder item and then Ctrl + Shift + O places the document in the inactive window of the Editor in split view. (Or will create a split view to do this as above.)
Using Menu commands for the other Editor
You can use this to effect the other Editor window, and the keyboard shortcuts are visible on the menus below. You must be in split view for these controls to work.

When set up properly clicking a file in the Outliner or Corkboard View will open that file in a regular editor in the other window of the split editor view. You can with this quickly cycle through files and check the text of that file in the other editor window without leaving the Corkboard or Outliner view.
This applies to both the Outliner and Corkboard view. You must check to make sure you have a link option chosen under the Navigate menu. Options default to none when you are in the editor view and must actively choose when in the Outliner or corkboard views.
Copyholders
A Three or Four way split is possible as well in the editor using Copyholders, but unless your Monitor is very large this view may not be helpful. Often, you are better served using multiple Quick Reference Panels floating on the other monitor screens to have better visualization of multiple files at once.
Copyholder facts:
Copyholders do not possess all of an editor’s functions.
However, they are capable of displaying the media itself or the text content of a document. They also have a unique header bar.
A Copyholder is a way to clip a document from the Binder on to the Editor and it will generally stick to you actively remove it. This will maintain the view of a file until you actively change it and can be helpful when you moving around in the Binder.
A Copyholder will never have a blue underline in the header. (They can be an active keyboard focus, but just a click of a binder item will not open it in a Copyholder.) Use the Menu command Navigate > Move Focus to > Copyholder to shift the keyboard focus to Copyholder.
Once you have viewed several items in a Copyholder, then the standard keyboard history shortcuts become functional. (Ctrl + [ or Ctrl + ] will flip forward or backward through viewing history.)
The Copyholder Header Bar:
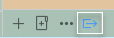
This is a simplified version of the Editor bar. On the right you will see two symbols. An X to close a file and a special symbol which if clicked will open and change the Copyholder into a Quick Reference Panel and remove it from the Editor window.
You can also use the Menu command Navigate > Open > as Quick Reference (Panel)

An image of the special symbol to open the Copyholder as a QRP.
An example below of a split editor view and a Copyholder window as well.

There are Five different ways to load an item into a Copyholder:
1.) Using the Menu command Navigate ▸ Open ▸ in Copyholder menu command to clip any file you are looking at to the current editor window.

2.) Use the Right Click Menu command to open any file in the binder, Corkboard or Outliner views into the active editor window or active split (if the editor is already in split view) as a Copyholder.

Note: You can also load the current file in the Editor into a Copyholder as well using the right click menu options. This can be useful to hold your place while you navigate elsewhere.
3.) Click and Drag
A.) First - Hold the Alt key.
B.)-Second - Now click and drag any Binder item while continuing to hold down the Alt key. When you drag the item over the Editor’s header bar, you will see a small curved arrow indicating it will now be loaded as a Copyholder panel into the editor as a new Copyholder window.
**** If you do this and drag over an already open Copyholder, then the file you dragged there replaces the current Copyholder file.

Most often you would do Click and Drag from the binder, but nearly every icon you see in Scrivener can be dragged to a header bar.[[ Lee, 11/10/2025 8:00 AM
Added could do with a quick reference panel but did not work]]
4.) While you are focused inside/on the Copyholder (ie the active window) then if you highlight and hit enter/return on any Quick Search results then this will open in the active Copyholder window.
5.) Load a Snapshot directly into a Copyholder.
A. Right click on any snapshot in the editor offers the option to view the snapshot in a Copyholder.
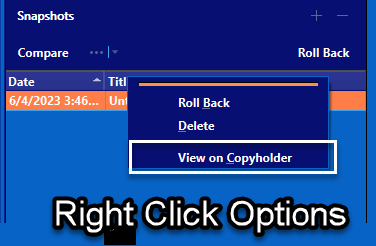
B. Drag a snapshot into the header bar of a Copyholder to open the Snapshot in this window, BUT using this method you LOSE the ability to turn the Copyholder view of the Snapshot into a Quick Reference Panel.
The icon (below) will be gone when a snapshot is dragged into the Copyholder.


Note: The Recent option (above) will show all the files that have been opened in this Copyholder, and you can choose and go back to a previous file quickly this way.
When using Quick Search, pressing the Enter key with the focus in a Copyholder, will result in your Quick Search results being loaded into the Copyholder with the current focus of the Scrivener program.
If the Copyholder is already present, you can change the Copyholder content by:
Dropping a Binder document’s icon directly into the Copyholder header bar.
When using the Quick Search, then pressing the enter key WHEN the active focus is in a Copyholder will open that item in the Copyholder view and replace the current content.
Linking Splits
If you have an Outliner or Corkboard in one pane of the Split View Editor view, you can by linking arrange to have any items you click in these views automatically opened in the inactive editor for viewing.
Use the Menu command Navigate > Outliner Selection Affects > Other Editor menu toggle is enabled this feature will work. (This when active works in both Outliner and Corkboard Views).

Why this might not work?
1. Not in Split Editor View (only works in this view)
2. Link Icon(see above) is not active which is blue in light themes or a deeper grayish white in dark themes.
3. The Proper option under Navigate menu dropdown options was not chosen. (see altered Menu image below) (This will be Outliner or Corkboard Selection Affects depending on which Group Mode is active in the Split View Editor. [Must also be inside these views to change these options.])

When set up properly clicking a file in the Outliner or Corkboard View will open that file in a regular editor in the other window of the split editor view. You can with this quickly cycle through files and check the text of that file in the other editor window without leaving the Corkboard or Outliner view.
This applies to both the Outliner and Corkboard view. You must check to make sure you have a link option chosen under the Navigate menu. Options default to none when you are in the editor view and must actively choose when in the Outliner or corkboard views.
Linking Splits together with the Auto-Load feature:
Both the Corkboard and Outliner views have an auto-load feature that when enabled (Do this by clicking the symbol when the Editor is in a split view), will load any selected item(s) from the Corkboard or Outliner into the other split view Editor window or the editor’s Copyholder (if on the same split), much like when clicking on an item in the binder.
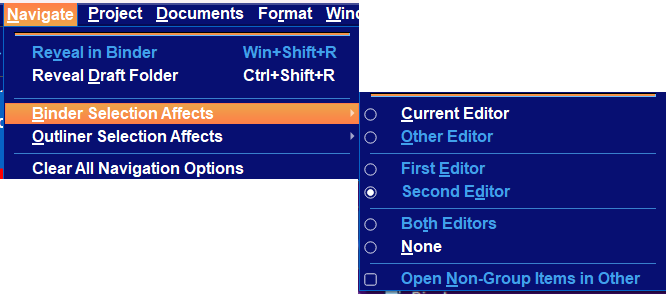
These options are chosen using the Menu command Navigate > Corkboard (or Outliner) Selection Affects.
The three options include:
None (the autoload icon will go gray)
Load into the other split editor window (The Icon is blue and appears as below)
Load into a Copy Holder on the same side of the split Editor view as the Corkboard/Outliner view. (The icon is blue but appears as below.)

Making Splits Load by Type
If you would Binder files/folders to open in specific places when the editor is in a split view mode, then use the Menu dropdown-
Navigate > Binder Selection Affects >

Once choose an option then clicking on any binder item will follow the specific rule you selected above. (See definitions below)
— Current Editor: This is the default behavior out of the box. Whichever split you clicked in last will be targeted.
— Other Editor: Whichever split is not currently active will be targeted. This way your current workspace is never disturbed choosing binder items to display in the editor.
— Left (Top) Editor Only: The top or left split (depending upon orientation) will always display binder clicks no matter which split is active.
— Right (Right) Editor Only: The bottom or right split (depending upon orientation) will always display binder clicks no matter which split is active.
— Both Editors: In this special case, both editors will update whenever you click on something in the binder. This will most often be useful when using two different group view modes.
— None: Neither editor will update when using the binder. In this mode of usage, you will always need to manually open items into an editor. This can be done by using the Open commands in the right-click menu or Navigate menu, or by dragging and dropping binder files into the header bar.
— Open Non-Group Items on other menu toggle may achieve what you are looking for. (This would always force a single file if clicked to open on the other Editor window in the split view as a text file when the group view is shown on one side of the split view. Group items selected from the Binder will be opened in the currently selected group mode you have chosen.)
When the Navigate > Outliner or Corkboard Selection Affects > Other Editor menu toggle is enabled when you are viewing a Corkboard or Outliner view, then this feature will work together like the autoload feature shown above without having to click the autoload option icon.
You will see the same symbols used for the Autoload options.
Load into the other split editor window (The Icon is blue and appears as below)
Load into a Copy Holder on the same side of the split Editor view as the Corkboard/Outliner view. (The icon is blue but appears as below.)
When clicking on a group in the binder, two things will happen:
— The selected group will be loaded into the split the binder affects, displayed using whatever view mode you are using in that split ie as an Outliner view or Corkboard view for all groups you select.
— If the affected split is displayed as a Corkboard or Outliner, then the other split will automatically load whatever file you were working on last within that group. The view of any group opened this way in the other Editor or Copyholder will be based on how it was last viewed.
For example if you click on a folder called “Geographical Distribution” and then within that folder click on a sub document called “Summary”, loading the text of that file into the other editor, when you next load “Geographical Distribution” from the binder, “Summary” will automatically load in the other split as well. It’s worth noting that this may load a group into the other split, if the last thing you clicked on in “Geographical Distribution” was a subgroup
Manipulate the Other Editor while still writing in the active Editor window either via Menu commands or keyboard shortcuts.

Keyboard commands which affect the Other Editor window:
Move Forward in History (Alt +}) Activates the “Forward in Document History” behavior for the other split.
Move Backward in History (Alt+ { ) Activates the “Backward in Document History” behavior for the other split.
Remote Scroll the other Editor window Up (Alt +↑ key) Scrolls the other editor back a page, similar to having pressed the PgUp key with it active.
Remote Scroll the other Editor window Down (Alt + ↓ key) Scrolls the other editor forward a page, similar to having pressed the PgDn key with it active.
Scroll the other Editor to the top of the Previous Page (Win key + Alt + Shift + ← key) Scrolls the top of the previous page into view, when the other editor is in Page View or displaying a PDF.
Scroll the other Editor to the top of the Next Page (Win key + Alt + Shift + → key)
Controlling media in the other editor by using the Ctrl + Enter/return keys to stop or start media files in the other editor window.
Clearing All Navigation Settings in the split view at once.
If you use Menu command Navigate > Clear All Navigation Options
The following changes will be made:
— All previous navigation settings will return to default.
— The Navigate > Binder Selection Affects mode will reset to default open in “Current Editor”, and the “Open Non-Group Items in Other” option will be disabled.
— The Navigate > Outliner Selection Affects mode will reset to “None”.
— Navigate Editor > Lock in Place option will be disabled.
— Finally, the Inspector will be unlocked from working with only one split (this happens as a secondary effect of closing split views)
Locking the Editor-
Locking Group Mode-
1. First choose a Folder or Document with subfolders
2. With this folder/group open choose a view Mode
3. Right click on Editor header and the icon and choose Lock Group View. (If for example, you choose to view a folder in the Corkboard view, then even if looking at this folder and others in the Outliner view, when you click on this folder/Document (with subfolders) it will open and be displayed as a Corkboard till you unlock this mode.)
Note: Depending on your Toolbar Icon size you may not see the lock image on the Group mode Icon.
Note: If a folder is duplicated then the setting locking group mode view will be duplicated as well.
Locking in Place-
Four Methods
1. Right Click on the document Icon in the Editor header.

2.) Right click on the far right portion of the header on the up (∧) and down (∨) carets and see the option to lock in place, as well as Lock the Inspector to the Editor. In a split view either side can be locked to the Inspector.
3. Use the Menu command Navigate > Editor and pick one of the options below.

4. Use the Keyboard shortcut (Alt + Shift + L). Note this shortcut only works for Lock in Place (see above). The other two Lock options do not have a keyboard shortcut.
Once locked the header bar will change color (A reddish color in the default light theme, but varies depending on the Scrivener theme.) when in single editor view without a red line.

In the split view, a red line is added beneath the Editor window that is locked in this view.

Locking Inspector to the Editor-
This forces the Inspector to ONLY display information for the Locked file. In split view, it will look like this.


1. You see the reddish color showing the file is locked.
2. A red circle with an I will appear at the right of the header bar to show the Inspector is locked to this document. If you click elsewhere in the Binder, the file appearing in the split Editor view will change, but it will still be locked to the Inspector for viewing comments, metadata, document bookmarks, snapshots, and Notes. The file area will still be blue to show it is the active file. If you switch to the other Editor view, however, that document’s information will NOT appear in the Inspector.
3. You can ALSO now right click the icon in the Editor window and Lock in Place as well (both can be functioning at the same time) A red line will appear under the file to show if it is locked and the header will change to a reddish tinge.
*****Note: You can remove these settings in #2 and #3 by simply expanding the unaffected view and eliminating the split. This will clear the locked settings above.
4. The Inspector header will also have this reddish tinge in the default Scrivener theme. (Again colors will vary based on your chosen theme.)
Use the Swap Editor Menu command View > Editor Layout > Swap Editor to move the Locked document to the left side in a split editor view. This will allow you to see the Inspector information on the unlocked documents you are viewing. You can then drag the Locked Document’s Icon into the active file’s Document Bookmarks or drag the icon onto highlighted words to create a Document Link without leaving the currently viewed item. You can then switch the document you are viewing and repeat the process.
*** If the Editor is not behaving as above, then go the Menu command Navigate > Binder Selection Affects to see what is your current choice when clicking in the Binder.
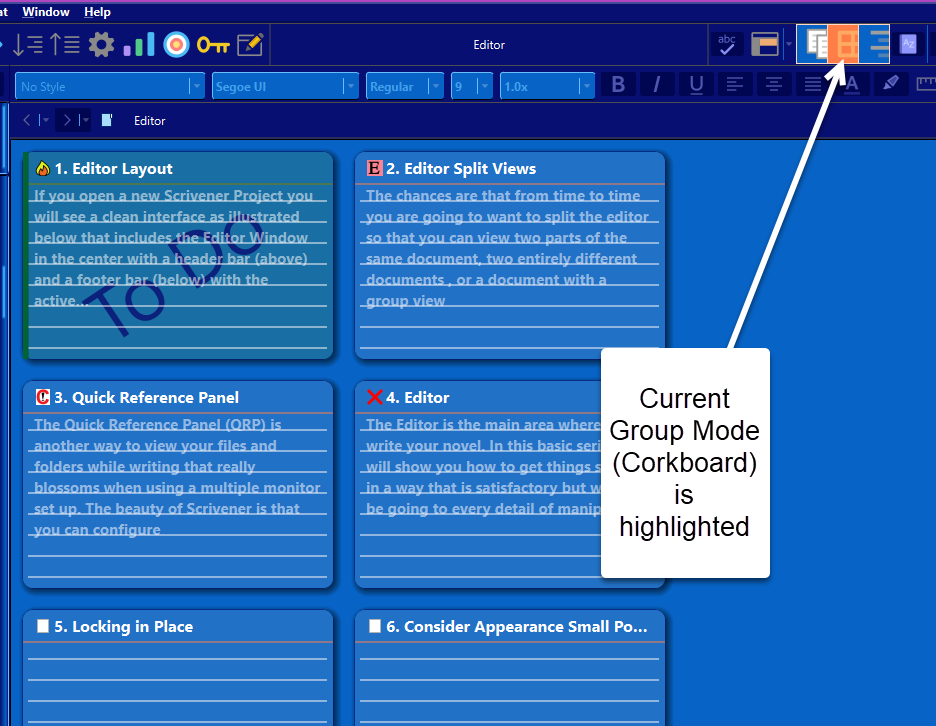
Editor View Modes (The group Icon will tell you which mode you are in.)
Scrivener’s editor has four modes—four different ways of viewing your work—and learning how and when to switch between them will make your Scrivener experience much more comfortable. The four modes are as follows:
Quickly change between modes using keyboard shortcuts Ctrl 1, 2,3
1. Single Document Mode
In this mode, the editor shows the contents of a single document, whether it’s a text document, a folder, an image, a PDF file or whatever. If viewing a single document and then you click on the Corkboard or Outliner group views, you will only see a blank page and the statement that the Editor has no subdocuments.
The editor is in single document mode right now.

2. Corkboard Mode (The File or Folder chosen MUST have subdocuments.)
In Corkboard mode, the editor shows the subdocuments of the current document as index cards on a corkboard. The group mode icon will show the icon that shows small index cards.

3. Outliner Mode

Outliner mode is much like the Corkboard mode, allowing you to see the subdocuments of the current document, except that it shows them as rows and allows you to choose which various columns of possible information to review.

4. “Scrivenings” Mode (if highlight multiple folders then go to top— click View>Scrivener can show multiple files to appear as one continuous document allowing you to edit multiple chapters at once)

Scrivenings Mode Icon
“Scrivenings” is the term for Scrivener’s combined text mode, and it is one of Scrivener’s coolest features. It allows you to view or edit multiple text documents as a composite—as though they were one long document.
An important point to note about Scrivenings is that you cannot make textual edits across the individual document boundaries, so if you try to select a range of text that spans more than one document block and try to edit it, you will not be able to. (Just move on to the next document to continue editing.)
However, within each section, every edit you make will be automatically saved into the original document.
The Undo Command
Can be done by one of two methods:
1. Use the Menu command Edit > Undo (Redo)
2. Use the Keyboard shortcuts Undo (Ctrl + Z)/ Redo (Ctrl + Y)
This can be done multiple times to reverse several changes at once for example if accidentally delete something in the Editor you have the ability to go back multiple steps.
However, Each component of Scrivener has its own undo stack which works as long AS you STAY IN that component. If you are in the Editor and accidentally delete something you can reverse it if you stay in the Editor, but if you go to the Outliner, you have broken the Undo stack in the Editor and can no longer reverse any changes there.
The Undo command will work inside comments and footnotes to restore note text you may have deleted.
Each document has its own Undo history, which means you can go back to documents you’ve edited previously and undo changes made there without undoing changes made more recently to other documents.