importing in Scrivener part two
Now, let’s look at other things you may want to import into Scrivener.
Importing PDFs:
You can convert an imported PDF in the Research folder to text using the Menu command Documents > Convert > PDF to text. PDF files must first be imported into the Research section of your project before they can be converted.
Scrivener Tip: Leaving the imported PDF unchanged is the best way to preserve any included images and special formatting. Consider importing these as “Research Files as Shortcuts” to keep your project size smaller. (This will be discussed later in this blog.)
Importing Scapple Documents: (3 ways)
1. Drag an individual Scapple Note/Notes into Scrivener and each note will be converted into an individual Scrivener document.
2. Use the Scapple Menu command File > Export > Various Formats. The PDF format saves the Scapple Document closest to its true form. Some of the other import forms can break up a Scapple Document in a confusing way.
3. Drag the Scapple File into Bookmarks as Document Bookmark in either the Binder or Research section.. This can be opened by clicking on the application icon, or using the Menu command Navigate > Open > in External Editor.
Note: Using methods 2 or 3 will preserve images included inside your mind map.
Importing > Research Files as Shortcuts (Aliases)…
Rather than fully importing items into the project, this command establishes a link between the original item and the project. This link will be broken if the original item is moved or renamed, but you will be given the option. Creating links is the solution to avoid large increases in the Project size. Linking to these files will have them present appearance wise in the Binder as a fully functional file, though the file is hosted elsewhere.
You must click on the Research Folder in your Project, then use the Menu command File > Import > Research Files as Shortcuts … (If you click inside the Manuscript this Menu command will not work when clicked on.)
2. Linked resources in the Research Folder will have a small curved arrow in the lower left corner of the file icon.

An Image as an Alias
A PDF file as an Alias

A custom icon
A file’s custom icon will also show this shortcut arrow.
3. Windows Explorer will attempt to reestablish the link with any computer file which has been moved, but this can be unreliable. (These file paths are computer-specific even if they stored on a mutually shared cloud folder. This is because the User pathway is unique per computer.)
4. You can repair a broken link with the Menu command Documents > Change Shortcut Target and navigate to the file’s new location and update the file’s link to Scrivener.
5. Use the Menu command File > Import > Research Files as Shortcut to keep the research files external but linked to your project with a meaningful name. When using this command the Imported Shortcut (file) will be imported as a new document directly below the current one.
6. These can ONLY be imported into the Research Folder, but you can import multiple files at once IF they are in the same folder.
7. Everything you have learned so far about working with research files can be applied to linked resources. These items will act just like files imported or created in the binder.
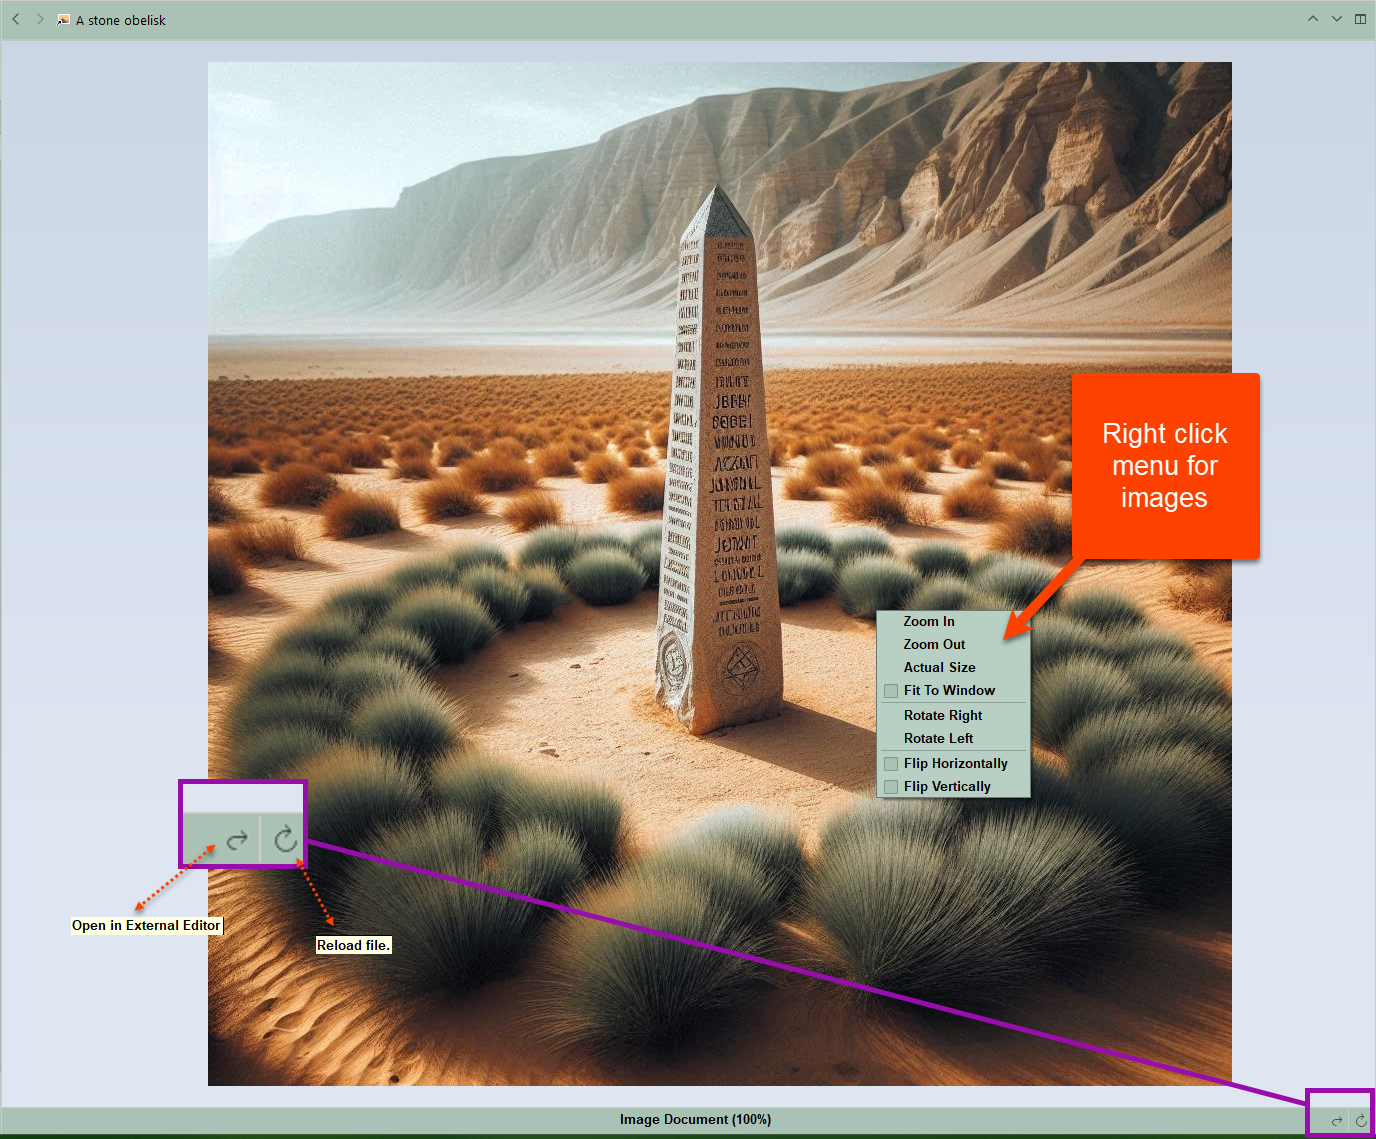
8. This works the same way with images imported as Shortcuts (Aliases). It will behave like a binder image in every sense, but the footer displays the option to edit the image in a program that can handle this type of image. (see below) However, since it is linked to the project rather than inside the project, it will keep your project size smaller.
There are two methods to do this:
1. Use the Menu command File > Import > Research Files as Shortcuts
Doing this opens the Windows File Explorer, and you can go to the folders storing research material. You can add one or multiple files at once. Ideally, you should have a single or only a few folders where you store your Scrivener research files. Having Research files grouped in a single folder makes bulk importation possible.
2. Drag and drop in already existing window file shortcuts to media files (Such a PDF or Image file) into the Research Section (This can NOT be dragged into the manuscript.) If you have dragged in a file’s shortcut rather than importing the file, then the document can ONLY be viewed in an external viewer. In the image below, the shortcut would look like a Research File brought in as a shortcut with the small curved arrow on the icon (#1 below). However, when you click on the Binder entry it looks like the second #1 below with an icon with a blue shortcut and the document title underlined. Clicking the link will open the file in an external editor.(This applies to PDF and Image files, and I assume multimedia and web files, though I did not test these.)

This feature is only available for non-text-based files such as PDF files, images, multimedia, and web files which Scrivener can display in the Editor Window. You CANNOT do this for word processor or plain text files unless you export these as a PDF and then import the PDF to avoid this limitation.
Like any regular file, you can assign keywords, metadata, add Inspector notes, label colors, etc. They can also be viewed in split editor windows or with a QRP. Bookmarks can also be attached to these files as well.
****However, you cannot take snapshots of these types of files nor add comments/footnotes. (The Inspector for these types of files is limited. See the image below) The normal Inspector options you can still use are boxed in white. The red box area shows where the missing options for Snapshots and Comments would normally be.)
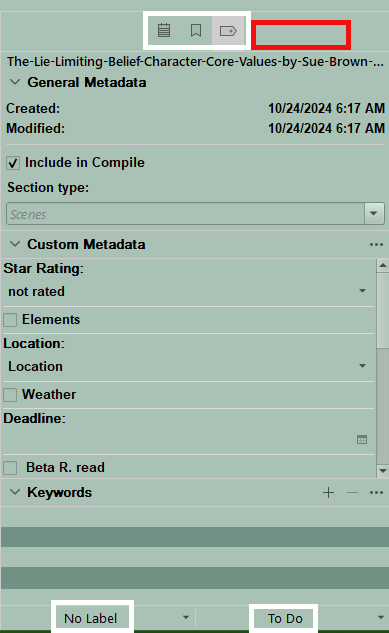
The disadvantage to linking is that if you move or sync the project to another computer, the research files will no longer be available. The links will stay in place, and all metadata, tagging, and Binder organization you have assigned will remain, BUT the source of the file will be inaccessible until you reconnect the link to the file on the second computer, even if the files are in the same shared folder on both computers. This includes a shared cloud folder.
The advantage to linking by either of the above methods is that you drastically decrease the increased Project size caused by directly importing these research files and images because these files exist outside the Project. This will keep the project nimble if you add multiple large images or PDF files to your Research folder.
Repairing Links:
Select the link in the binder that you wish to change or repair:
Use the Menu command Documents > Change Shortcut Target.
Use the file dialog box to reselect the source file for the item you wish to relink.
Unfortunately, this can only be done one document at a time.
Scrivener Tip: You can make this process easier by keeping all source files for linking in one location (A resource folder), even if it contains subfolders.
The magic that makes these file shortcuts capable of being followed around when renamed or moved depends upon a link that is specific to that one computer. I tested this using my home PC tower and my laptop. When you open the project on the second computer/laptop even if the files are stored on a common cloud folder, the link path will be different on each machine. You could keep both links to the file for both machines, while adding a letter combination to the link name which will identify which computer an individual Research Shortcut is linked to.
Linked files will have a small, curved arrow on their icon to indicate they are (imported) shortcuts and not the actual file. Even if you change the Icon, the small arrow to indicate the file is a shortcut will remain. An Imported Windows Shortcut to a file will have a blue curved arrow rather than the normal black curved arrow with the underlined file name. You must click on the underlined title of the file to view this in an external editor.
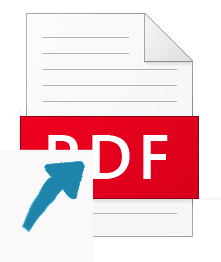
Below is how the icon appears (a blue arrow) if a Windows shortcut is used to link to a PDF/Image/Media file rather than a direct file link.
Examples of Images imported as research shortcuts.
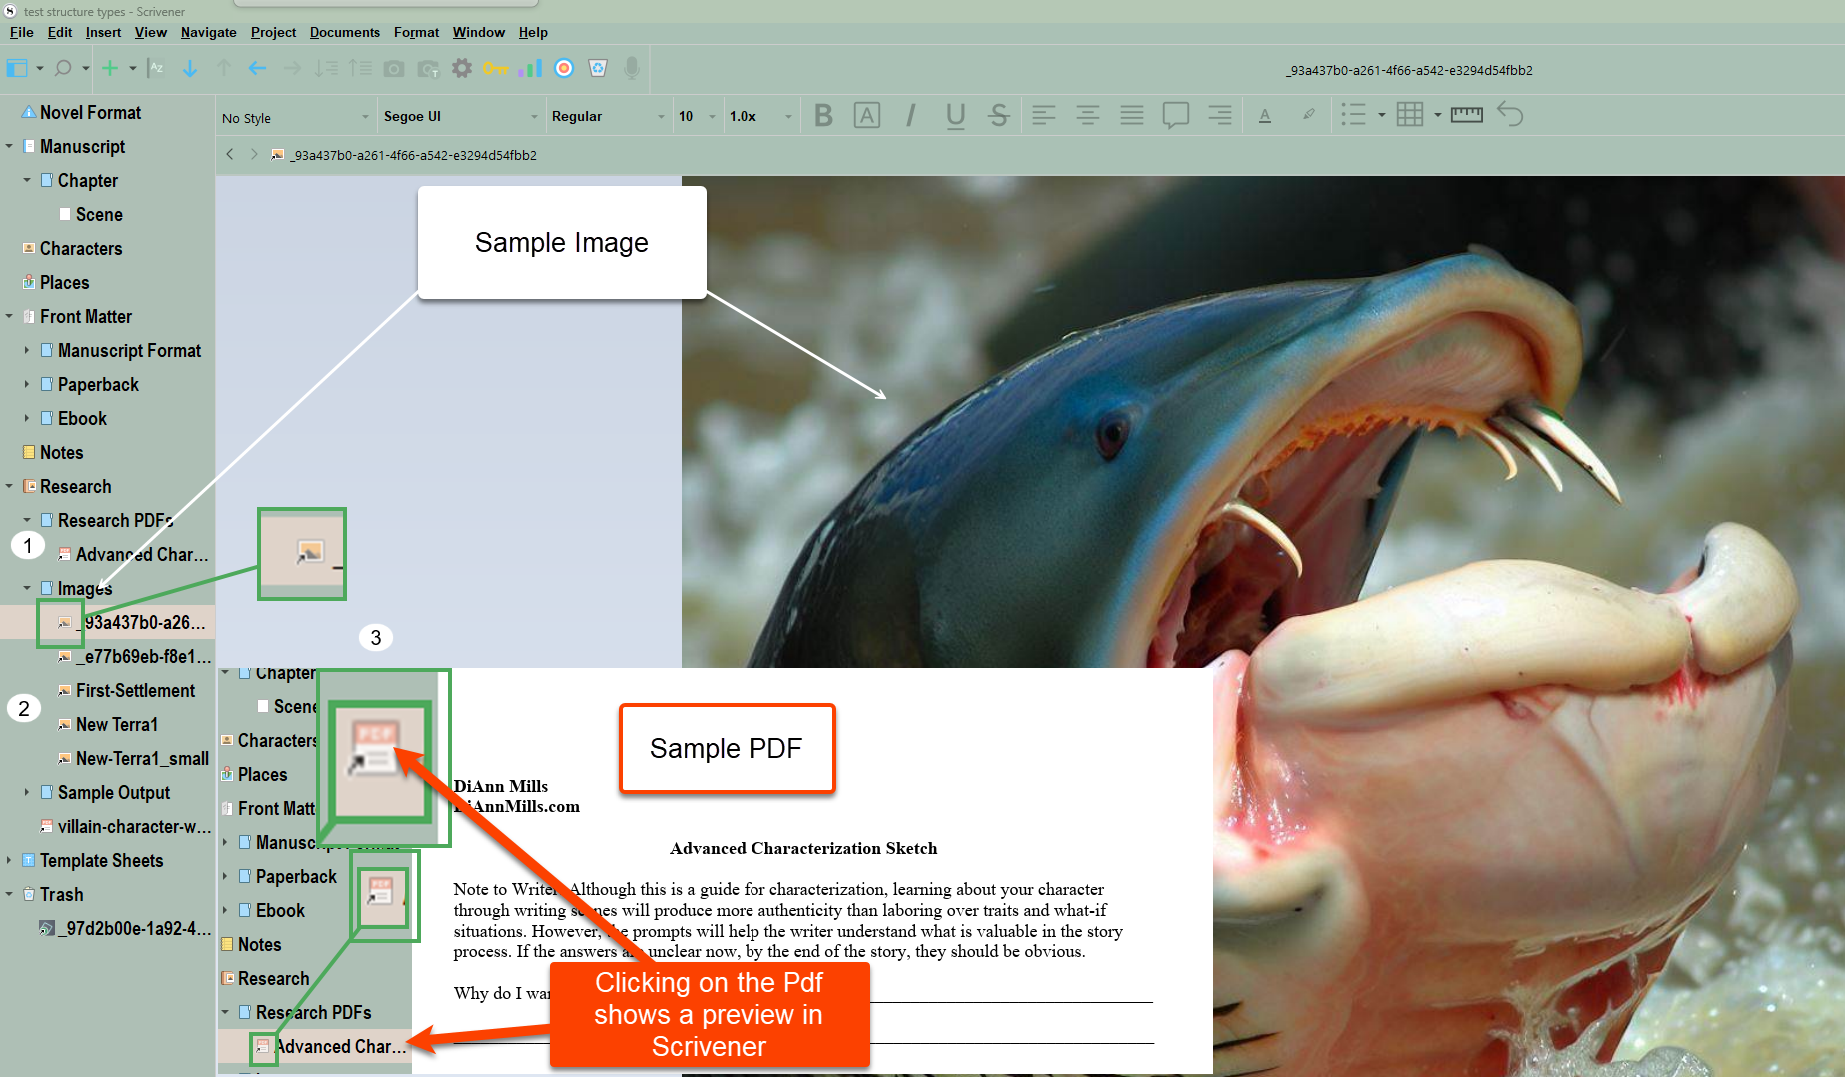
#1 is a folder holding research PDFs. Once imported, these documents(shortcuts) can be organized/rearranged in folders just like ordinary documents as long as they stay inside the Research folder.
#2 is a folder holding images. An example of the previews of both an Image and PDF are shown above.
#3 is adjacent to a blowup of the image and PDF icons.
Once in your project, these resources can be dragged into any document’s Bookmark Panel as a resource or into Project Bookmarks. These can be previewed in the Editor window.
If the file changes its location or its name on your computer, then the link is broken.
If you open the project on another computer EVEN IF the research files are shared on the same cloud folder the links will be broken. There are specific to the computer they were created on.
However, when importing Research files as shortcuts, you can select multiple files to import at once and these will all be imported as separate documents below the current document. These can be a mix of different files types (except text files).
Scrivener Tip: The ability to import multiple documents at once this way shows the advantage of keeping research files you want to import using this method in one location even if it contains subfolders.
Everything that applies to research files applies to linked resources. These will behave just like items imported into the binder. They can be organized into folders, have an index card, keywords and viewed like any other file in multiple editor views.
To locate the original source file for the alias, right-click on the item in the binder, then hold the Ctrl key, and select the “Reveal in File Explorer” contextual menu command which reveals its location on your computer. This HIDDEN option only appears when you hold the Ctrl key before or AFTER right-clicking on the document. If the document is a Scrivener file, you will still see the option appear, but clicking on the option produces no action.
Importing Images
You should import Image files using the Menu command Insert > Image from File (Keyboard shortcut Windows Key + Shift + I).
Dragging an image into the Resource folders raises a warning dialog reminding you of this.
Scrivener Tip - Ways to write while viewing pictures:
1. Use the Split Editor view with your writing on one side and an image file in the other editor window.
2. Right-click on the image and use the option Open > Open in Copyholder to see an image while writing.
3. Right-click on the image and use the option Open > Open in Quick Reference (Panel). This can be expanded for a good view of an image especially in multi-monitor setups. If you use a Quick Reference Panel, you can add bookmarks for the image if the bookmark area is opened, or have notes visible if open the notes option in the QRP.
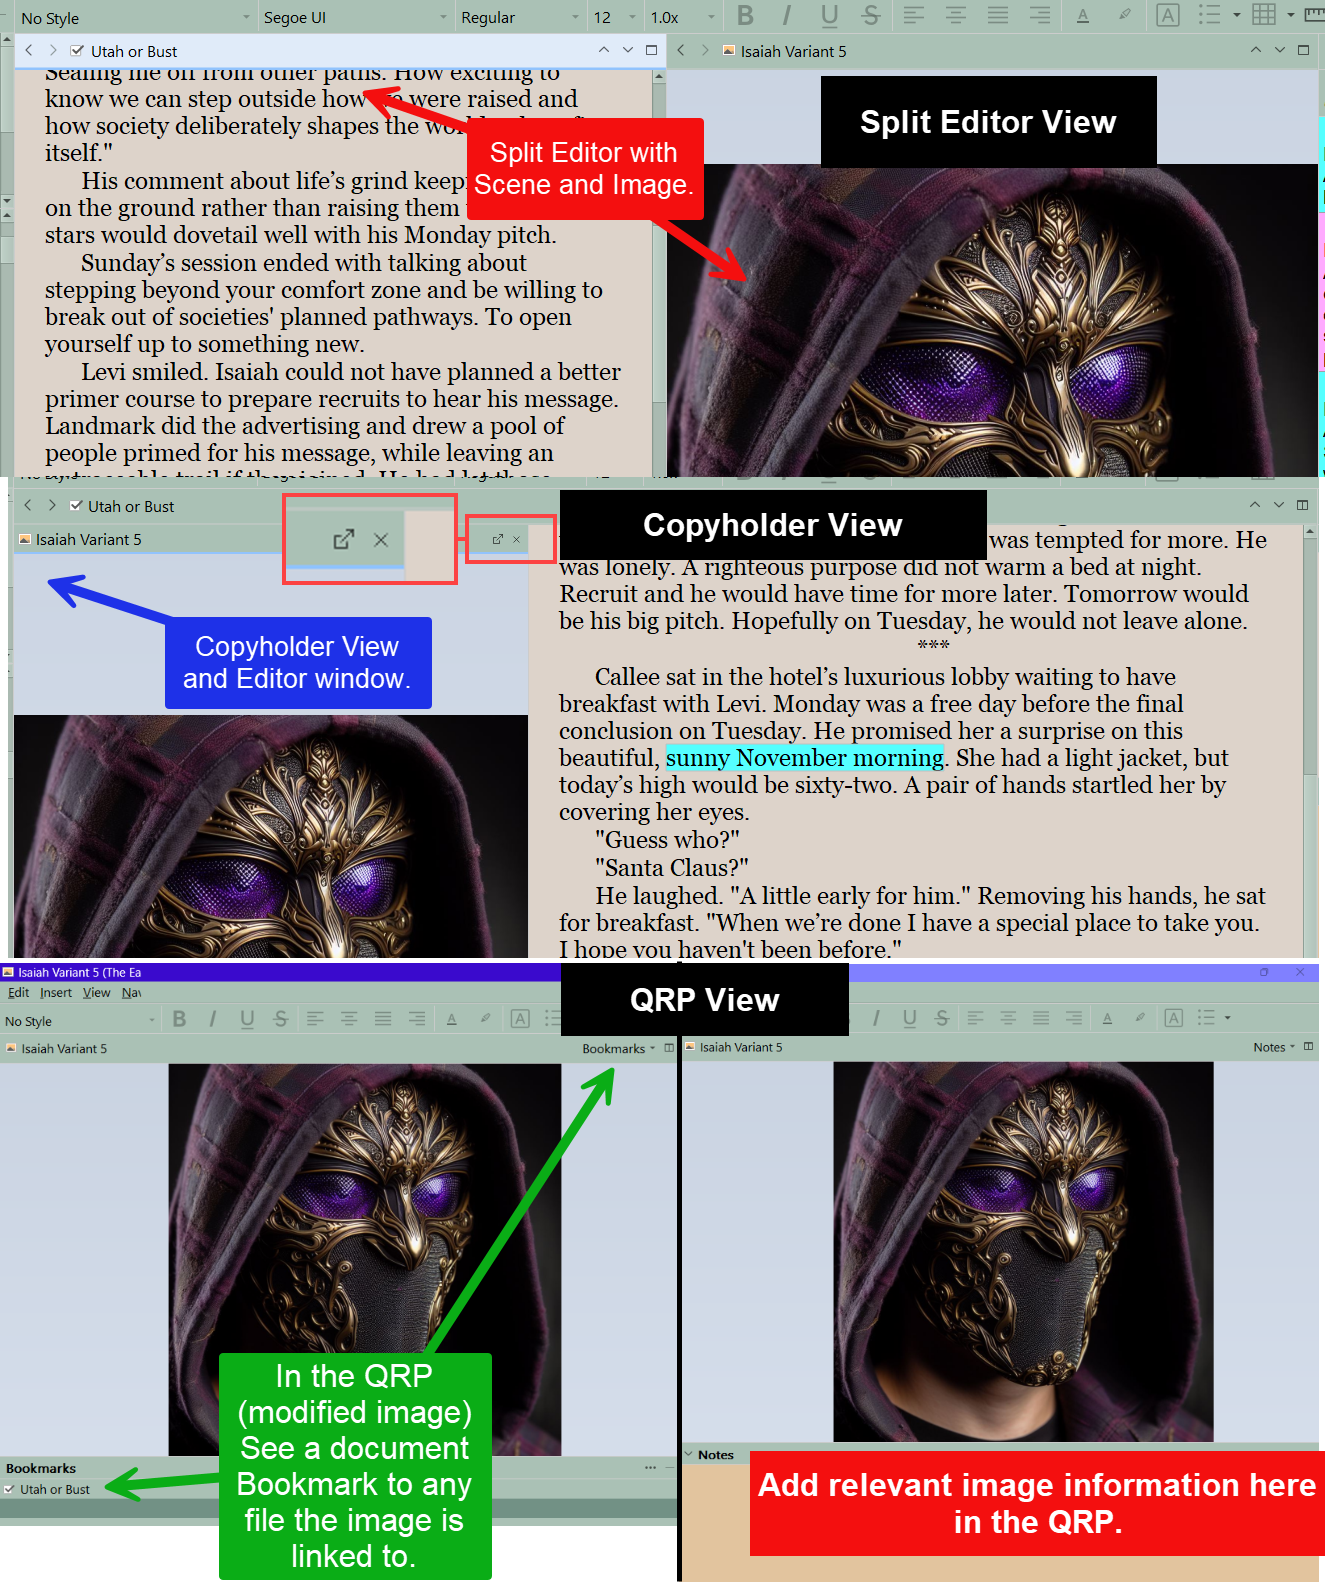
A pretty picture of a setting may help you describe the right mood. A portrait may help you introduce your characters to the reader. An intricate scheme helps you explain a complicated process. A building layout, or local map can help you stay oriented in a location while writing. The possibilities are limitless. Each imported image should be its own document. This will help with Bookmarks for your project and help with Compile Process especially for choosing Front and Back Matter.
Importing and Splitting:
Not every document can be easily split in a predictable fashion using this tool—some might require a little reading to figure out where structural splits are best placed. In that case, it is best to import the document normally, as a single file, and then use the available tools for Splitting the Document.
Use the Menu command File > Import > Import and Split.
Using this option, you can import a single external text file and convert into multiple documents within your Binder. To do so, you’ll first want to find the text file you’d like to import on your computer and open it separately. You will need to pick a symbol for Scrivener to use to split the large file into smaller pieces. Next, you need to decide where to place your separators. Classically, this is before a chapter/scene header in an imported novel for example.
The specific mode of operation depends upon the file extension. For example, if you import a .Docx file, options pertaining to the stylesheet import will be presented. If you import a .md or .mmd Markdown file, then Markdown options will be presented.
Follow these steps to get the results you want:
Before you do this, open the file. Decide where you’d like the file to split into multiple documents when imported into Scrivener. This can be done with the original document’s Outline Structure or unique symbols at the desired separation point. You can use a pound sign, an asterisk, whatever you’d like. (Make sure to use unique symbols such as #,@, %, or $ which do not normally occur in the document, or you may inadvertently split the document in the wrong place.) When you’ve finished inputting the symbol that will separate your file into multiple pieces, save and exit your file.
Now use the Menu command File > Import > Import and Split (The current Binder document will have the imported (and split) file placed below it with all the subdocuments as well.).
This option splits the larger file into sections where you placed the separators in the text. ***These separators are removed during the import process.
Make sure the source file is closed (when importing your file) and unlocked or Scrivener will generate an error message.
Import Interface:
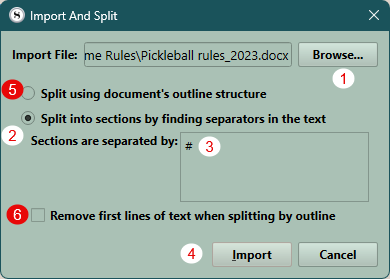
#1 Browse- Click to open Windows Explorer and locate the file to import.
#2 Choose to split based on the document’s outline structure or separators.
Choice #1-
File has a structure:
If you're importing a Microsoft Word file created with styles, such as Heading 1, Heading 2, etc., Scrivener can detect these headings and split the document into separate files at each heading, with the file names adopting the names of the headings. Choose Split using the document's (outline) structure (see #5 above), then click Import. (see #4 above). If you check Remove first lines of text when splitting by outline (see #6 above) this will strip out headings from the text and just leave the body of the text alone. (You may want the Compile process to supply section headings.)
Choice #2-
Your File has no obvious structure, and you will need to place separators. Pick something unlikely to appear in your imported text, such as ***/#, etc.
With this option you'll need to manually insert characters into the document where you want to separate it into smaller pieces using unique characters to delineate sections. This is best used for documents that aren't formatted with styles.
A. Insert a unique symbol to indicate the split point. You place this symbol inside the box (#3) prior to using the Import and Split command
B. Click the Import tab (#4).
If the final result is not exactly what you want you can split manually with the Menu command Documents > Split > at Selection (Keyboard shortcut Ctrl + Shift + K). Or you can use Documents > Split > with Selection as Title (Keyboard shortcut Alt + Shift + K), but in this case the currently selected text will be used to create a document title.
This can be reversed by using the Menu command Documents > Merge to combine any documents inadvertently split.
Importing Problems:
Sometimes, importing material from word processors may yield text which is indented artificially, causing the text to be narrower than it should be. You can use the Menu command Documents > Convert > Text to Default Formatting command to clean up large amounts of text at once.
You may wish to strip all styles from selected imported documents when importing from other word processors when unwanted styles are also imported.
If you find some styles are not importing as expected, try another format like RTF, ODT or DOCX and make sure your Windows computer supports the font you are trying to import.
Importing an Excel Spread Sheet
Importing directly from Excel into Scrivener does not work, however copy and pasting the table into Word and then copying again and pasting into Scrivener does work.
You can export an Excel Spread Sheet as a PDF file and then import the PDF file to preserve the Excel table/spreadsheet structure. Or your last option is to capture and save an image of the table and import this image.
You can import the table from Scrivener into Scapple but you will have all the information but no table structure. Each horizontal line will be separated from the other by a blank line and then the information will be displayed with a line containing each cell in the horizontal row running from left to right. Consider capturing an image of a Scrivener table to use as an image in Scapple.
Importing whole Scrivener Projects:
It is possible to import another entire Scrivener project from your computer into the binder of the current project, using the Menu command File> Import > Scrivener Project...
Using this command will open the Windows File Explorer. Now navigate to where your Scrivener Project folders are kept and click on the FOLDER of the Scrivener Project you wish to import. (Remember: Click on the folder itself to import the whole Scrivener Project, NOT the .scrivx file.)
The full binder structure of the other project will be imported into a single folder named after the project, at the bottom of the binder below the Trash Folder. All of the text, synopses, and notes will be imported, along with snapshots and most other forms of metadata. You may want to synchronize metadata between the current project and the one you are importing involving things such as keywords, labels, and custom metadata to make manipulating and using metadata easier. This tool can be of use if you work with software capable of exporting Scrivener projects, such as Index Card for iPad.
Certain types of Metadata can be shared between projects by the drag and drop method if the Project Settings windows for both projects are open. You can drag Section Types, Labels, Status, Custom Metadata, and the auto-complete list.
Note: This can also be done with Keywords. Instead of opening the Project Settings on both project you open the Keyword Panels and drag keywords. Keyword folders and their contained Keywords must be individually dragged over to transfer. The Keywords will all come across but the values will all be on the same level and you will have to move them to recreate your previous Keyword organization from the original project.
Though not metadata, you can drag a project’s stylesheet to another project as well.
Windows Tip: Importing a Scrivener Project can also be used to import, and therefore restore, corrupted projects.
If you have a project that has somehow become corrupted and can no longer be opened in Scrivener, use this command from inside a new blank project. Scrivener do its best to retrieve all the data. The outline structure may not be recovered from badly corrupted projects, but every attempt to import the raw data will be made.