The Compile panel’s Third pane part two
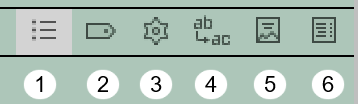
2. Metadata Settings
Some of the information fields found in your Compile output comes from information entered using the Menu command File > Options > General > Author Information panel. The title comes from the Project name by default, but you can edit this and save your changes when finished by holding the Alt key. The Compile button in the lower-right corner changes into a Save button. Clicking this will save your changes. In some instances, the information here can be automatically inserted using Placeholders which pull information from the Options Panel.
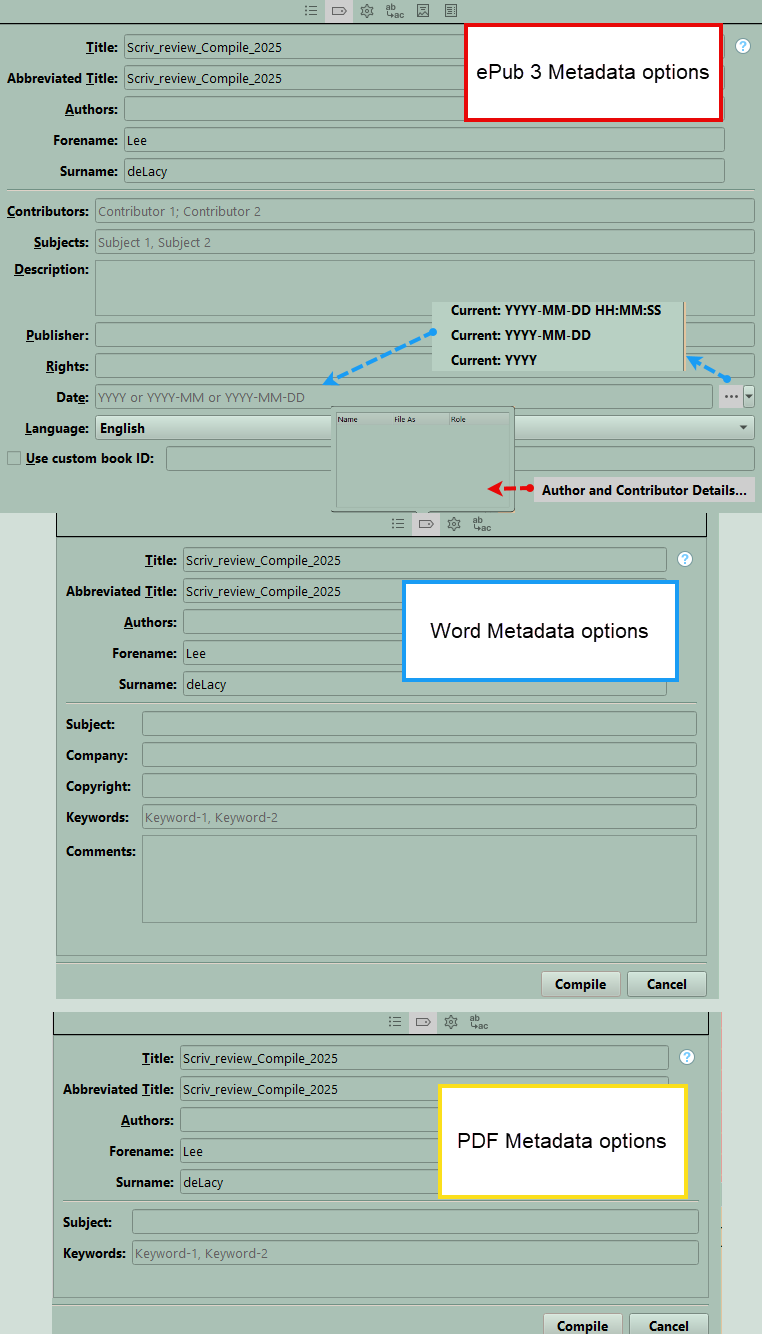
*** Metadata fields available will change based on final Compile output. Options for Ebooks, Word documents and PDF’s are shown below.
Scrivener Tip: If your project has multiple authors, then you will need to separate the names with a semicolon (;). However, Amazon’s conversion software does not recognize multiple authors. (Avoid semicolons when publishing with Amazon.)
IN THE LOWER HALF of the Metadata Pane you may see some of the fields below based on what format you are compiling to:
Subjects and Keywords can be entered. If you have multiple entries in either category, then these should be separated by a comma. When used with HTML files this information inserted here (for RTF, DOC, DOCX, and ODT files) can be used in the header to help search engines discover the information.
Subjects- Should include a listing of the topics or subjects the work covers. This is not commonly used in fictional works. Each subject should be separated with a comma.
Description- Typically is used to store a marketing blurb, or a short description of the work
This next section is a little more distant from your manuscript, but still important, because with the data you supply here, Scrivener will embed it into the output document. These can include the Subject, Company, Copyrights, Keywords, and Comments regarding your work.
Placeholders can supply some of this information. (See Scrivener Placeholders)
For example, you can use the placeholder <$compilegroup> as the title and whatever your compile group be a book in a series or a Compile Collection which will then be used as your Compile title.
File managers and search tools may use this information to inform a reader about your book.
Web Pages and Ebooks will store the data in the page's header, informing search engines and making your document more discoverable.
The Ebooks File Formats sport even more specific input fields for data to be stored in your Ebook. More on these when I discuss creating Ebooks. (see below)
Ebooks allow more information to be entered in the Metadata settings in the Compile Window (right pane). (see categories below and the image above)
Date/Year dropdown choices include multiple formatting options.
Language, here you have the option to click the dropdown and choose a different language.
You can add a custom book ID. Here, Scrivener will generate a random unique number if you do not supply one. (If you use the checkbox.) You most often will want to use a recognized numbering format such as an ISBN number.
Author and Contributor details can be added if click the Author and Contributor details tab to provide more info.
Here you could put information linking to an author’s website or Facebook Page.
Note: Fountain and Markdown settings were not discussed here.
3. Options (Settings Icon)
The screen below has been edited for clarity. This gives you the options to remove links, (text) highlights, text colors, comments, annotations and footnotes (among other options), and even trailing white space from the exported document.
Scrivener Tip: These options can significantly change based on your chosen Compile Output (examples below).
This is discussed in more detail below. In general, you can see options for things to remove below. Most of these options are self explanatory.
Note: Each specific Compile Output type has unique options associated with it.
General Options include some or all of the choices below.
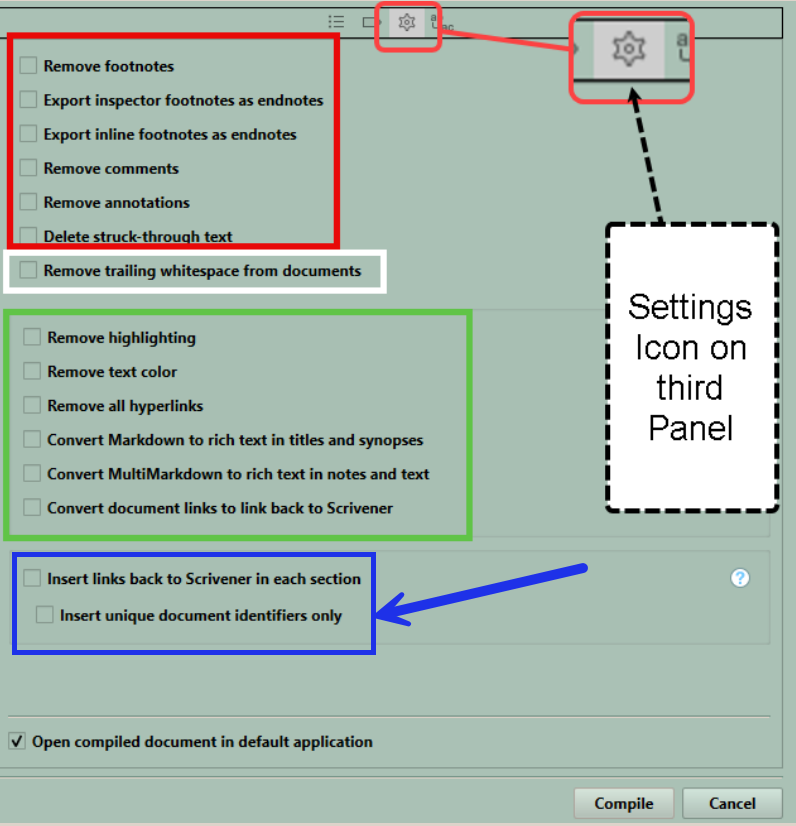
If you choose to leave comments in, they may have their format and presentation altered by the Compile process. In an RTF output, comments may become a margin note, or in Microsoft word, these become a comment box.
As with comments, if annotations are left in the Compile output, how they present will depend on your Compile output.
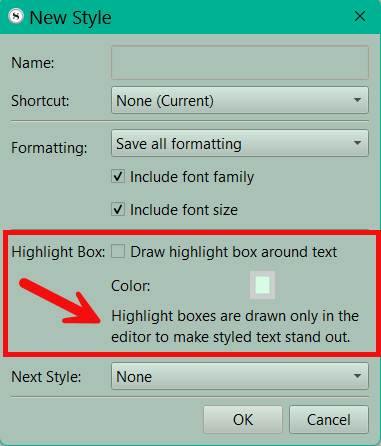
Note: If you use style highlighting in your text, this is never compiled. You could use this to identify a character’s dialog if you wanted to highlight this. To create this, first choose an example of the text you want to highlight/identify. Now use the Menu command Format > Style > New Style from selection and choose to add highlighting for the text to create this effect.
Scrivener Tip: Ideally choose text which includes your current default paragraph settings so when you apply the New Style, it will not disturb the default paragraph formatting.
However, manual text highlighting will be Compiled, unless you check the option (see above) to remove it.
Insert links back to Scrivener in each section- (Blue box above) Using whatever mechanism is most appropriate for displaying a hyperlink in the target file type, Scrivener will insert a special link at the top of every chunk of text used to build a Compiled document, pointing back to that item in the project itself. This link will work if the Project compiled is on the same computer you are viewing the Compiled output on. You can for example compile to PDF and use your favorite PDF reader to proof, clicking on these links to load sections up in Scrivener when coming across areas that need fixing. Read more about this capability, and other Proofreading Tools in the Manual.
Insert unique document identifiers only- This specific option will not create a usable link in the exported file. However, it will print the internal identifier (in UUID format) for the binder items used to build this compiled document. When importing such files back into Scrivener, it will scan for text that matches this notation and build document links based upon them. This is a safer approach to distributing proofing copies to readers, as some software might disturb the hyperlinks inserted using the option above—as well it will work even with formats that do not support hyperlinks natively, such as plain-text.
Scrivener Tip: Decide on a set color to mark any edits which are done by people you send this to proof to before beginning this process. When you import the document back into Scrivener, this will help you identify documents which need updating, where changes occur, and who based on the color of the edits made the changes.
The above two options are not available for Ebook and Final Draft Compile outputs.
You can check Open compiled document in default application. Doing this will cause the compiled file to be automatically opened in the default viewer/editor/software used by Windows for this type of file.
Specific Output Options per Compile Format:
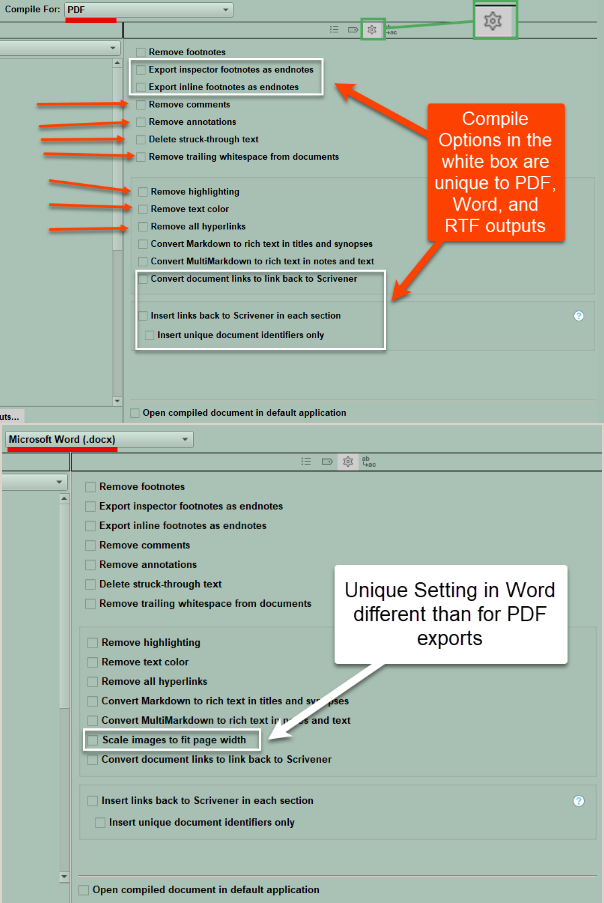
Unique Word/PDF/RTF (not Ebook) Options
Delete struck-through text (deleted words):
If, during the Editing process, you’ve struck through text want to exclude from your project, then this option — when enabled — will actually scrap it. By default, this option is disabled, which exports the struck-through text with the struck-through formatting if supported, or ordinary text if the File Type doesn’t support this special format.
Remove trailing whitespace from documents:
This option will clean up any empty lines at the end of documents. Don’t count on trailing whitespace to remain in your documents if you tick this box.
This is different than the Compile Format Separators used to add space between documents, like Scenes, Acts, and Chapters.
You can also use Regex can help as well with this equation-
Enter \n\n in the Find box.
Enter \n in the Replace box.
Insert links back to Scrivener in each section:
On the same machine, you can proofread and check your links to other parts of your document by inserting [Open in Scrivener]-links in the output document. Clicking these (on the same machine as the source project) will link back to the original Scrivener Project. Check this option to maintain your links back to the original source documentation used in Scrivener.
Insert unique document identifiers only:
This won’t create a [Open in Scrivener] link, but inserts an internal identifier (an UUID like <ID:32A8F581-763B-4C77-8CE7-0BF306242A4D>). These build valid document links upon importing back into Scrivener that you can click to see if they link back to the original document.
This will even work when exporting as Plain Text.
Convert document links to link back to Scrivener:
Document Links while writing normally end up as links you can use to navigate your document. For proofing purposes, this option tells the compiler to link back to the chunks of text inside the Scrivener Project you just exported.
Footnotes come in two forms:
Inspector based
Inline
For PDF or Word formats, you have the choice to export either form as endnotes based on the option you check. (see above)
Removing text color removes any Revision colors as well.
For Word, you want to consider checking the option of Scale Images to fit (the) page width.
For images in word processors, this option scales back images which are too wide for the intended paper size minus margins. Thus, images won’t extend beyond the page boundaries. Images are now resized to fit the page width.
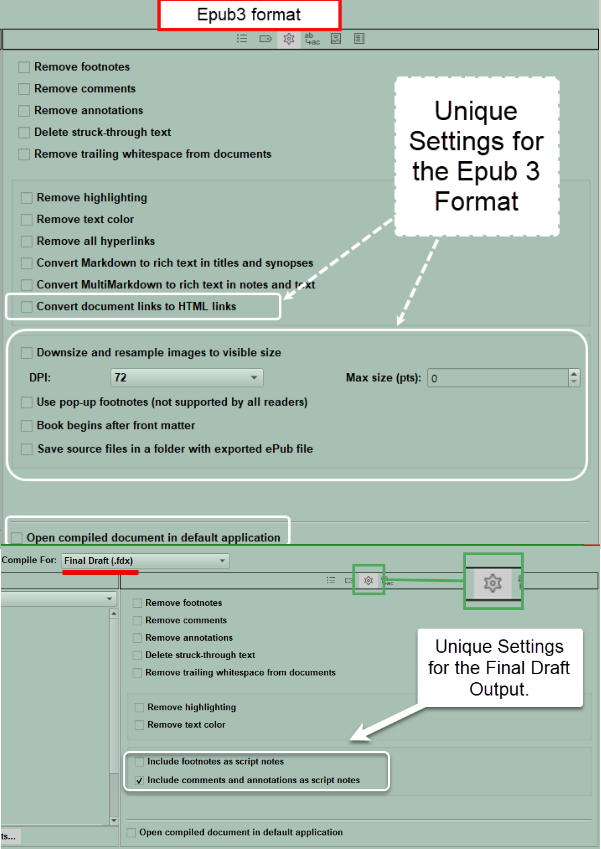
Unique eBook Choices Include:
Convert document links to HTML links- Internal references to other items also located in the compiled output will be cross-references for the reader. In web pages and eBooks, this means people will be able to tap on the linked text and be taken to the section you refer to. This will even work if the sections themselves have been glued together into one longer formal section—like subsections within a chapter.
This option has no impact on the automatically generated table of contents in ebooks, or a designated contents section in the draft, and only involves the links you create yourself in the text.
Downsize and resample inline images to visible size- To cut down on the overall size of your Ebook, you may wish to have Scrivener resample the graphics when compiling. (A larger size Ebook will cost more to publish.) This option will physically resize the graphics for the compiled output. It is not destructive; the original images in the project will remain untouched, as is the case for nearly every function in the compiler.
Additional options are available:
— DPI: sets maximum target DPI for all images in your book. Those images with a higher resolution than this setting will be downsized.
— Max size: sets the absolute maximum height or width in points.
Use pop-up footnotes- Some eBook readers support displaying footnotes in a pop-up bubble, as opposed to a link which can take the reader to another point in the book. This option will add the necessary code (syntax for HTML to do this) to trigger that behavior, in a way that should not interfere with eBook readers that do not support this function.
Save source files in a folder with exported Kindle or ePub file- This is an advanced feature intended for those who wish to customize the look and feel or structural layout of their Ebook after compiling it. The actual files used to create the Ebook will be outputted as plain folders and files for you. [The "opf" file can be opened in the Kindle Previewer to create an eBook.]
Book begins after Front Matter- This option only matters if you include a Front Matter folder when compiling your eBook. For this feature to work, you must have chosen to add Front Matter during the Compile Process. The book will initially open at the first section that follows the material added as Front Matter. This can be useful if the Front Matter you are inserting with the feature is not essential for the reader to see to understand your story, and you wish for them to start immediately at chapter one. When unchecked, the book will open at the start of the entire book. Uncheck the box, when your Front Matter contains text that is important for the reader to see before starting the body of your book.
Multimarkdown and Scriptwriting options are not being discussed here.
4. Replacements
This is another place to do replacements of words or phrases in your project before compiling. This is available for every type of Compile output.
Scrivener Tip: This can be a list of search and replace commands to run when you compile WITHOUT modifying the Original Text. I always suggest backing up your project prior to doing any replacements, even though the Original Text is untouched.
This works in a similar manner to search and replace, but without changing the source text used to compile.
Some example usages would be to replace an abbreviation used for a frequently typed place name, shortened character name, or text with the proper placeholder. (see below) Replacements can replace text which was placed in your project to save time while typing.
The replacement table consists of several columns:
— A checkbox will appear before every replacement row in the table. This can be used to temporarily disable a replacement you might not presently need, but wish to keep around.
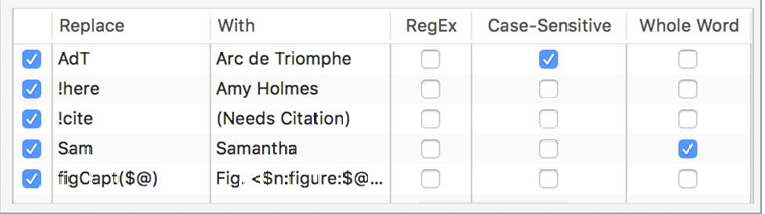
Figure 23.14 Replacements can be used for a variety of purposes, from saving time to keeping complex placeholders out of the editor.
The meaning of the various fields shown above:
— Replace: the text which you wish to instruct the compiler to look for.
— With: The text to be substituted for the search/replace term. This can be a word, phrase, or even a placeholder.
— RegEx: enables the regular expression engine for both the Replace and With columns.
— Case-Sensitive: when checked, the letter case in the Replace column must precisely match, otherwise it will be ignored by the compiler.
— Whole Word: restricts the match to only those cases where the text is bounded by a space or punctuation on either side of the word. "Sam" will not match "Sammy" when this option is active.
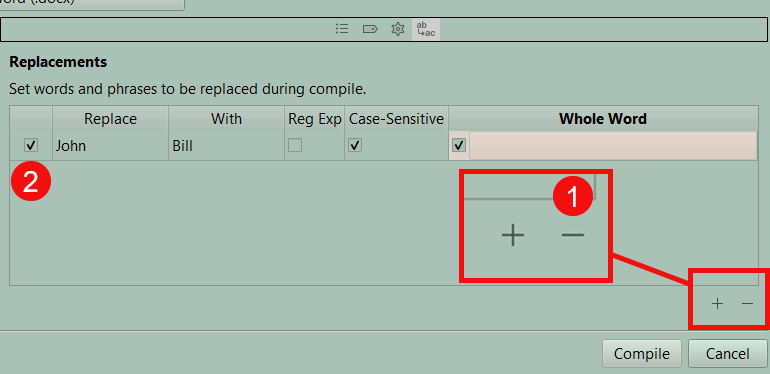
Creating Replacements
Two ways to create a new replacement:
1.) Click the + button in the lower (#1 above) right-hand corner of the table. Type in the text you want to have changed when Compiling into the Replace field.
Use the tab key or click into individual fields to add the neccessary information to make the needed changes.
Press or click elsewhere to commit your changes, and tick any relevant checkboxes to the right of the text columns. (see above)
2.) Hit the enter key and then follow the steps outlined above.
Looking for what you cannot see?
Looking for what you cannot see?
If you need to include white space characters, such as carriage returns or tabs, in your search or replacement field, it is possible to do so by:
TAB- The Ctrl key + Tab key adds a Tab into either the Replace or With fields. (The appearance differs if the cursor is in the field.)
LINE BREAK- The Shift key + the Enter key creates a Line Break into either the Replace or With fields. (The appearance differs if the cursor is in the field.) [A Line Break moves the the remaining text in the paragraph to the next line WITHOUT treating it as a new paragraph. The line spacing for the rest of the paragraph’s text remains unchanged.]
PILCROW (Paragraph Break)- The Ctrl key + the Enter key creates a Pilcrow symbol or (right/left) arrow keys or the shift and enter keys for line feeds. [The Pilcrow symbol signals a paragraph break which ends the current paragraph and starts a brand new one with the default indent you have set.]
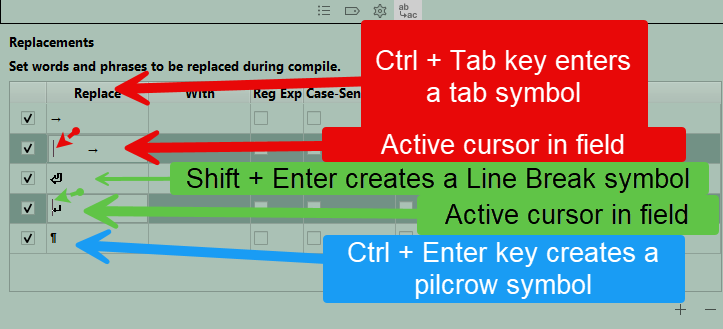
The Menu command View > Text Editing > Show Invisibles will reveal these symbols in your text.
Removing and Disabling Replacements
To Remove- Click the minus sign in the lower right of the panel (#1 above) to permanently delete a replacement.
To Disable- If you merely wish to disable the replacement, then unclick the checkbox (#2 above)in the leftmost column of the corresponding row.
Modifying Replacement Order
The order of replacements in the list can have a significant and different overall result based on their order. Each replacement will be implemented in order from the top of the list to the bottom. You can change the order of replacements by dragging and dropping them inside the table and then Compile again to see how changing the order of replacements affects the final output.
Advanced Replacements Usage
Replacements can also take a special placeholder (or wildcard which in Scrivener case for replacements is only ONE combination of symbols. $@), "$@" which will be used to match everything between the rest of what you type in the search field. The matching text will be inserted into the With field at the place where you add the wildcard.
— This wildcard only works when surrounded by text which can be used to match inside your project. Using a wildcard at the start or end of letter strings in the Replace field is not reliable.
— On the other hand, the placeholder can be positioned anywhere you like in the With field, even if all by itself. (ie a word can be replaced with just a wildcard symbol if you want)
— Placeholders or wildcards must be present somewhere in both fields for the replacement to work.
— These can only be used once in the Replace field, but you can use it as many times as you like in the With field.