The Compile Panel’s Third Pane part One
The Third Panel in the Compile Window has a number of different Icons each of which impacts the final Compile Product.
This is the first of a three part series on this panel.
In General (with rare exceptions) these settings apply to your project globally rather than based on the final Compile Export product. You can save these but only for the current Project Template. These settings can be included in a Project Template to be reused.
Use the ALT key to change the lower-right Compile button to a Save button to save your settings.
**** I do not discuss using MultiMarkdown in this blog.
Third Panel Icons
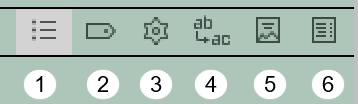
1. Contents (What are you including in the Compile output?)
When you open the compile panel, you can compile everything not in the research folder (the default option) OR choose TO DO ONLY a fraction of that.
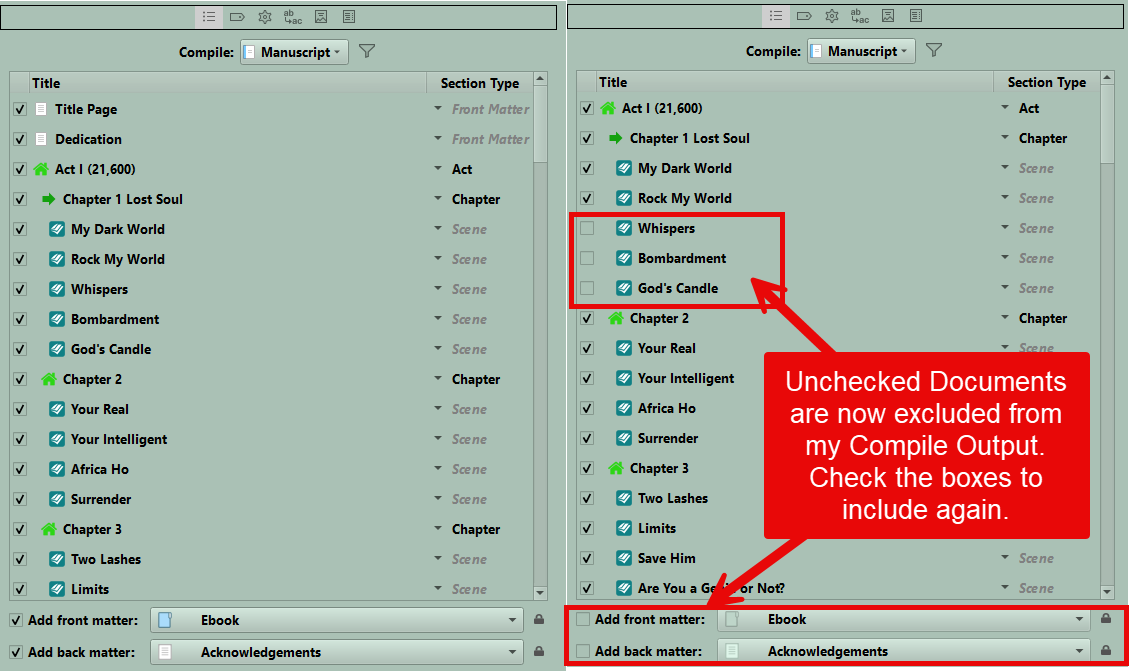
The Default setting is to Compile the whole manuscript, but here you can uncheck individual files in the Compile Panel’s content list or inside the editor panel at lower right corner. If a Manuscript document is excluded from being Compiled then in its lower right corner of the Editor will be an x symbol.

Not Included in the Compile output
You can choose multiple Binder items and then change their Compile status at once.
You can limit what you compile to:
A single folder (which could contain a book in a series) and all its subfolders as the Compile output product
A collection and all the files in it. (This can be especially helpful if testing out a Compile Format to tweak the output, or sending a partial manuscript to an editor, coauthor, or Beta readers)
Current Selection-Choosing this option will Compile ONLY the currently selected items in the Binder be it a single document, folder, or a specific group of files.
You can also add Front and Back matter to any of the configurations above. These documents do not need to be near each other in the Binder but MUST be outside the Draft/Manuscript folder.
Even inside of any of choices above you can further modify what is Compiled by unchecking items listed in the third panel under the Content Icon (#1 above).
How to check to see if a Binder item in the Manuscript is set to be compiled.
1. In the Editor
Look at the Editor footer bar in the lower right corner.

A checkmark means the Binder Document is currently included in your Compile Output. If you click this icon you can change the status to not Include in the Compile Output and the symbol will now have an x in it.
2. In the Inspector
Look in the Inspector Metadata tab under General Metadata and see a checkbox showing whether a document be it a folder or file is included in your current Compile output.
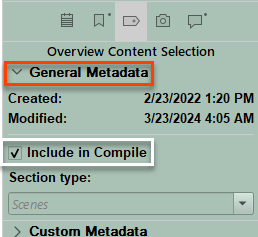
Scrivener Tip: If you are finding some of your book/project is not compiling, then check the missing files to see if under General Metadata the Include in Compile option has been chosen (see above).
3. In the Outliner
Scrivener Tip: An easy way to double-check on this is to use the Outliner to look at the Manuscript/Draft Folder. One of the columns you can check to view in the Outliner is Include in Compile. In the example below, I moved that column next to the title to make it easy to see if a Binder item has been included to be Compiled. (Below is a modified image of the Outliner and its options. Clicking on the far right caret shows any columns which can be added to the Outliner view and all of these including the Document title, can shift column position inside the Outliner.)

The Third Compile Pane:
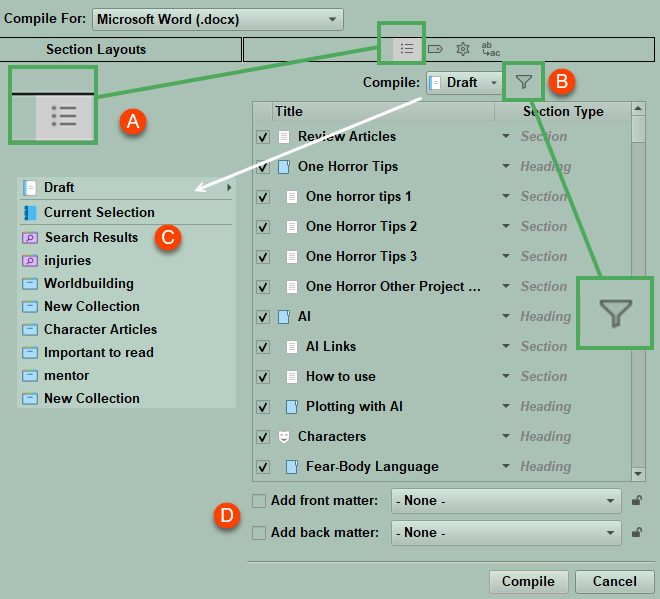
A. Contents Icon- (Contents have a checkbox (include or not), a Title, and Section Type. [These can be manipulated in this area before you Compile.]
Scrivener Tip: Inside the content area if you use the Keyboard shortcut Ctrl + A, then all the items in the Manuscript can be chosen at once. Now, if you hold the Alt key and then with one click every selected item will have a check in its box to Compile, or all will have nothing checked. All the checkboxes will go on or off at once. Click again while holding the Alt key if needed.
Scrivener Tip: It is a good idea to review the information (Compile checkbox status, Documents listed, and Section Type for any obvious errors at this point.).
B. Filter Icon- If the icon is a pale blue, then the filter is active and you will only compile the items you selected with your filter. This can be a cause of incomplete Compile outputs.
C. Options for the Compile Content include:
1. Your Compile Content is the whole Draft/Manuscript-
The Default Setting which will compile all documents inside the Draft folder which have been marked to Include in the Compile process.
However, you can choose a container from inside the Draft folder to Compile. If you have a book series for a trilogy in the Draft folder, then you could could choose one book (a folder) of the trilogy to Compile and use this setting to switch between books. In the example below, I pick Act I of a three act novel to compile.
When choosing a folder (container) within the Manuscript to export rather than the whole book, you NOW see two additional options in the Contents pane. (see #2 below) These are:
Treat compile group as complete manuscript: Ordinarily when a portion of the draft folder is selected for Compiling, then Scrivener’s auto-numbering for things such as Acts and Chapters numbering will be set up as though the rest of the manuscript existed; chapter 13 will remain 13. However, when the Treat compile group as complete manuscript option is checked, the smaller portion you have selected will be treated as though it were the entire manuscript. All counters (either in compile settings or in the draft itself) will now start at one.
Include text of containing group: Enabling this adds the selected container and its text to the compile group. This can be useful if the container (folder) itself is meant to generate meaningful information, like a chapter heading, page break or introductory text. Thus, any text, including titles and other information, inside the folder you are Compiling will appear in the Compile Output.
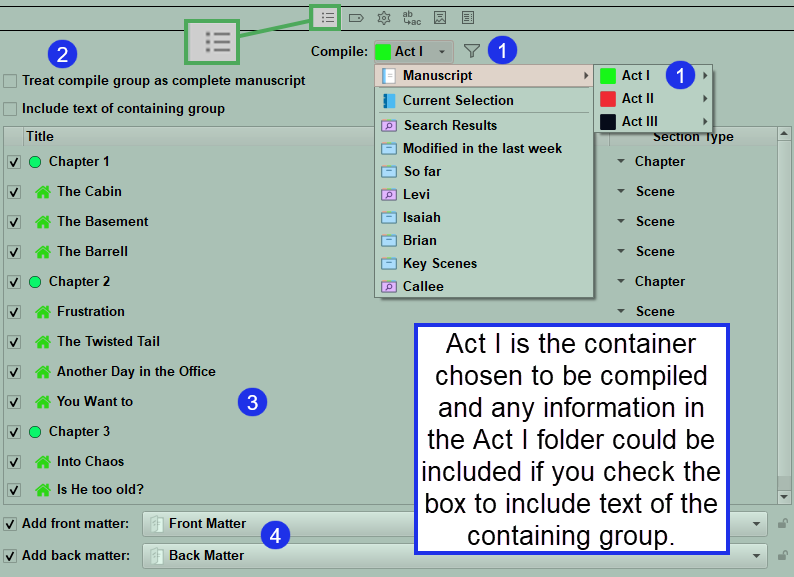
#1 Here you have chosen to Compile Act I of the Manuscript and Act I contents are displayed in the Content Area (#3).
#2 Here you have the options to treat Act I as the complete manuscript and reset auto numbering and have the ability to include Front and Back Matter information when you Compile. If you check include text of containing group, then any text inside the Act I folder will be included when you compile this.
#3 Shows the contents of what will be compiled. (As with anytime you Compile, you can uncheck individual items in this list if you do NOT want them included when you Compile. Note: Choices you make if you use the Filter (discussed below) can override choices made here.
#4 Is where you can check to include Front and Back Matter. (At the far right is a lock icon and you can lock this to prevent excluding Front and Back Matter.
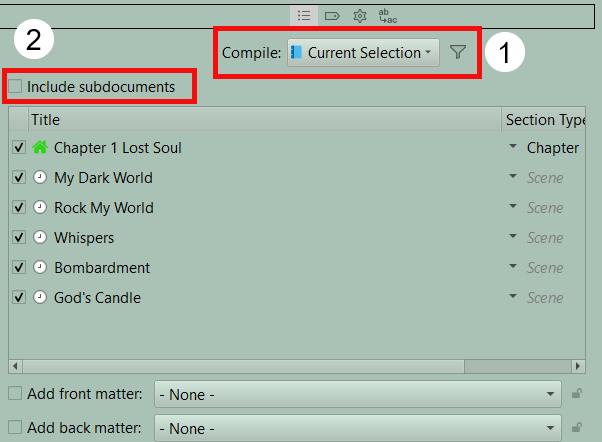
2. Your Compile content is the Current Selection-
This is the CURRENTLY ACTIVE/Highlighted FOLDER(s)/FILE(s) (ie clicked and highlighted in the binder and is not given the folder(s)’s name, but is identified only as (the) Current Selection. (#1 below)
When making this selection, you will see a checkbox above the contents to Include Subdocuments. (#2 below) If you enable this, then all the subdocuments of any folders will be included when you Compile the current selection.
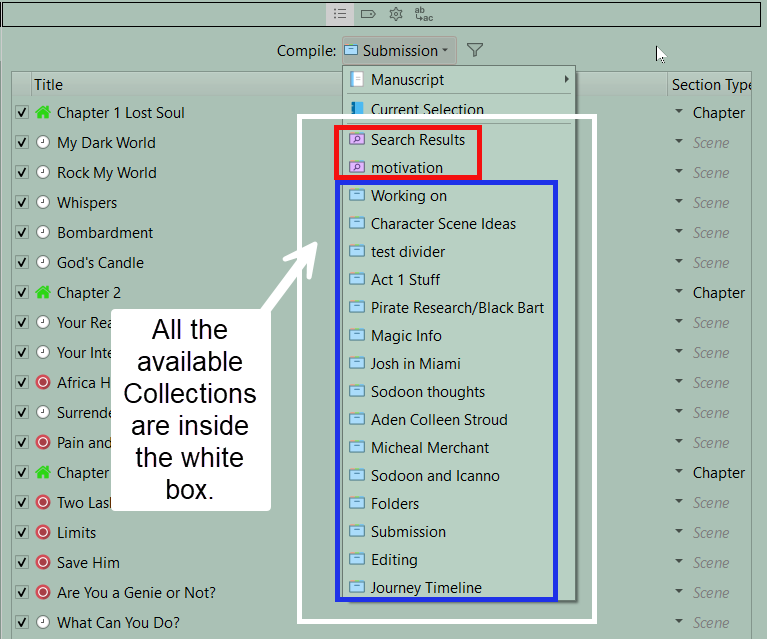
3. Your Compile content is the selected Collection-

Dynamic Collection

Static Collection
Below the Current Selection option is a current list of all your Collections, both Dynamic (in the red box below) and Static (in the blue box below). You can select any single Collection to compile. The key is to tailor the Collection (dynamic or static) to include the files you want.
Pro Compile Tip: Create a sample Compile Collection containing examples of every element you intend to Compile to practice on. (Such as Acts/Parts, Chapters, Scenes, check the boxes in the third Compile panel to add Front and Back Matter to see if the these look the way you want when Compiled.) A small collection of files allows you to quickly produce a Compile output to test tweaks to the Compile Format.
D. Front and Back Matter -
The compiler will include Front and Back matter (see D above) in your selection if you tick the two checkboxes at the bottom of the pane.
Now, after choosing what files/folders to include in your Compile output, you must decide whether to add Front Matter (Which might include a Cover, a Title Page, Copyright, Dedication, Acknowledgments, ? a series page (what other books are available), ? other books by the author, ? a blurb page, or an author web page). Back Matter could include Endnotes, a Glossary, an Index, Acknowledgments, About the Author, or Other Works. Some choices included in these sections could be placed in either one. Generally anything you wanted included in either is placed in either folder and will be included in your book as you choose. Most often these sections are formatted with the Section Layout AS IS to preserve the appearance you have chosen for this material.
Scrivener Tip: Inside the Front (or Back) Matter folder you can have subfolders for Ebook outputs (which can include a cover image), PDF, or Word outputs. These could also be different Front Matter folders for each book in a series if kept in the same project.
Only Documents OUTSIDE of the Draft/Manuscript folder can used for Front and Back Matter.
E. Filtering
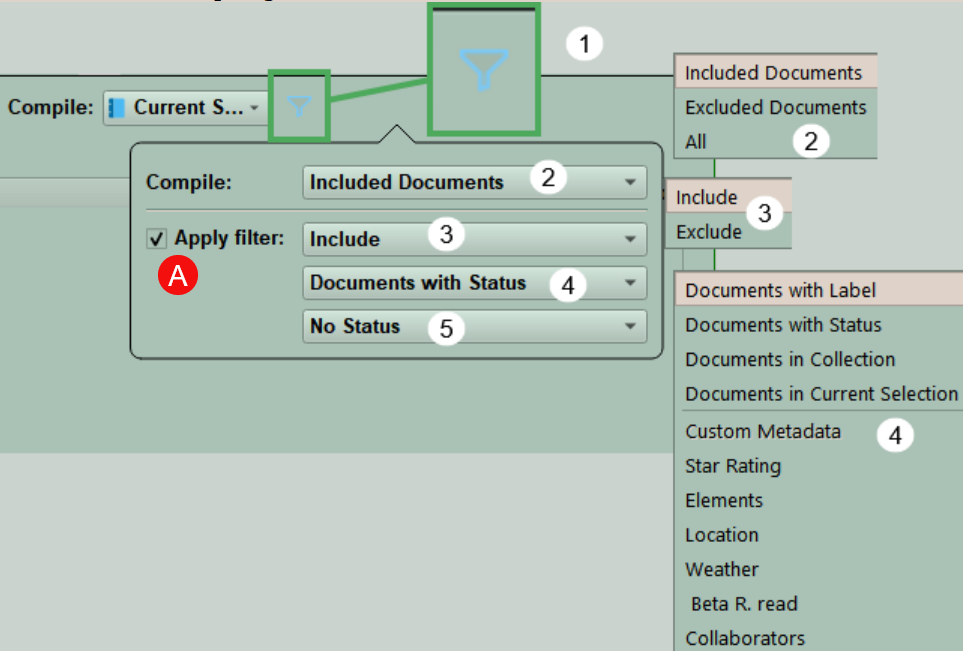
The Filter Icon (see #1 below) is another option you can use to narrow the number of documents you will Compile by choosing various Metadata options. The Filter Icon (if active) will then have a light color. (See an active Filter Icon below, though how the active filter appears is Theme dependent.) You must click the Apply filter checkbox (A) to be able to use these filter options. After you have narrowed the documents you want to compile using these filters, you can still choose to uncheck individual files in the resulting Content list before Compiling.
Compile Filtering Options set what to include in the Compile output. You can apply filters to select only certain Documents. The choices here are reflected in the Project Statistics Panel if you select the Count current compile group only. These filter settings will affect which documents will be Compiled and counted in the Statistics Panel.
#1. The Filter Icon will have a subtle color (light blue) when active in Scrivener themes which display in light mode.
#2. Options here choose which documents the Filter will be applied to and these options include:
A.) Included (to be compiled)
B.) Excluded (to NOT be compiled)
C.) All for the documents the current filter applies to. (See #2 above)
Clicking the Apply filter checkbox (A above) offers more options to further limit what is compiled by applying some of the criteria discussed below.
#3. The Filters you chose will either Include or Exclude items as choices based on the options you choose in #4 and any specific value chosen in #5. (see above)
#4. Gives the option to Include or Exclude documents based on their current label, status, or custom metadata values. Or you can limit your choices to documents in a collection {If you choose to filter by Collections, then Scrivener will show you the list of every Collection currently in your project to choose from.}, or filter by the currently selected group of documents highlighted in the Binder.
#5. Here you choose a specific value from the list of values for Labels, Status and Custom Metadata as your filter. For Status and Label values you can choose the no label, or no status choices to select documents with no currently assigned values.
Scrivener Tip: If you look at the Compile content list and see an empty list or missing files, check to see if the filter from a previous compile is still active.
Depending on what files you have chosen to Compile additional secondary options may appear at the top of the Content List.
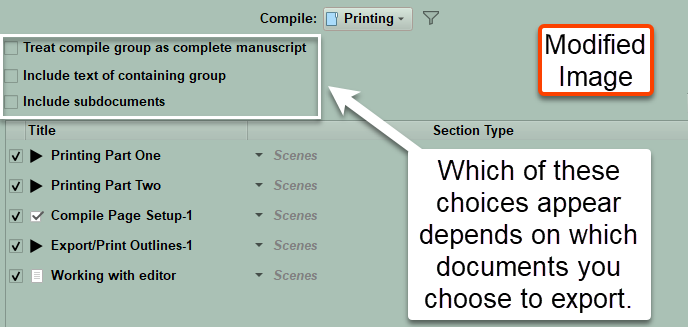
These options include:
Treat Compile group as complete manuscript
Normally selected files you choose to Compile will keep their chapter numbering from the manuscript unless you choose this option and then the files to be compiled will be renumbered as though they were the entire manuscript. (This is helpful if one Project contains a book series.)
Include text of containing group
Checking this option will include the contents of the top folder (such as text) holding the files to the Compile output.
Include subdocuments
This adjusts whether to include all the subdocuments inside a folder will be Compiled. This can be useful if just want to check several folders to Compile, rather than have to check every file inside the folders.
You always have the opportunity while writing to change the Compile status of any document from excluded  to included  or vice versa.
See Front and Back Matter to go over what can be included and how to choose and where you can place these folders.
The compiler will automatically select a Front and Back Matter folder based on the current compile group so as long as the group itself has been designated to function as a complete manuscript as discussed above.
We will discuss more on the third Compile pane in the next two blogs.