the page settings tab inside the compile format designer
An Overview
This Pane in the Compile Format Designer is used for Compile outputs which can be put on physical paper (ie NOT Ebooks). You have the options of using your current Project Settings reached by using the Menu command File > Page Setup. (see below) This comes with many automatic settings for predetermined page sizes, but you also have the option of using a custom size. You can set Portrait or Landscape views and set margins as well.
If you are not compiling correctly, then the Page Setting Tab is the section to reexamine. This may be as simple as change page orientation from a Landscape printing to a Portrait one, or adjusting your page margins.
****This section of the Compile Format Designer is NOT available for Ebooks.
Macs have a preview option to allow you to see what you selected will look like prior to exporting as well as additional page type preset options that you can adjust.
Project Settings for Page Setup:
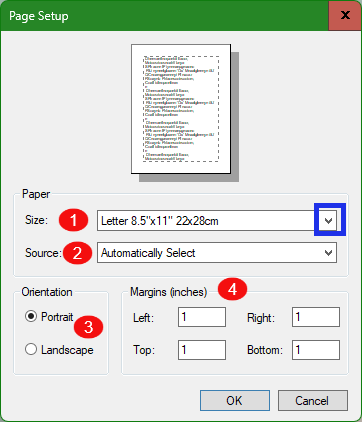
1. Allows you to click the Caret and choose from multiple preset sizes, or even choose a custom one. Look at this link for the sizes of the various size options in both millimeters and inches. See this link for the various industry standards for page sizes.
2. Allows you to choose the source which you are printing from.
3. You click your paper orientation. (Portrait or Landscape). This can also be set independently when you Compile by not checking/ or unchecking the use project settings checkbox in the Compile Format Designer. Unchecked, means all page settings are made within the Page Settings tab of the Compile Format Designer (discussed below).
4. Here you set your page margins.
Page Settings in the Compile Format Designer:
You have the option of using the Page Settings of your current Project (set as shown above) for your output or you can uncheck the box and choose a new default or custom size for a particular Compile output. You might need to print a paperback book, which has different size requirements than a standard print job.
Below are the options that become available when you uncheck the box-
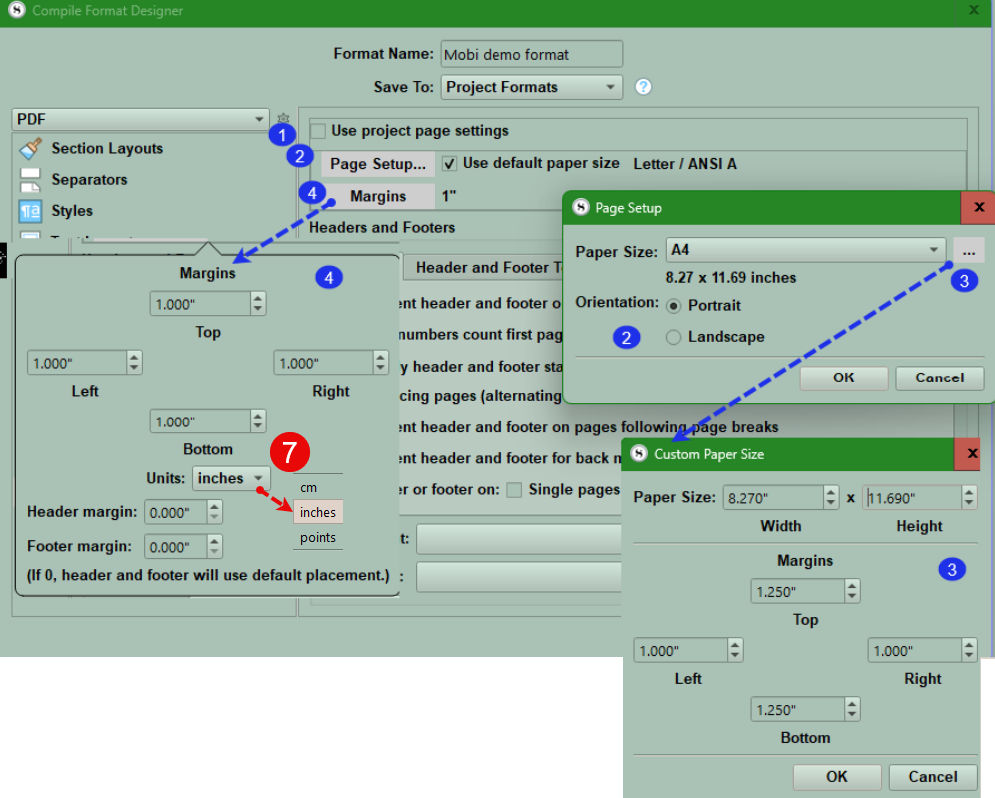
Use project page settings checkbox (#1 below).
Clicking the Page Setup button (#2) brings up the Page Setup Panel.
Here you can set page orientation (Portrait versus Landscape), choose a standard paper sizes for your printed Compile output, or click the … (#3) to open a Custom Paper Size Panel to create a custom page size with/or without custom margins.
If you choose a standard paper size when clicking the Page Setup button (#2) then by default you use the standard Margins of 1 inch at the top, bottom and sides.
However, you can click the Margins button (#4) to customize/adjust your margins.
The default measurements are in inches, but this can be changed to centimeters or points (72 to an inch). Adjust the Margin measurement units by clicking the dropdown (#7 below).
You can also designate Custom Paper Sizes, Header, and Footer Margins by clicking … (#3) and making any needed changes (see below).
Header & Footer margins
When you set Margins (#4 above) and click the tab, you can set the distance of the header/footer from the top and bottom of the paper. If the distance you supply is larger than the margins you have, then it will come to rest along the very edge of the main text body.
If the Header and Footer margins are both zero, then the header or footer are placed within the top or bottom inch (regardless of unit preference) of the paper.
Header & Footer Text
After you have decided on your print settings (if needed), then you must decide how to format your Headers and Footers text. (discussed below)
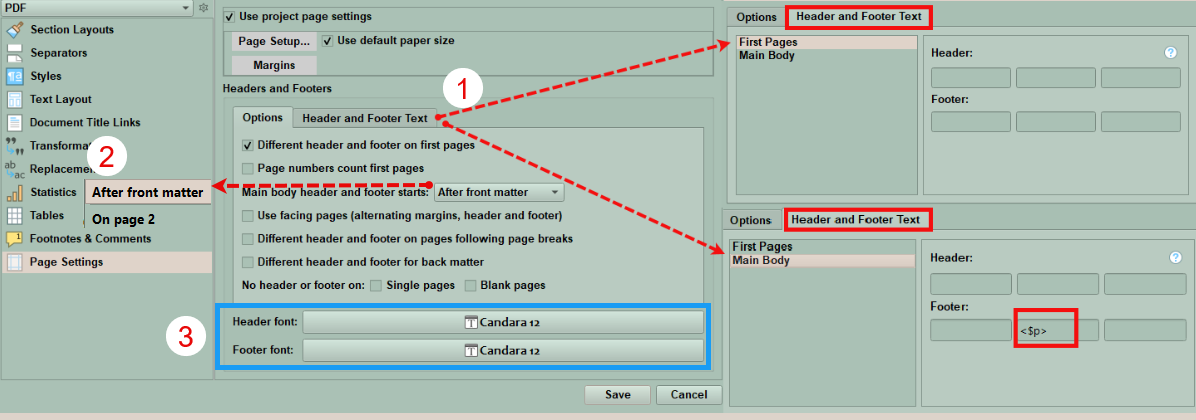
Header and Footer Options:
Scrivener splits the Header and Footer text fields into left, center, and right text boxes, giving you the option to align the text either on the left-hand side, centered or on the right-hand side of pages.
If you want your page number at the bottom of your page, then place a placeholder <$p> script in the far left, center, or far right footer.
— Different Header and Footer on first pages:
If you check this option, then it enables you to set separate options for the Headers and Footers which occur on your "First Pages". "First pages" generally refers to your front matter, where typically pages will be numbered using lowercase Roman numerals. You could choose a minimalist approach and eliminate the Headers and Footers for the "First Pages" entirely.
— Page numbers count the first pages
If you check this option, then the page counter counts the first pages rather than skipping them, even if they do not display a page number. If you are using Roman numerals in the front matter, then regular numbering will begin where they left off. For example, if there are four pages of Front Matter the page numbering would go from "IV" to "5", instead of from "IV" to "1", which would be more traditional.
— Main body Header and Footer starts...
This setting defines what is meant by "First Pages". If you choose the first option of After Front Matter, then Front Matter will include everything in the Front Matter dropdown in the Compile contents. If no Front Matter folder is included in your Compile set up, then this option for the "First Pages" will be ignored. You also have the option of designating a set number of pages, up to 10, to use these special "First Pages" Headers and Footers. Thus, you can manually set when the main body of the text (book) starts, or let it be automatically determined by the "After Front Matter" setting.
— Use facing pages
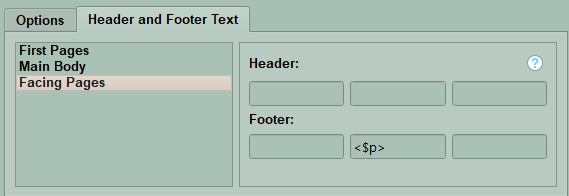
If you check this option, this adds a "Facing Pages" header and footer configuration section in the Header and Footer tab (see below). If your margin settings are asymmetrical this will also have the effect of mirroring those settings from one page to the next, creating a narrower inner or outer margin (in the sense of how both pages would look in an opened book side by side) as you require. If you require symmetrical margins, make sure to keep your settings uniform when you set your Margins (as discussed above), and this feature will then only impact the Header and Footer text that is used on facing pages.
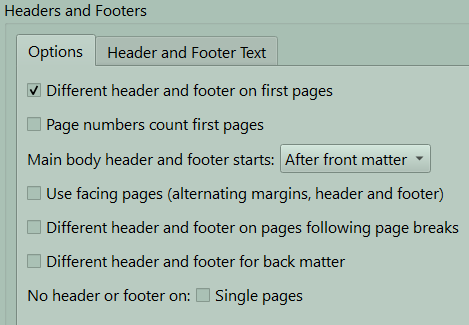
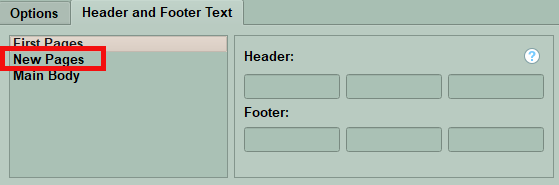
— Different Headers and Footers on pages following page breaks
If you check this option (see above), then this adds a "New Pages" header and footer configuration section in the second tab. (see below) This will allow for a different header and footer configuration on new pages—a common use here is to place the page number at the bottom of the page instead of at the top, to keep the chapter heading clean while still leaving the page numbered.
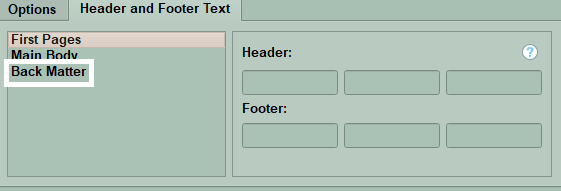
— Different headers and footers for Back Matter
This option, when checked, applies to BOTH Front and Back Matter.
If you check this option, then this adds a "Back Matter" Header and Footer configuration section in the second tab. All pages that have been inserted using the Back Matter dropdown in the project’s Compile contents settings will use these settings instead of the main body’s Page settings.
— No header or footer on...
If you check this option, then both the Header and Footers will be removed from the pages that match their respective checkboxes (Single, Blank pages or both- See above images):
— Single pages: This setting applies when the amount of material between two page breaks is only a single page. This would most often be seen in cases like book or part level breaks, where a full page is dedicated to some sort of title.
— Blank pages: available in the PDF and Print formats, where blank pages are generated in the book, they can also have the header and footer removed from them, as is typical. A common example of this would be a blank page inserted to keep the part break on the recto side. Remember, in Windows as opposed to Macs, this may require a Blank Page placeholder to accomplish this effect.
The <$BLANK_PAGE> placeholder tells the compiler to leave this page blank. At the end of compiling the text, Scrivener goes through looking for potentially blank pages and removes them, but if it finds this placeholder on an otherwise blank page, it just removes the placeholder and leaves the page blank.
Header and Footer fonts
Below the "Headers and Footers" section are settings for controlling both the font and its size for the Header and Footers. The font family itself can be overridden by the project’s compile settings. (see #3 above)
You can choose one or combine several of the above options to obtain the results you want.
Helpful Placeholder Tags for Headers and Footers:
Sectional Page Headers
For use with print, pdf and the word processing formats, the <$pageGroupTitle> placeholder tag can be placed into the header and footer fields to print out the title of the current section of the item which last caused a page break. This header will be used for all subsequent pages until another page break is generated. (ie You move on to another section.)
Available useful Placeholders which can applied for the Header and Footer fields:
<$compilegroup> The current compile group. If you wish for this to be more descriptive than "Draft", you can change the displayed name in your Headers and Footers to the title of the current Compile Group. (This could be a Compile Collection title.)
<$projecttitle> Project Title, as set in the Project's Compile settings in the third pane of the Compile Panel under Metadata settings. Here you can set a title for the printed document. If this placeholder is not used, then this defaults to the name of the Scrivener Project file.
<$abbr_title> Also defined in the project's metadata settings tab. It will fall back to printing the previous placeholder or the Scrivener Project name if left blank.
<$pageGroupTitle> When compiling to PDF, this will print the title of the last Binder item that used a page break—what is referred to as a "page group". All subsequent pages will continue printing that title until a new page break is encountered. The <$sectiontitle> placeholder is deprecated, but supported for backward compatibility.
<$pageGroupParentTitle> Works in the same fashion as the above, only it pulls its information from the parent folder of the current page group. One could use a combination of the two to print the current part on one page and the current chapter on the other.
<$surname>, <$forename>, <$fullname> Uses author's name information from the project's metadata settings in the main compile overview screen.
Some useful global replacement tokens
<$p> Prints the current page number.
<$pagecount> The total page count for the entire manuscript. This is a static number that is primarily useful in conjunction with the page number token. A value of <$p> / <$pagecount>, will produce, "73 /258" on page 73 of a 258 page manuscript.
<$shortdate>, <$mediumdate>, <$longdate> These will print the current date using one of those three formats.
Some Potential Issues
Issue: On compiling for MS Word, I find that in some chapters, the page numbering in the Word doc restarts. I can’t find out why it does that in those particular chapters.
Solution: Compare the Compile settings for the chapters that number correctly and look at the ones that don’t. You should only have ONE Section Layout type for all of your Chapters to maintain consistency.
If you have any suggestions on issues with this which were missed, please add in the comments below.
7/11/26