Image Compiling Facts
Images and Compiling Facts
You need higher resolution for print images (300 ppi/dpi) as opposed to ebook Images (require a minimum of 72 ppi/dpi). However, as the quality of Ereaders improve image resolution may need to increase.
Most images can be at or under 3o0 DPI.
Ideally your image should be .png files not .jpg. JPEG files will be much be larger files than the corresponding PNG version of the image.
**When compiling to Epub or Mobi make sure your image name does not contain any special characters in it.
If you do want an image anywhere in the text, don’t place the physical image there. Place it outside the Manuscript and use the placeholder <$img:imageName> in the text.
Using placeholder tags for images allows you to bring images into areas of the document that otherwise wouldn’t support them—on account of these areas being defined by plain-text fields — such as custom separators, title prefix and suffix fields.
When using Image Placeholder tags, everything after the image name is optional. The image must be specified either by its imported name, as displayed in the binder, or by a valid system path to the image’s location on your computer.
It is valid to specify only the height or the width alone for an image in points. (IF use only one dimension then the image will resize to remain proportional. Remember, there are 72 points to an inch.)
While working within the Compile Format designer, images will not be previewed. However, Image Placeholder tags will be visible in the Compile Panel if you have assigned Section Layouts. You can see by where the placeholder is as to where the image/separator will appear in the Section Layout preview pane before you Compile.
4 ways to Compile Images
There are four different ways to include images in your Compiled output, each with its own particulars:
If you do want an image anywhere in the text, don’t place the physical image there. Place it outside the Manuscript and use the placeholder <$img:imageName> in the text.
Embedded: It’s simple, you just drag stuff into the editor and it is there. It has significant downsides though, many of which you may ha1. ve encountered:
You are trusting the “host” to manage your graphics correctly from input to output, and you shouldn’t. Graphics formats may change, compression may happen, resampling might happen, color profiles may get damaged or lost, etc. Need CMYK? Forget about it. You are limited by what the host supports, which often means no SVG, no EPS, maybe no TIFF and other standard design formats.
Editing the image is a bother. You have to right-click and save it to the disk somewhere, edit it, delete the copy in the editor and then insert the update in its place.
Large scale changes of necessity (say your designer gets back with you and asks for all of the images 300 DPI) compound the above problem multiplied by however many images you have.
Storing graphics in a text file is inherently inefficient because the “code” of the image must be converted to text (Base64). With everything being larger than it needs to be means you run into efficiency caps earlier.
Tangentially, massive RTF files are slower to work with, and image corruption can mean troublesome recovery diagnostics.
Linked to the disk: using the Menu command Insert > Image Linked to File..., the result is a simple and short directive in the text that points to the image location. While you see the image represented as a graphic, none of its bulk is actually in the file, keeping it swift and easy to back up.
On the minus side, if you move the image on the disk or change the file name, then the link breaks and you have to restore it to relink the image.
On the plus side, having all of your core graphics available on the disk (single file location in computer)/or USB/external drive directly means being able to solve problems just like this one, so much easier. You can sort your image folder by size, and you’re done. You know which images are bloated and can fix them right then and there with an image editor.
Linked images are also advantageous if you need multiple versions of each image depending upon the output. You might need black and white for print, or color and slightly lower res for ePub.
Since images are all kept outside of the project, it keeps your total project size down, way down, meaning frequent backups of only your text is more feasible. More backups is always a big plus!
Linked to the Binder: Fundamentally this is very similar to the previous method, only instead of locating a file on the disk, you drop the image into the Binder somewhere and use the Menu command Insert > Image Linked to Document, or even just drag the image from the binder into the editor, to create a link to it.
With Scrivener managing the content, this negates the one big negative of linking in general. Renaming the image in the Binder or moving it into another area will not break the link.
With the images on the disk, you can readily edit them with a graphics editor or even run batch operations to clean them up and get them sized in an optimal fashion. With Binder linked images you can only open them one by one, and they’ll all have a generic “content.jpg” name.
But that said, it’s still a whole lot easier to hit the shortcut to open an image in an external editor and be done with it, over the whole export-edit-delete-insert routine with embedded images.
Of course with the image actually still stored in the project, it also negates the frequent backup bit, but if your total image payload isn’t massive that can be okay.
There is an interesting combination of features that can combat that however. If the image is imported as a shortcut or alias, then it isn’t actually stored in the project, but is referred to in a way that is more resilient to file system changes than a text path. You’re linking to a link to a file. To accomplish this use the Menu command File > Import > Research Files as Shortcuts.
Image placeholders: Image Placeholders (either link to the disk drive/USB key vs linked to images in the binder) They uniquely also allow you to provide separate size directives to an ebook output and a print output.
You don’t get a thumbnail, which for some can be a big downside. I’d count myself among them, I really like having a figure to write around, it helps me compose better than just staring at a code. Yeah I can open the image in another split or Quick Ref, or another program entirely, but that’s more juggling than just staring at it in the context it is meant to be within.
Everything after the image name is optional. Spaces in the name are replaced by _ (an underline).
Using tags allows you to bring images into areas of the document that otherwise wouldn’t support them—on account of their being defined by only plain-text fields — such as custom separators, title prefix and suffix fields.
On the other hand, placeholders are text, which means they can be manipulated by things that manipulate text, unlike all other image tools. Recall the example of the folder name changing and breaking your image links? Not a problem if you can run a global search and replace to fix all of the old paths to the new path to the image at one time.
By extension, text can be manipulated by Replacements when you compile. Shorthand can be used to refer to full paths, reducing the need for particular management of them in the placeholder, and keeping them more readable. You can also more easily swap out images for purposes, if “image name.jpg” can turn into “image name-pdf.jpg” or “image name-epub.jpg” depending on your compile format.
For some, typing is easier than messing with menus and commands. Those that like Markdown-type writing styles may find working with image placeholders to be equally convenient and preferable. (And of course, those actually writing using Markdown can and should use its native syntax for image referencing, though Scrivener’s Markdown integration includes compatibility with all of the above techniques.)
Adding Images for your Ebook Cover have very specific requirements. (Check with your retailer, but these are some general guidelines.)
Cover Images
Cover image requirements are pretty consistent across the major eBook retailers. You will normally need to provide a cover image inside your EPUB file, as well as a cover image separate from your EPUB that is used by the retailer for marketing.
Interior Cover Image
To satisfy the broadest range of retailer requirements, cover images inside EPUB files should be built according to the following specs:
File type: JPG or PNG
File name: Can be anything, but some retailers like it to be the ISBN.
Color: RGB (CMYK is not allowed)
File size: Less than 5MB
Dimensions: At least 1200px on the shortest side, no larger than 3.2 million pixels (width × height). FlightDeck will warn you if your cover image is to large.
Transparency: None
Content:
It is best to only include the book title and the author name on your cover image. Some retailers or distributors may not allow price, email addresses, website addresses, or other information.
Cover Image HTML:
It is a common practice to display the cover image as the first item in the EPUB. This is done by creating an HTML file that includes only the cover image, sometimes with special formatting to allow it to display without margins and without the page being broken into columns.
Marketing Cover Image: Typically, marketing cover images should be the largest image you have available. Other than that, the specs are similar to the interior cover image:
File type: JPG or PNG. Some retailers also accept TIFF.
File name: Can be anything, but some retailers like it to be the ISBN.
Color: RGB (CMYK is not allowed)
File size: No limit
Dimensions: Provide the largest image you have. At least 2000px on the shortest side is best.
Transparency: None
Content: It is best to only include the book title and the author name on your cover image. Some retailers or distributors may not allow price, email addresses, website addresses, or other information.
Using Image Placeholder Tags
Specifying Image Width and Height:
The width and height of the image is an optional value, declared in points. If you have already sized the graphics correctly in accordance with your printer’s specifications and output quality, then you will not need (or indeed want) to change the image size using Scrivener. However, if you are not concerned with pre-sizing the images and just want to let Scrivener handle them for you, you can specify the width and height of the image in the placeholder tag, to instruct the compiler to resize it as necessary.
It is valid to specify only the height or the width alone. (IF you only specify one dimension, then the image will resize to remain proportional.) This will cause the compiler to shrink or expand the image to match the specification you've provided, automatically resizing the opposing measurement, keeping the image's original shape, or aspect ratio, intact. If you declare both the width and height yourself, it is possible to squish or squash the image however you please.
<$img: Portrait of Dickens.jpg;w=468;h=Height>
The best way to do this is to figure out the widest your images should be in points (72 points to an inch), given the intended print settings, and then never exceed that. For example, a typical US Letter is 612 points, but with 1" left/right margins would be 612 points wide as paper, and minus the margins (144 points total) that would be a maximum of 468 points (=6.5 inches).
Once you know that, then you know the maximum size of images you can have on a standard letter page. So you now know your upper allowable width limits. Now, you want to create your images of that width, at the DPI needed for the print job. So commonly that will be 468 pt maximum at 300 DPI. With the images properly scaled from the start, you just drop them into Scrivener and leave them alone, no matter what they look like in the editor. The file size and detail you have set will give the best and most professional looking result—particularly if you are generating the diagrams from a scalable source.
Specifying Image Size based on a Percentage:
You can optionally declare an image to be set to a percentage of the screen's display area, rather than a fixed size. This will be done by using a secondary setting in addition to a default static width setting. The following example will display the image at 468 pts wide in most compile formats, but when compiling to ebooks, will instruct the image to be displayed at 50% of the reader's screen size (or the software's reader window, et cetera):
<$img:Portait of Dickens.jpg;w=468h=Height;ebook=50%>
Placing images into the Section Layout preview pane to display in chapters or scenes at the beginning or end of them was discussed above.
If you have two sets of images for different Compile outputs, such as print and an Ebook, then you may need to change image tags based on your Compile Output. Since Image Placeholder Tags are text, then the placeholder tag for images [<$img ] can be searched to create an Image collection containing any documents holding image tags. This makes it easier to change the image tags to different image groups for print or ebooks.
If multiple images share the same name, but have different resolutions, then consider using a number ( like 300 DPI to identify print images versus 72 DPI for ebook versions of the same image).
Using Images as a Scene Separator or as a Chapter or Scene Headers
A.) With a Chapter or Scene Header- you must place the Image Placeholder tag in the Section Layout area of the Compile Format Designer. You must choose the "Chapter" Section Layout and place the tag or use the "Scene" Section Layout that formats your scene (Section Types). See below, where to place the Image Placeholder tags. Using this method will place the same image for each chapter or scene in place.
****If you want individual images for chapters or scenes you must use individual Custom Metadata placeholder tags inserted into the text of your project in the appropriate places. (Custom Metadata in the form of lists referring to the Image name offer the most flexibility.) Use the format bar to align the image on its own line (left, center, or right). You can also specify a specific width or an ebook percentage for the width of the image which will be added here.

An example of an Image Placeholder Tag-
<$img:Portait of Dickens.jpg;w=468;ebook=50%>
Note: Using the return key in this area can help ensure the Image does not run into the title. This will put the image one line below the Chapter number or Scene title, based on how you are using it. If you do not add this, then the image could run into the Chapter or Scene title. If this is happening, then this will appear in the Section Layout preview area of the Compile Panel.
You can also use the option to place a prefix after (a) title. This would work for Scenes where you will want to pull in a title. Using this option, you could still insert an Image Placeholder tag in the Title Prefix box, but have it appear below the Scene Title; see the image below. See the box in white that must be checked to do this.

You could place a simple Image Placeholder Tag in the Prefix Tab-
An Example where the image being inserted is a file in the Research folder called Portrait of Dickens
<$img:Portait of Dickens.jpg;w=468;h=Height;ebook=50%>
OR
You could place a Custom Metadata Image Placeholder Tag in the Prefix Tab-
In this Example the Custom Metadata field is called "Image" and is in the form of a list of individual images stored as separate files in the Research folder.
The components of the Custom Metadata Image Placeholder Tag include:
<$img:<$custom:Image>;w=WIDTH;h=300;ebook=60%>
<$img: This is the image placeholder tag.
<$custom:Image> This is the placeholder for a custom metadata entry called Image. This will pull in the current custom metadata entry in the Inspector Metadata area and insert the image where the placeholder is.
w=WIDTH;h=300;ebook=60% These settings are not needed but can be used to set the image size or percent of the ebook page which will be occupied by the image. The ebook size is expressed as a percentage because of the varying screen sizes/devices that can read ebooks.
Using an Image as a Scene Separator:
See the image below to show where to put this type of Image Placeholder. (This Image can either be a computer file or an image inside the project. This type of image is usually a small file, such as with a simple divider.) Often these are easier to use if added to the research section and have the images in a different Custom Metadata list so you can choose different images to use as a scene separator after the end of your text in a Scene.
There are two methods:
1. Using image placeholder tags inside the Scene Layout Section. (Simple, or a Custom Metadata list of images.)
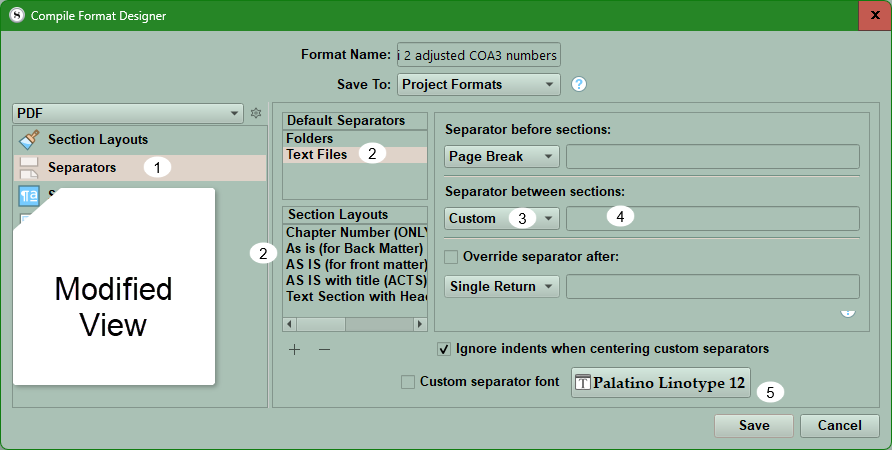
Open the Compile Format Designer and click on the Separators option (#1)
Now choose whether you are using Default (#2) or using separators per a specific Section Layout (#2).
Now click on the Separator between sections option and click the dropdown. Here, choose Custom (#3) and then put the Image Placeholder tag in the blank area to the right. (#4)
Note: Unless your image is already small, I suggest adding a specific height or width in points (or a percentage for Ebook readers). You need to designate only one parameter, and the image will adjust proportionally to this.
For example: <$img:ImageName;w=200;ebook=30%>
See an example of this below.

Outputting Images
Embedding very large high-resolution graphics inside your project can slow down Scrivener’s ability to load and save your work and even cause program instability. It makes more sense to link to high-quality graphics outside your project and provide these images to professionals when it is time to output your work to print and other media. Placeholder tags are the way around this.
Additional Image Compile Settings for Ebooks and special Ebook Image Points
The Ebook Cover Image
The Key is using the Menu command File > Import File command and select an image to import into the appropriate Front Matter folder as your first image. By default, your ebook cover is the First image in the Front Matter folder, but any image in your project can be used. Using linked images here will reduce the Project Size until Compiling. Specific requirements should be reviewed with the publisher but were discussed previously in this blog.
Image Resampling Options
You have additional options to resample images to reduce the file size and set a limit on the Maximum image size in points in the third part of the Compile Panel under settings. (see below) You can also add a placeholder tag to specify an image width as a percentage of the Ebook viewer’s screen.
Example: <$img:ImageName;w=200:h=Height;ebook=30%>

To cut down on the overall size of your ebook, you may wish to have Scrivener resample the graphics when compiling. This option will physically resize the graphics for the compiled output. It is not destructive, and the original images in the project will remain untouched.
Options in the red box above include
— DPI: This sets the maximum target DPI for all images in book. Those images with a higher resolution than this setting will be downsized. Default for ebooks is 72 dpi (currently, but is changing with improved ereaders) and print 300 dpi.
— Max size: sets the absolute maximum height or width in points. You can only define one limiting value.
Note: Recently, Amazon has been recommending not downsizing an ebook’s image DPI to 72 DPI given how many eInk and mobile LCD/OLED devices meet or exceed that resolution.
****Potential Scrivener bug for ebooks. The ebook percentage in the image placeholder tag is not applying unless there’s also a fixed image width included (though the value used for fixed width doesn’t seem to matter). I suggest including the width you want for print media and the Ebook percentage you want. This method covers either format for images. For ebooks, the ebook percentage will overrule a fixed width value for printing images.
Whether or not there is a tangible gain from using higher resolution images is perhaps subjective! However, nobody would buy high-res screens if there was no difference, and displaying a standard-res image on a high-res screen at the same scale could be noticeably blurry. The type of image makes a big difference.
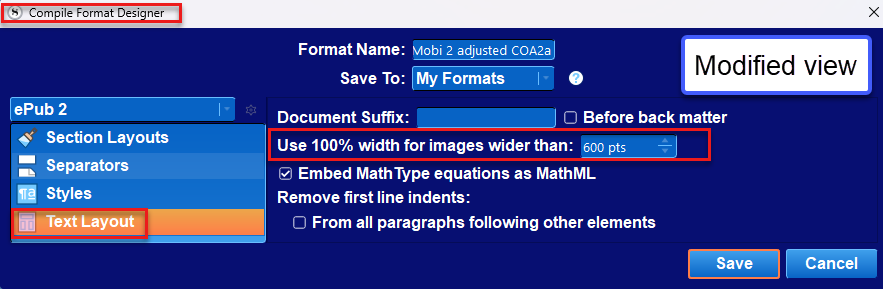
There is a default setting for ebooks in the Compile Format Designer under the Text Layout tab which can cause problems if you use large images in your Compile Output.
In the Compile Format Designer under the Text Layout tab is the setting:
Use 100% width for images wider than… For images that are wider than the width you set here (in points, not pixels), the compiler will set the requested width to “100%” of the image’s actual width, instead of giving it a static size. Most e-readers will fill the available width of the screen with the image. Some readers might always display images a certain way regardless of your settings here.
If problems occur, consider increasing the default (image width) of 600 pts to a larger number than your largest image parameter you intend to use when compiling. Doing this seems to eliminate this issue.
I will not discuss using SVG images here or advice on Cover Images here.
Images inside a Table
If place image placeholders inside a table and specify width and height then these can be included when you compile tables. The height and width parameters may need to be tweaked to get the appearance you want.
Compile Replacements for Images
Another option for inserting images is using Compile Replacements. That will not be discussed here but can be found in the Windows Scrivener Manual. (23.4.4) if you wish to explore this topic.
If linked images disappear in Scrivener:
The Scrivener support team discovered that resetting the application Options to factory default worked to clear this problem.
Do this by using the Menu command File > Options..., and clicking the Defaults button in the lower right, then restarting the software, can cause this problem to go away.
