Compiling with Images
An example of adding images to Chapter titles (Scenes could be done the same way) and how I got there. This is long winded so bear with me. This example has a numbered Chapter (#1), a centered Image (#2) which in this example is text placed on a transparent background (png file) created in Photoshop with two different fonts. This could easily be a character, or location image instead. Finally, I included custom text (#3) from a custom metadata field of text with the wrap text option chosen. The text is entered (whatever you want) in the custom metadata field for the Chapter folder. In this example, the Custom Metadata text field is called ChapterPrologue.

Above, you see how this looks in the preview area of the Section Layout Panel of the Compile Panel AFTER the Section Layouts have been assigned to the Section Types. (Note: Neither the Image, nor the custom text will be displayed in the preview. This will be limited to the Placeholders. The preview will show the location of the placeholders and whether they have been centered. If things do not look right in this preview go back and tweak the Section Layout settings until the layout looks right.)
We see three components in the above Section Layout preview:
#1 Chapter and number (The number could be replaced by other things here like roman numerals etc depending on the placeholder you use.)
#2 Here you see only the Custom Metadata link to the Image and not the image itself. Note here I included parameters on size (You can define both width or height but defining one will define the other by default) and including a size for the ebook based on percentage of screen space for the image. Since an ebook can be read on many different devices you need flexibility in deciding image size.
**** Even though this appears to be text in the topmost image, this is actually a transparent png with text embedded. This allows you to preserve a unique formatting regardless of the font chosen by a person with their reading device. I used Adobe Photoshop to create this, but other programs should do this as well. (You could capture an image of text on a white background, which should blend into most ereaders as another option.)
#3 Here you see a second Custom Metadata link to a text-based entry called ChapterPrologue. Here you can type a multi-line (wrapped) text entry for each chapter if you choose to. You can see a different, unique font for this text reflected in the appearance of its placeholder. Setting up the Custom blank multi-line text field allows you to type or copy and paste any text into this which could be unique for each Chapter.
This could also easily be done at the Scene level.
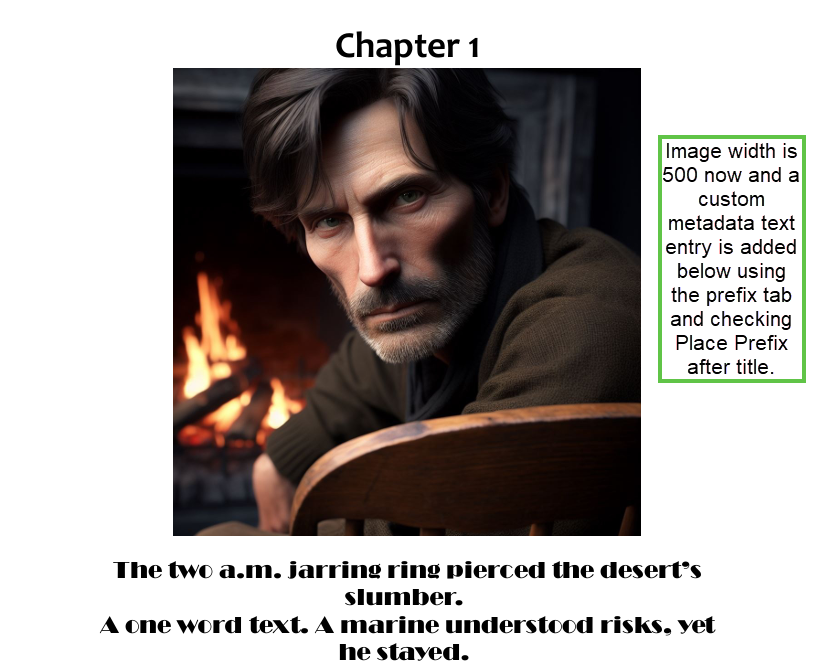
Now below we see the same setting but with an image replacing the transparent text png file. The first image is 300 points wide, and the second one is 500 points wide and shows a display of the formatted custom text below the image.

How did we create this? Let’s go through the steps.
First, you do NOT need to check the Title or Text boxes to accomplish this. However, you could include text in a Chapter folder document and have it appear at the time of Compiling by checking the Text box.

#1
First, the Chapter numbering is done through the Title Options tab where a formatted title is added separate from the Binder Title (With the option for Title NOT checked, then the Binder title of the chapter will not be displayed here.) The Title Prefix has the word Chapter followed by a placeholder <$n> which includes a sequential number for each chapter. You could insert different placeholders for different results. (See below)

In the Formatting pane if you click on Chapter 1 and use the Format Bar, you can then change the font, font size, and alignment (centered) here (for the Chapter title and number) and this will reflect in the Compile Panel in the Section Layout preview when you close the Compile Format Designer. (As shown at the beginning of this blog.) The Title Options > Title Prefix is where you decide the Format of the text for "Chapter” and its numbering scheme. (see other placeholders for numbering below)
Some of the other Auto-numbering protocols are:

#2
Next, we will insert the image placeholder (<$img: ), which will insert the image selected from the Custom metadata list of images underneath the Chapter Title/Number. This is set in the Title Options > Title Suffix. Let’s look at the components.
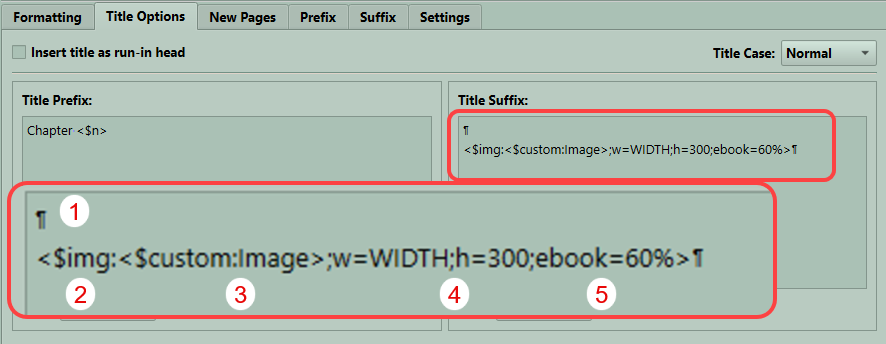
#1. This is a Pilcrow symbol, which indicates the return key was used to separate the Title Suffix from the Title Prefix (Chapter 1). If you do not place at least one, then the image will run into the Chapter 1 title in this example. How many you place here is based on what effect you want. The spacing will be previewed in the Section Layout Preview pane after you have finished assigning Section Layouts to the Section Types.
#2. This refers to the fact you are inserting an Image here. (<$img:) is the first part of the image placeholder tag.
#3. Is the name of the image being inserted by the placeholder <$img: In this example I am using a Custom Metadata (placeholder is <$custom:) item in the form of a list of entries called Image. This Custom Metadata is a list of the Image names of the Images stored in the Research Folder as individual items. When you create this Custom Metadata List the Image names listed must exactly match the names of the Image files in the Research Folder AND the name of the Custom Metadata field (Image) must also exactly match. If you had typed Images as the Custom Metadata entry, this would not work if the entry is actually Image. The same image from this Custom Metadata list can be chosen for multiple chapters if you want.
#4. This refers to the size parameters for the Image you will display in points. You can specify both Width (w), and Height (h) to get an exact size, or specify just one and the other will adjust to be proportional. Only the text will be visible in the Section Layout preview pane. You can check here to see if this is centered and how it is separated from the Chapter Title, but the preview will not display the actual image.
#5. This refers to ebook width as a percentage of the page and will only come into effect in ebook formats. Given that ebooks can be read on computers, phones, tablets, and Kindle devices, this allows the image to change size based on the screen size of the device being used.
Pro Tip - Use a Compile Collection. to create a mini version of your book elements to test the Compile Formats ahead of your deadline to work out the kinks. Separate from the Compile Collection in the third panel of the Compile Panel check the option to include your Front and Back Matter [If you want small roman numbers for these pages use the placeholder <$p-r> in the header or footer based on your preference in the Front and Back Matter pages] Your Compile Collection should include an Act/Part, one or two chapters (to evaluate the numbering scheme you chose and include multiple scenes. Make sure to check the options to include your Front and Back Matter. Having a small slice of the future book to practice on allows you to fine tune the appearance of the Compile output quickly and make adjustments as you go.
And the last component could be uniquely formatted text that could be inserted inside a Chapter page. This could add a prologue or epilogue where appropriate and allow formatting of the text outside of the main text used for the project.
How do we get this done?
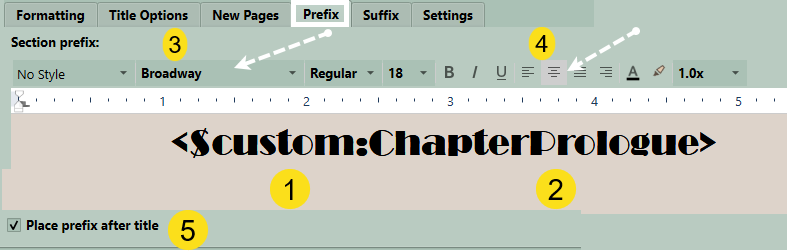
We use the Prefix Tab
1. States we are inserting Custom Metadata with this placeholder.
2. States the Specific Metadata being inserted. I called it ChapterPrologue, and it is a simple text field with the Wrap Text option chosen. This allows you to insert a unique text for each Chapter if you want to.
3. By clicking on the Placeholder you can set the font and size.
4. You can also choose the alignment of the text, such as centered.
5. Check this box to have the text appear below the Chapter title and Chapter Image.
You can use the return key to space these elements based on your desired choice.
This is placed for this example under the Prefix tab and can be formatted in this area. After you are done, the formatting you have chosen will be reflected in the Formatting pane in the placeholder text and will also be seen in the Section Layout preview pane.
Finally, once you have the Section Layout the way you want, then give it a unique name which makes its function clear to you.
This is one way, and I hope this helps you craft your own unique presentations for your creations you have slaved over.