Back Up Options
Follow the motto of a famous sneaker company and Just Do It.
Establish a proof of concept:
You should understand backups from the beginning when you use Scrivener. As a rule of thumb once you decide on a backup system/method you need to test it. Will the backups you have created restore your current projecst. If you use zip backups can they replace the current information in your project folder. Copy the ENTIRE folder of your active project and save it to a USB drive or external hard drive and place it on the desktop with a modified name like Project X backup. Open your zip backup, hard drive backup, or cloud (only Dropbox at this time is recommended) backup and see if you can recreate the Project with all its information by extracting the backup into the folder where you keep your projects. IF YOU CANNOT, then you need a new backup plan. If you save backups for your projects as a zip backup (recommended), a zip backup CAN BE saved on a cloud backup service safely because a zip backup is treated as one file by the cloud service. Test before the disaster of potential data loss, NOT AFTERWARDS. Always save your backups in more than one location and more than one way. Redundancy equals safety.
Scrivener offers many different backup settings that can be customized in two locations.
1. Project Settings in the menus dropdown Project>Project Settings>Backup
2. In the Options Panel there are multiple settings we will review which are system wide. File>Options>Backup and File>Options>General>Startup
In Project Settings
Here you can have project specific Backup options for a single project Using the Menu command Project > Project Settings > Project Backup. You can exclude any single project from automatic backups here, but doing so could result in there being fewer available backups if you have a data problem with a project. Checking this option means this specific project will NEVER be automatically backed up and can only be done manually. Checking this can make it easy to forget to back up on a regular basis. Ideally, I would not use this setting.
You can use a custom backup folder for a project. This could be important if syncing a project with a collaborator, or you want to share one project a different way. However, not saving all backups in one location can lead to confusion and errors, especially if storing zip backups on a cloud service. Zip project backups are a single file and much less prone to errors if stored on the cloud.

Settings boxed in red are Project specific and not system wide.
In the Options Panel
General>Startup

Note: On my laptop only, if I close the lid, this seems to prevent the automatic quit process. This can be important to prevent data loss that rarely occurs if Scrivener projects are constantly open. Also, if sharing a project with others, then choosing an automatic quit interval forces the program to backup when you stop working, and sync to the appropriate cloud service you are sharing. In this situation, a short time like 15 minutes may make sense.
General>Saving
The addresses the number of backups of your recent project you will save. For example: If you choose 5, then when you backup a sixth time you delete your first backup and retain the last 5 backups of this project.
Auto-Save after: By default this is set to be done after 2 seconds of inactivity. You will see an * by the project name in the title bar while this is happening. You can vary the time. (For a single document the Snapshot function allows you to save a backup of a point in time for a single document if you want to monitor its evolution over time. (Ie as you writing a novel you may want to visit previous versions of a scene.) Autosave is across the whole project and saves information in case of a system or program crash or freeze.
The duration before an Autosave occurs can be adjusted in the Options Panel > General > Saving.
Note: At any one time Scrivener only loads a few project files that you are actively using, not the whole project. These opened files are backed up every few seconds with the Auto-save option. If you had a crash or power failure, you should lose only a few words at most that were typed since the last Auto-save.
Snapshots after Manual Save: This option will take a snapshot of every document that has been changed/edited in the current writing session when you save the project manually.

This Manual Backups options which would trigger snapshots of any changed documents (as above) include:
File > Save
File > Save and Rebuild Search Indexes
(**The Back up Now option manually triggers an automatic backup)
Options to close or save the Project which DO NOT Trigger snapshots include:
File > Close Project
File > Back up to/Back up Now
Backup
Note: When Scrivener Program Updates occur, this CHANGES the DEFAULT SAVE LOCATION.
So, after every update you may need to reset the Backup folder in the Backup pane of the Options panel.
Make sure to check the current backup location after the update after every Software update.

Most of the choices above are obvious, but make sure you turn on automatic backups. This forces automatic saving of your work.
Usually, you want an automatic backup when closing the program, if using an iPad or iPhone, and you want to backup before syncing with your device.
The affect of the combination of checking the automatic quit option and backup on close options, is that doing both ensures your project will be backed up that day even if you forget.
Check the backup before syncing option even if you have no mobile devices. Then you have the setting active, if in the future you want to work with Scrivener on the iphone or ipad. This setting protects you from potential syncing problems with backups in the future.
*** Compress automatic backups as zip files, this saves the whole project in one file. Outside of Dropbox, this is the form that should be used to share projects on any other cloud service to prevent data loss.
Using dates in your backups gives another tool to pick the correct backup to open from a group of backups for a project, using the date to find the most recent copy. This will also include a time stamp which can be very helpful when sharing projects.

You must decide how many backups to keep. Keeping a larger number helps if the project becomes corrupted and increases the chance you can go back in time to an uncorrupted file. You even have the option to retain every copy, but this can consume a lot of storage space.
Choose a backup locally, or on a cloud service. Ideally the cloud service should retain a local copy on your computer as well.
These automatic settings are crucial to ensure regular backups of your projects to prevent data loss, but you should consider establishing a backup philosophy. A popular one is 3-2-1.
3. Have at least 3 backups of your project
2. Store these backups in at least two different places.
1. One Copy should be offsite for disaster recovery.
Where to save your Project?
1. Your main option is your computer/device. However, hard drives fail, become corrupted, fires can destroy, or ransomware can infect your computer, so you need other options. If your computer has multiple drives on it, or a cloud drive, then ideally save your Scrivener Project Folder on a different drive then where you store your backups (zipped or unzipped). This way if there is a hard drive failure on the computer all is not lost.
2. An external hard drive or USB key. (a 32 gig USB key is inexpensive and should hold as many projects as you need)
3. A cloud solution. What if you had your computer stolen or destroyed in a fire? A cloud solution will still have you protected. Only Dropbox works well with project folders. All other cloud services can have problems with the numerous files in an uncompressed project. Store your project as a compressed zip file on any cloud service other than Dropbox for added security. Zip files are treated as a single file by cloud services and have a much smaller chance of data corruption.
Backup Rules
Never save an open project with the source files and backups in the same folder.
Enable automatic quit so your project is saved every day. (Should backup when stop working for the day, if automatic backups not set.)
Backup files in more than one place, ALWAYS.
Validate the backups work, by opening occasionally.
Here is a helpful L&L link https://forum.literatureandlatte.com/t/what-is-your-backup-strategy/132732
Never have Scrivener open on two devices at the same time as this will lead to errors.
With any cloud backup, make sure the project has finished syncing to the cloud before shutting down your computer or opening the file at another location.
Syncing versus Backup
Syncing creates a mirror of the file and/or folder. If you make an error when syncing, it will propagate to your mirrored files.
Backups (ideally .zips) will preserve the history, allowing you to go back before the error. (note: zips also can’t be accidentally opened as projects which prevents accidents of a backup zip overwriting your .scriv file.)

Backup Rules For Cloud Services (Slower is better)
Yes, this method is more involved than direct syncing but MUCH safer.
1. Never store the Project Folder in any folder on your chosen cloud service.
2. Set your backup options for Scrivener (File>Options>Backup) to the same location on all your computers. This backup folder should be in a folder that is stored on your cloud service.
I suggest you set your configuration as follows:
Turn on automatic backups (yes)
Back up on project close (yes)
Back up with each manual save (yes)
Back up before updating from mobile device (yes-only for IOS version)
Use the default setting of zip compression of Project files
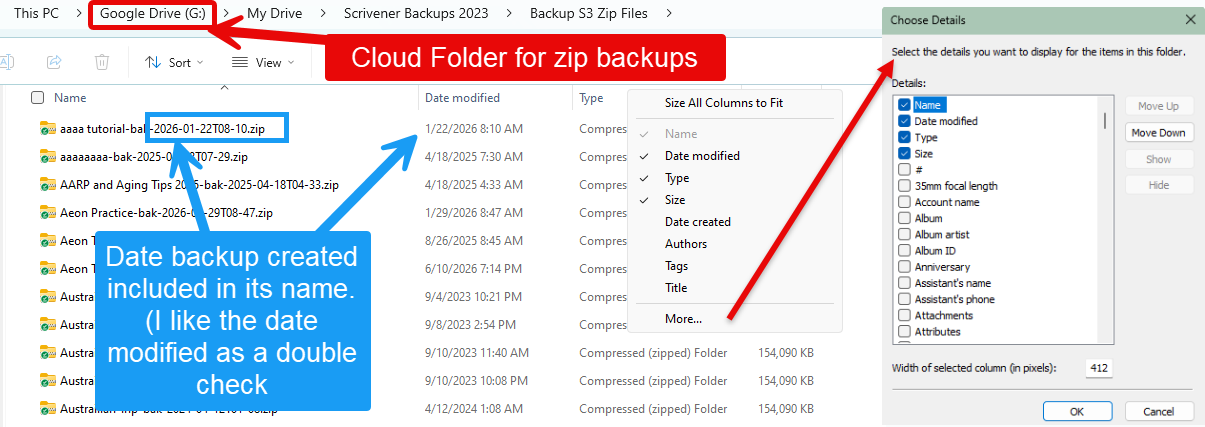
Use date in zip compression name (yes). Doing this means you do not have to add the Date modified column, though I add this column as a double check on choosing the correct backup to extract. Note see image below for customizing information displayed in your File Explorer Window.
Set Retain backup files to 25 if you have the storage or consider 10 if not as much room. (For Windows you have the option to keep all backups if space is not an issue.) Once you have backed up to designated number of backups then you start overwriting older project backups. (Example with 25 backups- at the 26th backup, Scrivener will delete your first backup. You will only have the 25 most recent backups retained this way)
Scrivener tip -if a problem develops with a project, then AFTER the FIRST episode, copy and put aside 10 of the most recent backups. Place them in a different folder as a backup while attempting to resolve your problem.
3. All of your cloud backups should be zip files for stability. Transferring one single file rather than an open folder with hundreds if not thousands of files is much safer and unlikely to run into problems.
4. Enable backups with dates to allow easier identification of your latest backup between various machines.
5. The other backup settings between machines should be identical. If two different machines have different numbers for the maximum number of backups, then the smaller number will become the default option for both machines.
6. Do not shut down a computer until the newly saved project file(s) have completed uploading, or open on the other computer until the backup has finished downloading.
7. ****** For most people, it will be less confusing to delete the older project folder from the Project Folder on your remote computer, before copying/extracting the zip backup. (Remember, the deleted Project folder will still be recoverable until you empty the Recyle Bin.)The newly extracted Project Folder will contain all the information in the latest backup. This workflow ensures that you only ever have one working copy of your Scrivener Project in your computer’s Project Folder at any one time. This reduces confusion over which copy is the latest and keeps your working area organized. It also ensures that the integrity of your backup folder is not damaged.
***This will take a little time to unzip your backup but will ensure a safe transfer of the latest copy of your Scrivener Project to a second computer/device.
One Exception: If you use an iPad/iPhone with a PC then the project folder must be stored on Dropbox and the iPad/iPhone linked to Dropbox as well.
Remember, there are settings which should be backed up before any Scrivener Software updates (or even on a routine schedule.)
These include:
Standard precautions before updating:
Save Options in a .prefs file.
Save any theme files as well.
Export Compile Formats- (these can fatigue)
Backup customized files in [Main drive]:\Program Files\Scrivener3\hunspell\dict\English-en-us
Backup wordlists.ini in AppData\Local\LiteratureAndLatte\Scrivener
Backup keyboard in a .scrkbd file.
Testing Your Strategy
1. Make a test project.
Pick a Project and use the Save As function to create a new version of an old project and modify this by stripping out most of the information and leave several files and folders to remain for the test. Give this a memorable name, Like My Saving Grace.
2. Backup Three ways
A.-Back up this project to your external drive or USB key. (Backup here every day when actively writing as an insurance policy against lost work. Spend those few seconds to protect your work.)
B.-Make sure the project is saved in the same computer location where all your other Scrivener backups are kept. (Remember, NEVER keep Scrivener project folders and zipped backups in the same folder on your computer. Note: I use a cloud syncing service for this folder to have offsite recovery in case of a computer disaster. Using a zipped backup allows almost any cloud backup to work well. Make sure this service is set to maintain an offline backup on your computer as well as the cloud copy. Configure Scrivener’s software to back up to your chosen folder. These zipped backups should ideally be on a cloud folder with local backup on the computer for extra safety.
C.-Cloud Storage solution. You should strongly consider a cloud backup for your Scrivener project as well all your other computer data to protect against disasters such as ransomware attacks. Log onto the vendor site to make sure this new project is backed up as well.
3. Recover the backup/test your methods
First, recover a deleted Project file. Delete this test project. Remember, on Windows can recover from your Recycle Bin if do not wipe it clean. Open the recovered test Project. Does it work? If so move to the next step.
Second, Copy the zip backup Project file from the external drive, Usb key, or cloud folder of your choice. Open and extract this zip backup to a test Project folder on the desktop or anywhere where you do not normally store your open Project.
Third, Open this copied Project in Scrivener to see if the information is there. (Look at the window screen capture (Windows Key + Shift + S) to capture the open Project, so you can make sure all the files are there.
Now, if you can recover your Project intact from a zip backup on a cloud service, your computer, and an external drive/Usb key, then breathe out and relax. Your system is in place and works.
*** Personally, I add a whole computer backup program such as Idrive to save a computer backup offsite, in case of a disaster at home such as a fire destroyed my computer and external drives. I look at the cost of this service as digital insurance not only for my writing, but any financial records, family photos, music, or other personal information.
Remember-
Yes, this maybe a pain to implement, setup, and test, but nothing compared to the pain of lost work, that you poured your heart into.
You owe it to yourself to make sure restoring/opening Project backups using your system works. The time to find out it doesn’t is NOT when disaster strikes.
updated 6/15/26