Overview on Cloud Backups
No Cloud based method is 100% safe.
Follow these Cloud Sync simple rules:
Every computer you are syncing should save zip backups to the same cloud folder, if you are not syncing live Projects with Dropbox.
It is best to have ALL/ANY cloud backup service set to store files to be available offline. (IE available at all times on your computer) This will avoid many sync issues with cloud services for your project. (Discussed below)
Enable saving backups with zip compression. A zip backup is essentially one file which contains everything inside the Project folder.
You should ALWAYS keep your zipped backups in a different folder from where your live project folders are stored. Ideally, the zip backups are saved on a cloud service as an additional backup option. (see below for a detailed discussion on several common cloud services) In this way, live Projects are stored locally on each machine and updated from a shared cloud based zip backup folder.
Strongly consider using dates in the backup name.
Ideally, save as many backups as your cloud storage allows, this helps if a sync issue occurs. When syncing between multiple computers, the computer with the lowest number of backups sets the limit for the other machines. Make sure all the sharing computers are sharing the same number of backups.
You should also consider storing recent zipped backups on a USB key or external hard drive as an additional safety measure when actively writing to a project. A little extra time to use the Menu command File > Backup to function to offload a copy of your project is well worth it.
For each computer, your live Project folders should be in an area that is NOT synced to the cloud and different from the backup location.
Allow the project to sync to the cloud before shutting down your computer. The dropbox app has a sync icon on it to show when the process is complete. Closing the computer early before the sync process has completed can result in errors.
Never open the same project on more than one device at the same time. (even for yourself)
Frequently backup your projects locally on your computer, in the cloud, and keep on an external backup option as well. In case syncing issues occur.
Dropbox Cloud Sync Rules
Always allow Dropbox to finish uploading before shutting down your computer, putting it to sleep, OR closing Scrivener. If your project is not fully uploaded from your computer and you interrupt the process, then you may corrupt the project.
When sharing on two devices, then always verify your Dropbox folder has completely uploaded on the first device before shutting it down. Make sure the Project has fully synced before opening your project on the second device.
Dropbox is the only service designated as reliable by L&L to use for cloud syncing a PROJECT.
If the file path your project is stored on Dropbox gets changed and Scrivener cannot save to this location, THEN it switches back to the factory default location in App data. Check the file path under File > Options > Backup tab.
Each Computer accessing Cloud Sync must use the SAME Dropbox account.
Have the same cloud folder for backup for each of your devices. The number of allowable project backups should be the same for each device. This is because the device with the lowest number of backups set in the Options Panel determines the number allowed for all other devices syncing with the cloud backup folder
There are two ways to backup Scrivener Projects to the cloud:
Method 1.
As a live folder project containing all the files. Per the L & L site ONLY Dropbox syncs live folders reliably.
Method 2.
The second method outlined below to sync Scrivener Projects between devices is more complicated than direct syncing of projects via Dropbox, BUT it much safer. The entire Scrivener Project is only stored locally on your devices and zip backups of your Projects are stored in the cloud. These are used to update your Scrivener Projects on the other machine. A zip backup acts like a single file which can be stored safely in the cloud.
Compressed (zip copy) project folder backups can be reliably saved on most cloud services. You download and then extract the zip file on your computer to a new location. Open the Project folder and double click the *.scrivx file to open it, or right clicking the file and choosing scrivener as the program to open the file with.
Using a Compressed copy (zip copy) of your project for backups.
Zip backups can be reliably saved on most cloud services.
Copying your updated project’s zip backup to the local machine:
Extract the latest zip backup for the project and choose a location to place your Project Folder outside the sync folder.
I put them on my desktop, then delete the "old" Scrivener Project on the computer, then move the "new" Scrivener Project from the desktop into my Project folder where my local live projects are stored.
Open the updated project the normal way using the Menu command File > Open. Select the project folder and double click on the *.scrivx file to open the project.
Following step 2 ensures only one working copy of a Scrivener Project is on your computer at one time. Though this method requires more steps, it greatly reduces the risk of syncing issues when using Cloud services including iCloud, OneDrive, and GoogleDrive among others.
You want any Cloud service you are using to also save your files offline (locally on your computer) for additional safety and in case you are using your computer in a location without wifi, or stable wifi access. This ensures you have a usable backup on the computer/device at all times.
Competing Cloud Services on your computer can compete and interfere/corrupt your Scrivener Project data.
Examples can include Dropbox, One Drive (included on Windows computers), Google Drive, Idrive and others.
1. Understand each of your cloud services and understand how to designate files which are being backed up to be saved BOTH locally and online. Be very careful and understand how they select files to backup so you can manipulate the settings to have only one service backing up your Scrivener Projects. ALWAYS have more than one backup plan for your Scrivener Projects including external backup devices.
2. Pick only one cloud service to backup your Scrivener Project files.
3. Always know where your projects are. Use the Menu command File > Show Project in File Explorer to reveal a project’s location.
4. Remember the File > Save As command creates a backup of the current project which is no longer connected to changes which occur in the original. The new project diverges going forward from the original project. Give any projects created with this method a descriptive name to avoid unnecessary confusion.
5. Don’t trust the Recent Projects menu. If you save a project to an external drive, then remove the drive, Recent Projects will still point to it. So when you use this command, you will see no results. Use the option in #3 or Windows Explorer itself to find your project.
Scrivener Tip: Keep ALL of your Scrivener Projects in one folder, even if you create subfolders to organize your projects. Never save your zip backups and Scrivener Projects in the same folder.
How to set different cloud services to save its files offline:
For Google Drive
Right-click on the letter of the Google Drive (usually G), then see the My Drive Icon. In the right-click options look at the option Offline access and make sure Available offline is checked.

This Google support Page shows how to use Google Drive Files offline.
Only backup zipped project backups to google drive. If you backup the folder to google drive, it is a known issue that Google Drive changes comments to xml files and there is a significant risk of sync issues. Zip the project then backing up to Google drive should resolve these issues.
For Microsoft OneDrive
OneDrive’s Files On-Demand feature is enabled by default on computers running Windows 11. This feature can cause problems syncing and opening Scrivener projects kept live in OneDrive. If you find you’re having trouble opening a Scrivener project stored in OneDrive, then you have one of two two options:
you’ll want to either disable the Files On-Demand feature all together, or set your project to always be kept locally on the device.
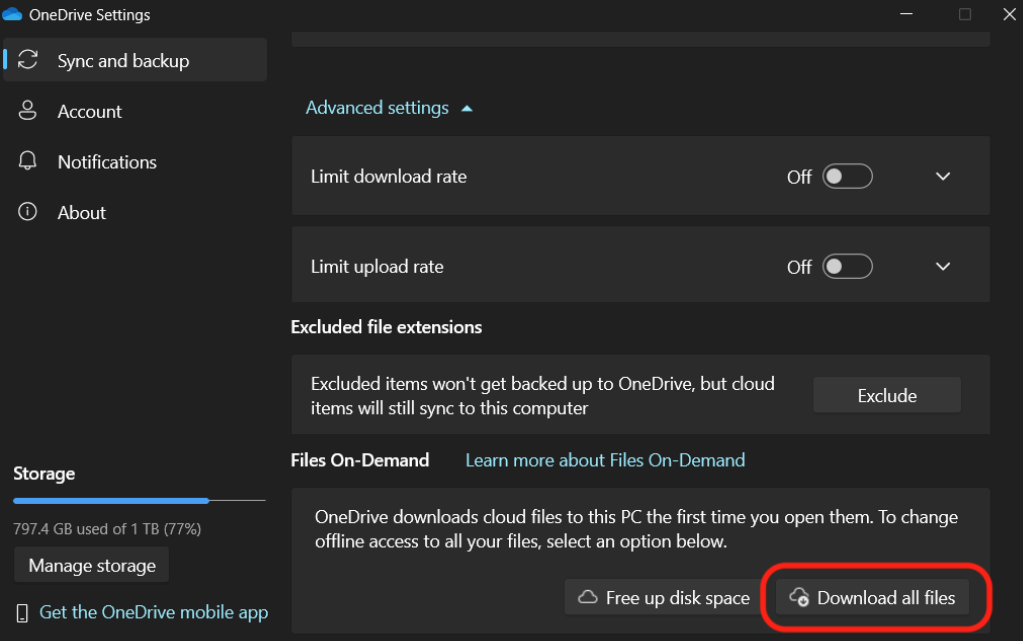
1.) To disable Files On-Demand altogether:
Right-click on the OneDrive cloud icon in the lower right of your taskbar to go to Settings.
Under the Sync and backup tab, expand the Advanced settings section.
Below the Files On-Demand heading, click on the button to Download all files.
2.) Set your project to always be kept locally on the device. If you have a OneDrive file or folder and need to make it available on your computer while offline, right-click on the file or folder and select -Always keep on this device.


The file or folder will now display a dark green tick. (see above) These always available files download to your device and take up space, but they’re always there for you even when you’re offline.
This Microsoft Support Page explains how to keep One Drive files always on your computer.
For iCloud
Install the iCloud app for the PC from the Microsoft store (free download)
Sign in with your iCloud password and ID
You will be asked to verify the request to install and enter a code. You will receive an email as well about this.
The screen will give you options as to what you want to add to the computer.

After installing iCloud you will have two ways to ensure your iCloud files (including Scrivener backups are stored locally on the computer.
Method 1:
Open the app. If you open the app and will see the iCloud Drive option with a Caret to the far right. Click this and make sure the iCloud Drive option that files will sync to their own folder in File Explorer is clicked on. You will also have the option to change the default storage folder. (see the image below)

Method 2:
Go to the iCloud drive icon in your File Explorer and right-click.

Right click on folder and at top of the list chose Always keep on device.
Any changes you make to the file will automatically upload to iCloud Drive when you're back online.
Here is a link to the apple guide for this-
If you turned on iCloud Drive using iCloud for Windows on a PC, you can pin a file or folder to keep it downloaded to your device. Any changes you make to the file will automatically upload to iCloud Drive when you're back online.
For Dropbox-
If you encounter an error stating that some of the project's contents are not accessible, have "zero length data", or that the project "seems to be of an older format, but no binder.scrivproj file could be found inside it", then you may need to adjust your Dropbox sync settings. Your Scrivener Project should be set to stored BOTH locally and in the cloud.
There are two methods to store the files offline on your computer:
Dropbox Syncing Method 1
Install the Dropbox app on the computer and open it.
You can right-click on the Dropbox folder on your computer after you have installed the desktop app. Click Manage Hard Drive Space. When you click this, you can view the status of your Dropbox items as individual files or as folders (Use the folder view).

You will see the screen below. You want to see the Dropbox on hard drive option with a green check. This means all Dropbox files are BOTH on your hard drive AND online. This is the safest option to prevent data loss for Scrivener projects or any other information stored using Dropbox.

For Dropbox look here for the information on keeping your files stored with a copy on your own computer.
If you use Dropbox to sync between an Ipad and a Windows/Mac Computer then set up a new folder on the Dropbox account called Apps > Scrivener > Host your live Scrivener Project Folders here. Set this up BEFORE moving Scrivener into the Dropbox Folder.
On an IPad you must manually sync as there is no Autosync. You can pause and restart sync to make sure files do actually sync. Scrivener will often detect and do mobile syncing automatically, but may need to occasionally be nudged manually.
Note: Computer backup services like Carbonite, IDrive, etc can also back up Scrivener files to the cloud. Make sure where you store your zipped backups are included in the folders/files saved by these types of services.
Syncing Best Practices
It is best to have ALL/ANY cloud backup service set to store files to be available offline. (IE available at all times on your computer) This will avoid many of the snyc issues encountered with cloud services for your project. Currently, Dropbox is the most reliable service to sync projects between computers, but you should also ALWAYS keep your zipped backups in a different folder that is also on the cloud service as an additional backup option. You should also consider storing recent zipped backups on a USB key or external hard drive as an additional safety measure. A little extra time to use the File > Backup to function to offload a copy of your project is well worth it.
If there is a problem with a Scrivener Project stored on Dropbox, then before trying to recover a backup go to your backup folder [File > Options > Backup > here you will see where your backups are stored.]

By keeping all backups, you will not overwrite any of your project’s backups when you open a backup to try and recover data. When the problem is resolved, then change this setting back to your desired number of backups. If you have the room, consider saving a larger number of backups to protect against data loss. This way, you can open multiple backups to recover the lost data and NOT worry about anything being overwritten.
When the data is recovered, you can reset the number to your normal backup number.
Dropbox Syncing Method 2
Right-click on the app icon in your computer taskbar.
Click on the your avatar/name in the right upper corner of the newly opened screen.
Click Preferences and then click the Sync tab in the newly opened screen. (See images below)

The Sync screen gives you multiple options. If you have the room, choose Available offline and all the files will be available locally and in the cloud.

Note computer backup services like Carbonite, IDrive, etc can also back up scrivener files to the cloud. Make sure where you store your zipped backups are included in the folders/files being backed up by these types of services. All Scrivener files should be backed up multiple ways including externally to a hard drive or USB key as added insurance for these precious files.
Cloud FAQ-
Many other cloud sync services will have issues maintaining live Scrivener Projects. Specifically for Scrivener- One Drive, Google Drive, Icloud Drive can have sync issues. This is different than using a compressed zip file. As a single file this will not be corrupted.
Sync with Mobile devices-
Use the Menu command File > Sync with Mobile Devices (KS Shift + F8) This will force Scrivener to check for possible changes between the current project and your mobile project. If there are differences, then it will close the project and correct the issues and reopen.
Oliver suggests syncing with your mobile device before leaving the house while you have a stable internet connection, rather than wait until you have left home.
Solving sync conflicts
Have you edited your project on different computers or devices at the same time and forgotten to hit the Sync-icon? You’ll have to solve sync conflicts.
You don’t have to do anything if Scrivener resolves the conflicts by itself, but the software occasionally saves files with conflicts in a folder called Conflicts with “Conflicted Copy” attached to its title.
The Conflicts Folder
The Conflicts folder appears at the bottom of your Binder, sporting a yellow warning icon. A folder, named by the date the conflict happened, will be inside the Conflicts folder, containing copies of the conflicted files. Also, Scrivener creates a Document Bookmark, pointing back to the file it conflicts with inside the Binder.
You can compare and see if any issues, and if not then delete.
In its context menu, you’ll discover the command to [Open > in Other Editor], making comparing documents side-by-side more convenient. Scrivener deletes nothing without you initiating it. Two versions of the same text will exist in this case. It’s up to you what to do with them. You may want to keep the one already in the Binder, one of the conflicted files, or copy content from the conflicted file to the one in the Binder.
Trash the rest.
Last updated 9/4/26