Scrivener Themes and Customization
Themes
Themes adjust the way Scrivener is displayed, but this is only part of what is customizable within Scrivener Settings.
Almost every app, on every platform, has settings. You can adjust the way the app displays (Themes), how certain features work, and more. Scrivener has lots of settings: the section of the Scrivener manual that covers these settings (Appendix B) is 60 pages long. You don't need to read all this, and you probably won't need to change most of these settings, but they allow you many opportunities to customize Scrivener.
Note: MacOS uses the term "preferences," and Windows uses "options" for the type of settings that control how Scrivener behaves outside of the Appearance Panel and includes some options in the Appearance Panel as well.
Changing the appearance of Scrivener and how it behaves fall into three main categories:
1. View Menu Changes (Temporary/Project Specific)
What they cover: Showing/hiding the Binder, Inspector, Toolbar, Format bar, as well as multiple appearance options for the Corkboard and Outliner.
Where they are saved: These are mostly saved within the individual project file itself, not in the Scrivener’s global preferences.
How to save them: If you want to keep specific View menu options for the Binder, Outliner, or Corkboard.
Note: How the various components of the Scrivener interface are displayed as well as how the interface appears (Split view, Outliner with editor, etc) requires using the Menu command Window > Layouts > Manage Layouts to save these project specific appearances. You will also need to click the boxes to save the Corkboard and Outliner settings and Preserve all Metadata options in the Layout Window.
2. Options[Windows]/Preferences[Mac] (Global across all Projects but can include Themes as well)
What they cover: Behavioral settings (autosave, backups), Appearance settings (colors, themes), and Default editor formatting settings including fonts among other options.
How they are saved: On macOS, these are saved in ~/Library/Preferences (usually a .plist file). On Windows, they are handled via File > Options > Manage > Save Options to File. (You can import a group of global settings including themes as well using the Load Options from File choice.)
Exceptions:
• Appearance Preferences: For the Outline or Corkboard some settings in the View menu are project specific as opposed to the Option Panel’s Appearance tab, which are global and included under Preferences.
• Zoom Settings: Default zoom levels for the editor are saved in Options/Preferences, not in the View menu. These include options for the Editor, Copyholder, Document Notes, Bookmark view, and Snapshots.
• View Mode Defaults: While you can change the view for one folder to corkboard, the default behavior of how new containers look is sometimes managed within Project Settings and the Layout Manager.
****Current Option files are not compatible with older versions of Scrivener.
3. Themes (Global across all Projects)
Themes do not include any personal information and can be safely shared with others. Themes are a combination of changes applied in the Appearance section of the Options panel which primarily alter the color schemes of Scrivener but can include the GUI font settings as well. You can manually alter these changes and even save the result as a new theme. If I do this, I will often name the new theme based on the original name, but add wording to indicate I modified it.
Themes allow you to customize many aspects of Scrivener including the colors and fonts of various sections such as the Editor, Composition Mode, the Corkboard and Outliner view. These can be changed based on your eyesight, lighting conditions, or computer screen to enhance the writing experience.
Theme Facts
Themes are global across all projects on one machine and do not include any personal information.
Changing themes requires a restart of the software.
Themes as files can be useful for synchronizing appearance settings between computers, without changing all of their Options, sharing your appearance settings with others, or loading theme settings you’ve downloaded from the Internet.
Scrivener includes a number of default themes in both dark and light mode.
You cannot edit default themes directly. However, you can modify a default theme and save it with a new name. However, there is one exception. The theme labeled Default CANNOT be edited or saved as a SCRTHEME file. It can be modified during use, but these modifications cannot be saved and included as a new theme. Antoni Dol has created a White Theme to mimic Scrivener’s Default Theme which does allow manipulation. The link for this theme will be included in the second blog in this series.
If you want to quickly cycle through themes to decide which one best suits your need, then open one Scrivener project and make NO changes other than the theme. Now, when you close Scrivener to apply the new theme, it will close instantly. You can repeat this process to rapidly cycle through multiple themes.
Tip for evaluating Options: If you have two projects open, you can change settings in the Option panel of Project A and view instantly the changes which occur in Project B on a split screen or second Monitor.
The newest versions of Scrivener’s preference files when including a theme as well, are not compatible with older versions of the software.
Even though Scrivener has made the saved Project files interchangeable between a Mac and a PC, themes ARE NOT interchangeable.
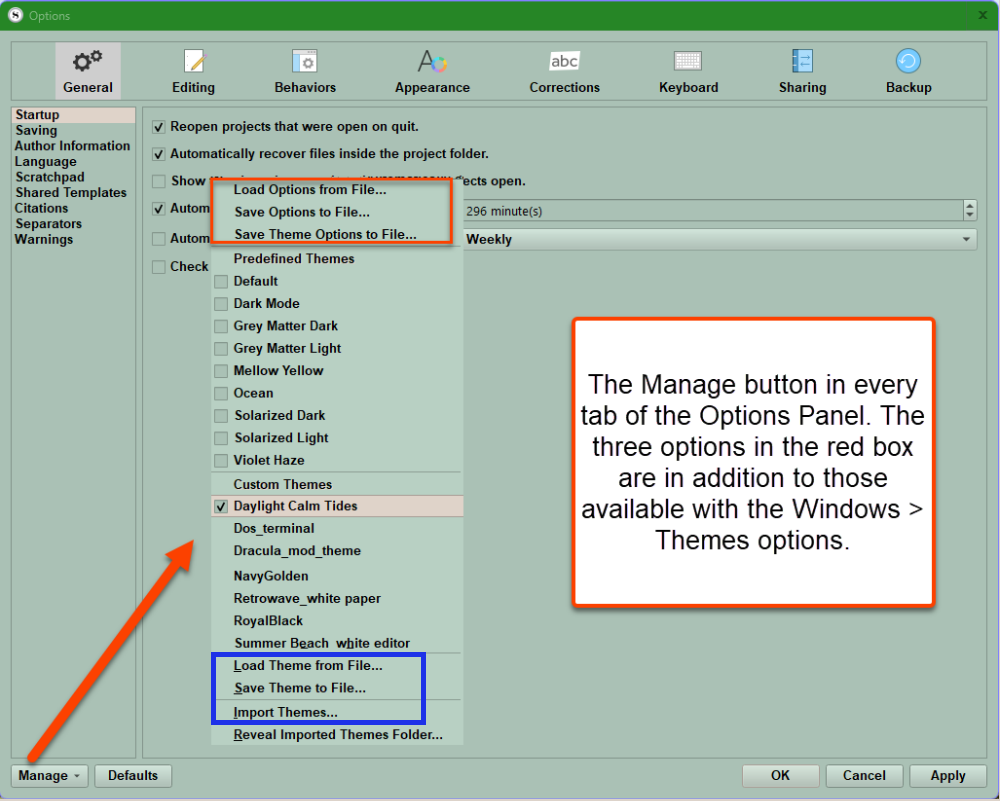
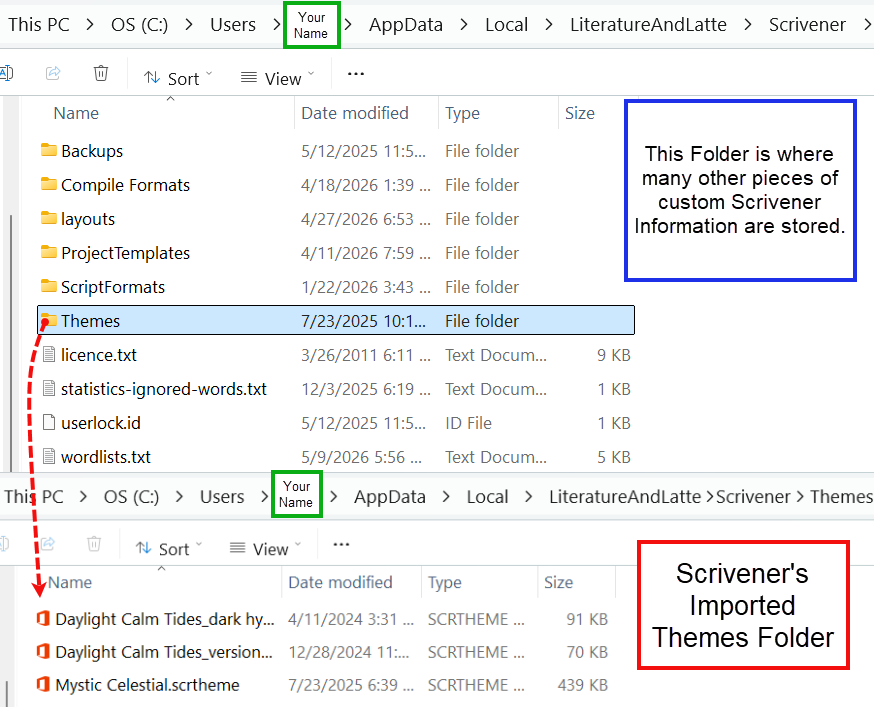
ALWAYS Import Themes - The [Import Themes] command (See the red box below) will copy the Theme to the application folder, and add your personal Theme to the list of Custom Themes in the Window menu. You will use the Manage button in the Options Panel to import or save Themes.
Themes vs Options
Think of themes as the superficial top layer which includes skin tone, eye color, and hair color for example and these belong in a theme file (.scrtheme).
Options (preferences in a Mac) include the above cosmetic choices as well as behavior changes from the option panel, layout, backup and sharing options, and other settings in the Options panel.
Themes (.scrtheme) primarily change the color options you see, but can include interface font styles. Those Theme settings which can be adjusted are in the Options Panel under the Appearance tab. In fact, a theme could be limited to Scrivener’s interface font settings alone if desired.
Options (formerly preferences, though the file still ends with .prefs) include everything else that can affect a project’s appearance, but include other settings that impact how Scrivener functions.
(Main) Options include:
General options including start up, saving, Scratchpad, and author information options including, address, email, and phone numbers.
Editing options including formatting and revisions
Layout Options
Behaviors options including navigation with folders and files, snapshots, dragging and dropping, double-clicking, and document links
Corrections options
Keyboard options/Shortcuts
Sharing options
Backup options, including the location of saves, methods of saving, and number of backups per project
Options under the Appearance tab which affect display choices for the General Interface including Toolbar Size, GUI Font size, and others
Binder- Binder spacing and indent
Composition Mode- Current Line Highlight (Color chosen under Main Editor Colors)
Corkboard- Grid Size, Tinting intensity of Status Stamp, Label color, and Shadows if use this option
Index Cards- Card corners (square or rounded), text lines on cards, or Label indicator display form
Inspector and Notes -
Main Editor- Current Line Highlight option, Editor width, and margins, and editor centering with a fixed width
Outliner- Grid line options, Row color options, and indents and text spacing
Page View- Center pages, Margin guides, and page spacing, and page size
Quick Reference- Current Line Highlight (as in Composition Mode and the Main Editor)
Scratchpad-
Scrivenings- Separator and Title options
Snapshots-
Target Progress Bars- Show smooth color transitions, and whether to display in the Quick Search Window
Textual Marks- How to display links and is hidden if choose Hide Markup option under the Menu command View > Text Editing > Hide Markup
These things are not saved inside either a Theme or Options file:
Metadata including labels, status settings, custom metadata.
Custom Icons.
Binder structure.
Special Folders like a Scraps folder, Template Folder, Front and Back Matter, etc.
Document Targets.
Custom Backgrounds (Though background images can be stored within the Project Template to have available for various theme appearances
Layouts arrangements for your interface.
(These must be saved per Project, or saved inside a Project Template which can be reused for future projects such as a personalized Novel Template.)
Themes can be implemented two ways.
1. Use the Menu command Window > Themes > then choose-
A default theme (Themes provided by Scrivener)
A custom theme you have created, modified from a default theme, or downloaded.
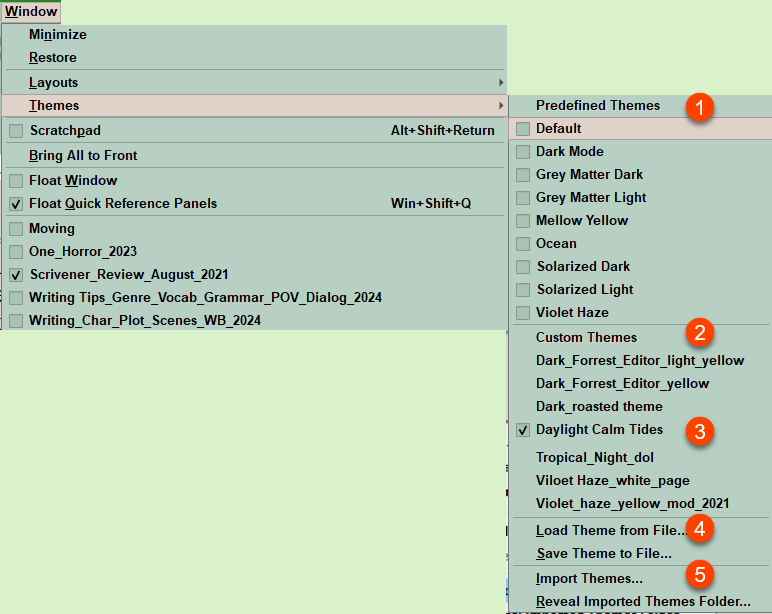
#1 Are Predefined Themes or the ones provided by Scrivener. These cannot be modified directly, but can be copied and modified with a new name. (Except the Default Theme.)
#2 This is where your personalized themes or custom themes are available to apply to your Scrivener project.
#3 Are Custom Themes which have been downloaded, created, or borrowed
#4 Here you load a saved theme or save a current custom theme in a set location.
#5 Here you can Import Themes, you have saved or downloaded and reveal Scrivener’s imported Theme folder location.
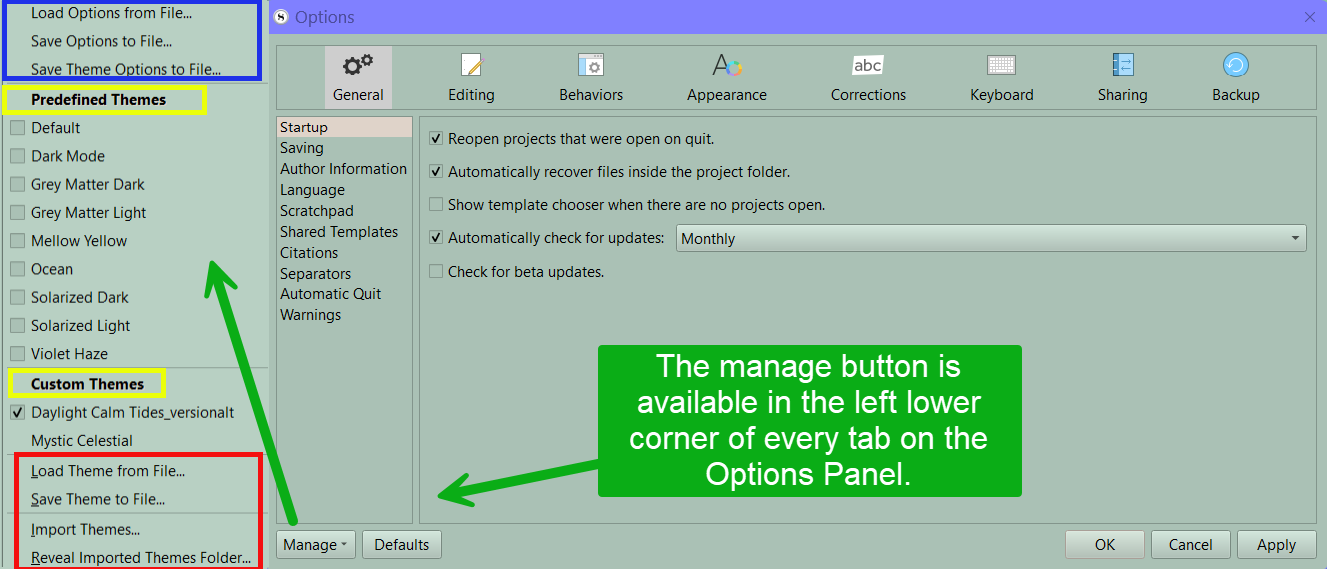
You can also customize themes/modify existing themes to make them more comfortable for yourself and then save these modifications as a new theme. This must be done from the Options panel by clicking the Manage button in the footer below. See below:
2. You reach this by using the Menu command File > Options > then click the Manage button in the lower left-hand corner to see your available themes and options on how to handle them.
2. Inside the Options Panel, use the Manage tab to load or save options (which can include themes) (in the red boxes). Saving Theme Options to file will strip out any personal information, if you want to share the file.
Or you can Load Theme from File/Import Themes Both commands will open the Windows Explorer to find a theme file to load. (in the blue box)
Manage options Include:
Load/Save Options from File… Save your options to an external file for either backup purposes, or to synchronize your settings between multiple computers. Options can be loaded from these files, replacing all current settings. (This INCLUDES PERSONAL INFORMATION and you may not want to share themes saved this way with others.) Current Preferences are not compatible with Scrivener software versions older than 3.15.
Save Theme Options to File… This command will strip out all options that might contain personal information, making the file suitable for sharing with others. When imported as a theme, only those settings that pertain to the appearance of the software will be modified.
It is safest to only open Theme files (*.scrtheme) which should minimally impact how Scrivener behaves. (I strongly suggest Saving themes using the Manage button > Save Theme to File option.
**** Windows Tip: Every theme created or imported should be saved in a single special theme folder [Whether you are currently using it or not.], and if you work at more than one location, then I would use a shared cloud folder. As single files, any cloud service should be fine. This way, if you change your mind in the future, it becomes easy to import/use other themes you have used in the past, including any you have customized.
Load/Save Theme from File… This option will simply apply the theme’s settings to your current options. Themes are useful for synchronizing appearance settings between computers, without changing Scrivener’s options which affect how it functions.
You will receive a message from the Theme Manager Panel.
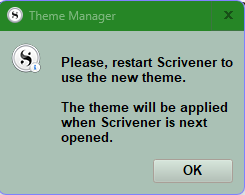
You will need to restart Scrivener to see this theme applied.
After restarting the theme settings will be applied to the software and the loaded theme will become available to use when you use the Menu command Window > Themes > Custom Themes (You will see the name of the newly loaded custom theme here.)
Windows Tip: To rapidly change themes, when you restart do not change anything other than a theme setting. You can now choose another theme to preview and restarting will cause Scrivener to close instantly. In this situation, you can quickly cycle through various themes to choose the one you want now.
The last option is Reveal Imported Themes Folder…
This will open Windows Explorer to the folder holding your INSTALLED Custom Themes.
Deleting Scrivener Themes or Preferences
To remove Themes on Windows, select the Reveal Imported Themes Folder which will open the Windows Explorer to the default storage folder for all your currently installed themes. You can delete any themes you do not use. You can also delete themes stored elsewhere the same way.
Changing Themes can be done two ways:
Using the Menu command Windows > Themes > choose a theme either a default, or custom theme you have used, or load/import a new theme.
Using the Menu command File > Options > And from the Options Panel now click the Manage button and choose a Load a Theme either default, custom, or a new theme. Clicking a currently installed theme will generate the prompt to install the theme. This command has several additional options. (see above)
Customizing Themes
If you wish to customize or create your own theme, look at the Fonts and Colors options for every tab found inside the Options Panel’s Appearance section.
First, you should use the manage button and backup your current theme if it is a custom or modification of a default Theme by using Save Options to a File. (Remember, Scrivener’s default theme can not be modified by you.) This allows you to go back to your current set of themes and options if you are not happy with the Theme you load.
Second, now choose any existing theme you have downloaded, or default one which is closest to the result you want to achieve.
Third, go through the Options Panel Appearance section as discussed below and tweak settings to alter Scrivener’s appearance. As mentioned, consider having two Scrivener Projects open to see the effect of any changes applied in the Options panel in real time in the second project to decide which changes makes sense.
Scrivener Tip: When you have things the way you want, consider saving the Scrivener Project as a Project Template. A Project Template can save all your options you implemented, but also preserve any changes from the View Menu, and save special folders, templates, and layouts you used to create the perfect writing environment. In the future, changing themes for this Project Template will change its appearance with minimal impact on how it functions.
Themes include changes made from the Appearance section in the Options Panel.
In the Appearance section, you can change various elements, including:
Binder- fonts and colors
Composition Mode- Background file, text color, link color, Scrivening title colors, and more.
Corkboard- fonts and colors
Index Cards- fonts, colors, background and divider lines.
Inspector and Notes- background color, Comment and Footnote area background color, and Text colors
The Main Editor- colors for the Editor (which is the Editor’s main window background color), text, current line highlight, text selection color, and Fixed width background
The Outliner- fonts and colors
Page View- background color
Quick Reference Panel- Comments and Footnote background color
Scratchpad- background and text colors
Scrivenings- fonts, and the colors for the title background and text
Snapshots- colors for the text background, new, and deleted text
Target Progress Bars- various progress level colors
Textual Marks- colors for multiple different text types, search results, underlines and your Footnote backgrounds
Some examples include:
Below is an example from Antoni Dol of what can be manipulated by changing a theme’s hidden files. He has written a book, Mastering Scrivener Themes (for Windows) where he explains in detail how to achieve significant changes to the normal Scrivener Interface as shown below.
To radically manipulate a Theme, first rename a .scrtheme file to .zip. Now when you click on the newly renamed file you will find the files needed for a radical change in a theme’s appearance. These include a palette file (. pal), a QT 6 stylesheet (. qss), and an extensible Markup Language manifest (. xml). You’ll have to edit these files to create a unique Windows Theme. Antoni’s book goes through this process in exquisite detail.
Antoni Dol’s Tropical Night Theme (in the flesh)
Under Composition Mode-A theme can manipulate any of the options seen under the Color Tab
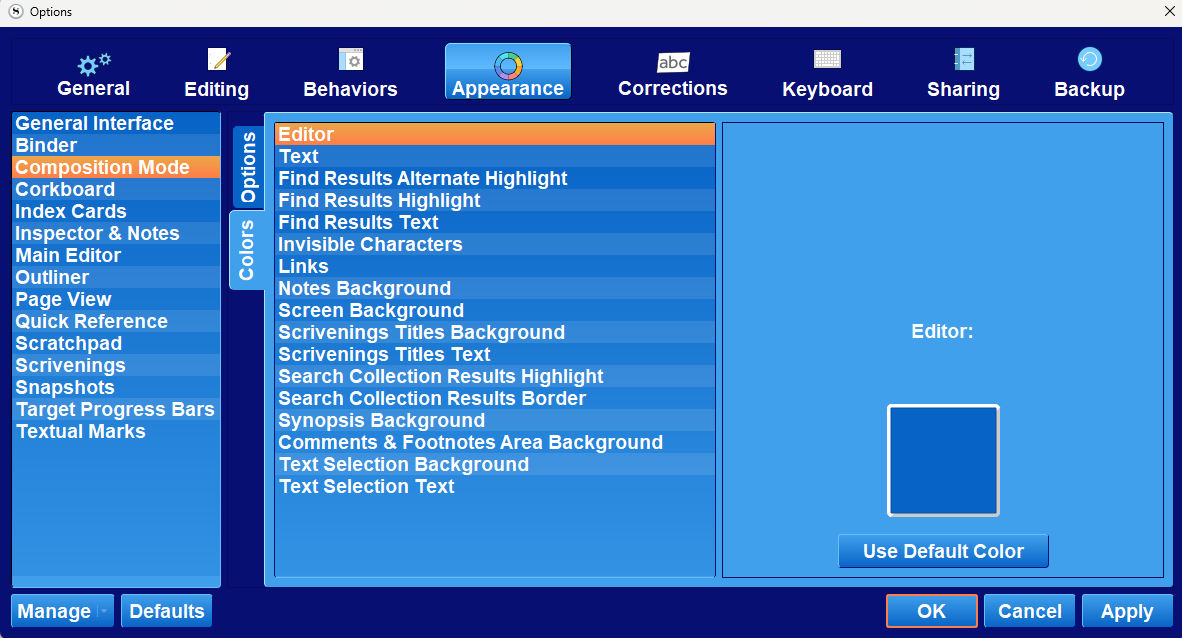
Other Areas where you can change colors include the Corkboard, Index Cards, Main Editor, Scratchpad, Page View, Inspector Notes (Your Synopsis background Color is chosen in the Composition Mode Tab (see above)—
You can change both Color and Font options to alter a Theme’s appearance. Below is a the Tropical Night Theme Overview.
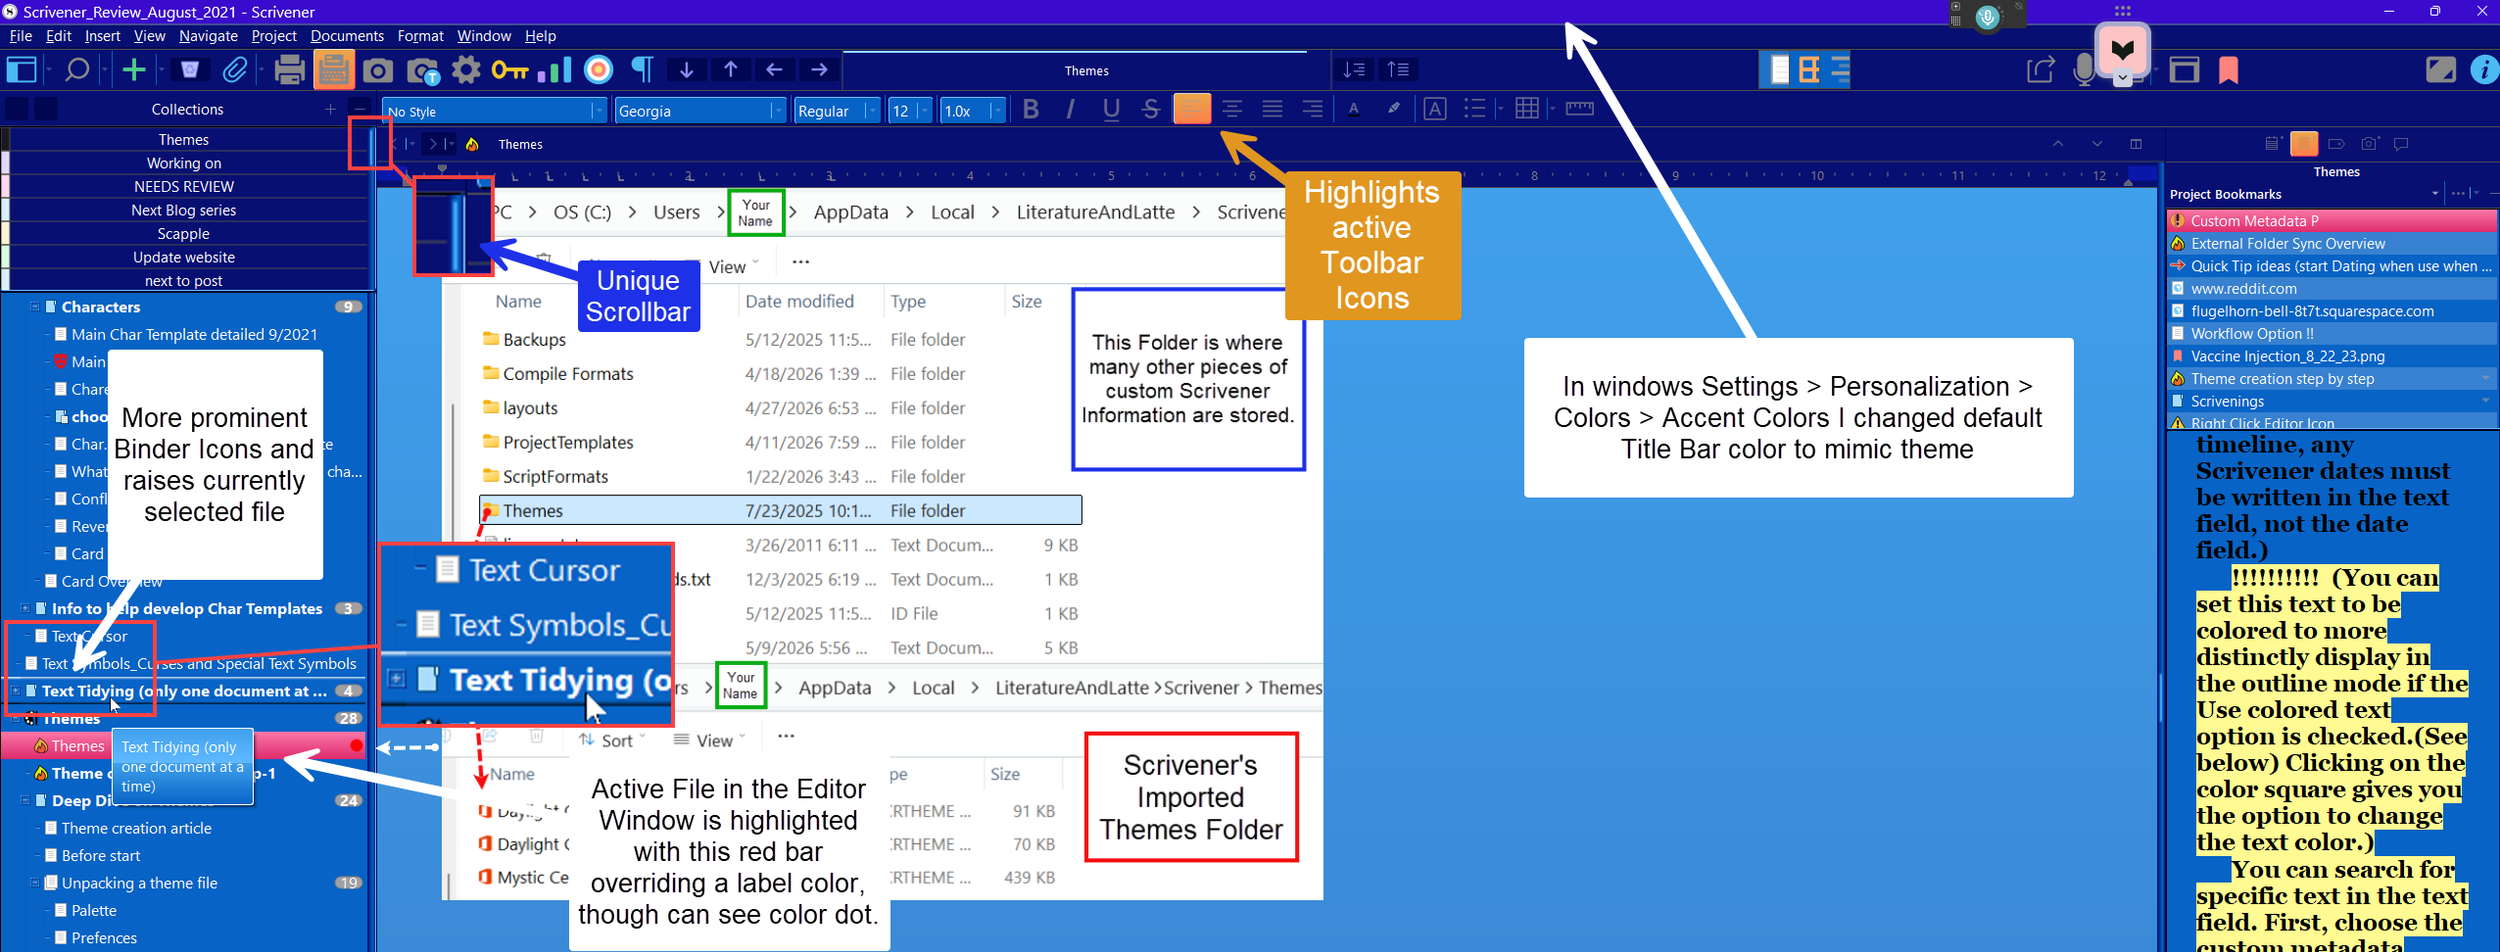
We will continue our discussion in the second part of this series coming in the future. I will also include links to theme resources in the second part.