Links- Linked images and Using Images
Linked Images and Using Images in Scrivener
A linked image is the placement of graphics in your text in such a way that the thumbnail visible in your editor is being generated by files outside of the document, as opposed to being saved into the text of the file itself. This reduces the size of your project.
Resizing Linked Images works the same way as with embedded graphics, you can adjust the display size of the image.
****It is important to know that doing so will alter the original image’s metadata on the disk. The image will not have its pixels touched, but its print size information will be altered and thus the original file will be changed.
To preserve the original file, consider using a folder of copied images for the project to maintain the original images stored on your computer.
***Note: Importing images as Research File Shortcuts will look similar, but the images can only be placed in the Research folder. This is discussed at the end of this blog.
Linked Image Facts:
Using Linked Images reduces the size of a Scrivener Project.
The image remains linked as long as the location of the image and its name on your computer are not changed.
Hovering the mouse over an image will show its name and say Image Link for any linked image and show the path to the original image.
Linked images will look and act like embedded images in every way. You can by and large ignore the differences while working with them.
Image Placeholder tags are searchable.
Both Images and Linked Images can only inserted between, before, or after paragraphs.
You can ONLY use the zoom function only on Image Documents in your Research fold, and NOT for any images inserted into a text document.
When compiling with linked images, the current version of those images on your computer will be used to create the embedded copies used in the compiled version.
If you change the current image to a different one using the Change button during a Scrivener session, the image will be updated when the program restarts.
Note: The Change button can also be used to rename the Image, but maintain the link to the Scrivener Project. Doing this will work for the current Project, but could break the image link if the original link is used in multiple projects.
Actual Images can only be saved as a document (file) inside the Research Folder, but can be inserted as a linked image into the Manuscript.
Images in your Project can be reused. (Use the Menu command Insert > Image Linked to a Document.
Consider keeping a running list of images placeholders you currently use so if you must search, then you know the exact image name to look for. If not you can do a generic text search using <$img (As this begins every image placeholder tag.).
Consider descriptive names for any image so the name itself will identify the image it is linked to. If files have the same name, then use numbers or letters to distinguish. My Cover1, My Cover2, etc.
Checking the Image links create back-link bookmarks in the Options Panel under Document Links (under Behaviors) allows you to click on any image file within the Project and in the Inspector Document Bookmarks you will see a list of files the image was inserted into.
If the image is a crucial one and it is important that Scrivener not adjust the original files, then -
1. Make a copy of the Image to use for your project which will preserve the original.
Note: Putting a computer folder for any Linked Images for Scrivener on a cloud service allows these images to be shared between different computers using the Scrivener Project at different locations without interruption.
2. Or do not use the Scrivener resize tool in the editor
3. Or use image placeholder tags (subsection 15.6.4), where the final output image size can be specified when compiling. Using placeholder tags affects the output images rather than the originals.
Image Storage Facts
Avoid using JPEG images if you can and use other formats like PNG. JPEG files are almost not images, but rather a highly optimized set of instructions for making an image. Copying a JPEG image over and over can lead to degradation. PNG files can be endlessly copied without a loss of quality.
The file size of an image imported into Scrivener does not change when you scale it down in the editor. A three megabyte file size would still be the same amount even if it was reduced in half by scaling. That is why it is often better to link images to your project to avoid the project become a large bulky mess.
If Several images have the same name tag, use letters or numbers to distinguish them.
Image tags use the file title of the image and do not require their file type in the tag.
However, the image names must match exactly for the tag to function correctly.
Resizing a Linked Image will ALTER the computer file’s metadata. The pixels will not change, but the print information will. (If the image is crucial, then have a special computer folder for holding Scrivener Project Images, which contains a copy of any image you want untouched by this process.)
Putting a computer folder for any Linked Images for Scrivener on a cloud service allows these images to be shared between different computers using the Scrivener Project at different locations without interruption.
If a Problem occurs with the image disappearing after insertion when you reopen Scrivener regardless of method of insertion, then reset Scrivener to its default factory/software settings by clicking the Default button at the bottom of the options panel and clicking apply.
Images DPI vs PPI and Ebook versus Print Images:
For eBooks, you should have images of 72 DPI (Dots per Inch)
For print books, images generally require more detail to avoid graininess and should have a resolution of 300 DPI. (Note PNG images can be used repeatedily without any image degradation unlike JPEG files.)
You may hear some refer to PPI (Pixels Per Inch) for screen work.
In reality, PPI and DPI are the same . 72 PPI (Screen) = 72 DPI (Print)
If you resize images in the editor, this affects the image size that is outputted. Making an image smaller in the editor will make it smaller when you compile the project and document. But if you want larger graphics at the time of output, consider using linked images.
Scrivener Tip: Have a single set folder to keep ALL outside images and do this in dropbox or similar cloud service if you are syncing your project between computers. (This will make Compiling easier to embed images in the various Compile outputs, as all project images are in a single location.) You could even create two sets of folders one for ebooks with lower resolution and one for print with higher resolution to get better print results and making it simple to choose the correct image format for the output.
*****Images themselves cannot be added into the Draft/Manuscript folder as single binder items, but can be inserted into any text files in the binder.
Four Ways to Place/Insert images inside text:
Dragging an image from the File Explorer.
Dragging an image from elsewhere in your current project or another open project from the binder/corkboard/or outliner.
Copy and paste the image into the text at the cursor point.
Using Menu commands.
Three ways to Insert an Image into Scrivener using Menu commands:

The three Image Menu Commands
These methods create a new copy of the image added to documents in this way.
Image From File …
Using the Menu command Insert > Image From File (Keyboard shortcut Win + Shift + I) will open the Windows File Explorer and you can import/insert the actual image by finding the file and clicking Open. (Note: Large image files inserted this way can impact Scrivener’s performance.) The inserted image will have no information when the mouse hovers over it. You will see the standard Right-Click options for an image. In this situation you will have a special option to save the Image as a Picture.

2. Image Linked to (a) File …
Using the Menu command Insert > Image Linked to File (There is no Keyboard shortcut.) will visually show the same image as above, but when the mouse hovers over it you will have the additional Right Click options in the red box. With a linked image, there is no option to Save As (a) Picture. (See below)

3. Image Linked to a Document
Using the Menu command Insert > Image Linked to a Document. This command will show a current list of Project Image documents within this Project’s Research folder. Choosing one will insert the Linked Image into the document where the cursor was. However, an image cannot be inserted inside a paragraph. Hovering the mouse over the image will show the Phrase Image Link: and then the path to the image in the Project. The right click options are the same as those of an Image Linked to a file with two exceptions.
1. You lose the Reveal in File Explorer option as the image is inside the Project in a Document in the Research section. This is replaced by the Reveal in Binder command.
2. Now, you will have a new option to Convert to (an) Embedded Image. (see white box below)
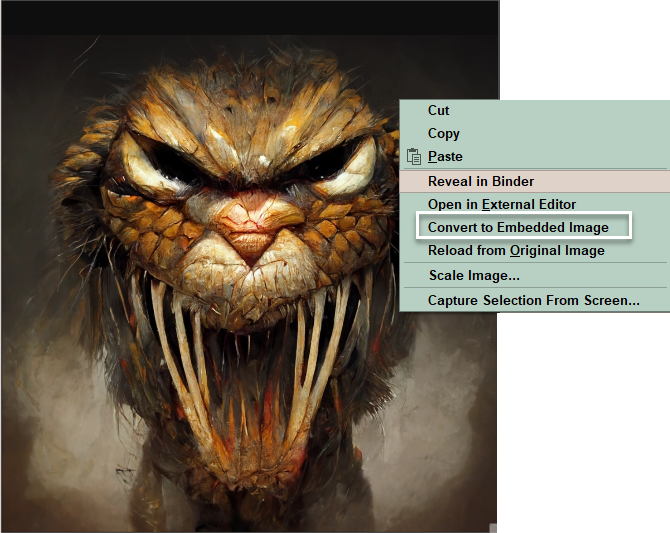

Normal Right Click options for any embedded image.
If you choose the Convert to (an) Embedded Image command, then the Image is changed from a link to a file to an image that is embedded inside the current document. This acts as if the Image had been copied and pasted here. The Right Click options will differ from those of a Linked image. They will be replaced by the simpler image menu which is identical to any image which has been copied and pasted into a document. (see above)
The Scaling Image interface for the various Inserted Image options:
When you right click on any image in Scrivener AND choose Scale Picture, you will have different options available in the Scale Picture Interface based on how the image was added to the document. (shown below)

The Universal Scale Image Interface options or features include:
A. Are sliders to adjust the image size together if the lock aspect ratio is checked or individually if unchecked.
B. If checked the Lock aspect ratio makes any change in the horizontal or vertical values seen in C be proportional to maintain the current ratio. IF UNCHECKED then the image can be distorted. IE You could change the horizontal aspect without changing the vertical ratio, which would distort the image.
C. If you adjust the numbers here, you can precisely change the size of the inserted image.
D. This gives the actual dpi of the image.
Unique Aspects for each type of Inserted Image:
For Images from File:
The name of the Image from file appears to the right of the Name tag, but if the image was copied and pasted from elsewhere, the default name of Clipboard Image may be used. This name can be edited in this interface.
For Images Linked to File when you select Scale Picture:
1. You will see the complete pathway to the folder holding the Image on the Computer and include the Image’s name and file type. The Edit Image panel will resize to accommodate seeing the whole path.
2. Clicking Reveal Location will open the computer folder where the Linked file is and highlight the image.
*****Note: For Windows user any image in the Research section which is dragged into the text of a Draft/Manuscript document will be automatically inserted as a Linked Image. This will save space on your project. (For Mac users you must actively choose this in Preferences under behaviors and Drag and Drop.)
3. Clicking Change will allow you to rename the Image and/or rebuild the connection between the image file and Scrivener.
Using the Change button.
Click on the Reveal Location button and the folder holding the image will open and the file will be highlighted. Rename the image and hit enter and the File Explorer closes.
Click the Change button in the same interface. Navigate to the renamed image and click open to update the Image’s information.
Now, using the Scale Image option will show the previous interface but with the new updated name for the image.
The link to the renamed picture is restored after updating.

After clicking the Open button, you will be back in Scrivener.
Now if you Right Click on the image, you will see the updated information with the new name (In this example the new name is retest image).

For Images Linked to a Document:

4. Will be the complete Project pathway to this Image, including the Image name (but not the file type).
5. Click Reveal in Binder to be taken to the Binder location of the file.
****Note: PSD (Photoshop) image types cannot be resized.
However, Png, Gif, Ico, and Jpg files can be resized. Try to avoid JPG files as they can deteriorate over time with reuse.
You may also want to visit the Options Panel under Behaviors: Click Document Links and enable the Image links to create back-link bookmarks option.

With both these options enabled, you can click on the image/or document in the binder and view its Document Bookmark list, which will have a Bookmark (back link) for every document the image has been added to.
Let’s Look at this process in action with several examples:
An Image inserted from another Project:
Here an image is inserted by dragging it in from another project and Scrivener labels the image as Clipboard Image as its default name, but this can be edited by clicking inside the Name field.


Our Second Example:
An Image inserted or copy and pasted from the computer.
Here the image is dragged from the computer, or added using the copy and paste function from Windows Explorer. In this situation, the file name is displayed (without showing the file type). If you add more than one copy of the same image to the Scrivener, it will see a designated number for clone images.
As copies are added the number increases from 1 to 2 and so on. This can continue increasing based on how many images are added.


Zooming and rotating viewed images (Image Documents only)
(This applies to image documents only and NOT images that have been inserted into a document.)
The footer of an image document will differ from that of the normal editor view.
The Image Document Interface

1. Is an image icon and the name of the image.
2. Is the image.
3. Designates this view as an Image document and displays the current level of magnification. There is no word count associated with this type of document.
4. This backward arrow will open the image in an external editor.
5. The recycle arrow will reload the page just like reloading a web page.
6. Double clicking inside the image brings up the image tool interface. Once this appears, you can drag the Image Tools panel around the document page.
Scrivener’s Image Tool

1. This allows you to adjust the scale/zoom of the image. You can also hold the Ctrl key and use the mouse wheel to adjust the zoom, or use the menu dropdown View > Zoom to set a zoom level.
2. Allows you to rotate the image clockwise or counterclockwise 90 degrees at a time.
3. Allows you to flip the image horizontally.
4. Allows you to flip the image vertically.
5. Scales/zooms the image to fit the screen.
6. Displays the image at actual size.
Hovering the mouse over any of these icons will display its function in a tooltip.

Two methods for Image Searches:
1. Use Image Placeholders (as described above) and search your text for the image tags <$img:.
2. Use the Find by Formatting tool. Use the Menu command Edit > Find by Formatting and now choose images in the find window.
This will find inline images inside text files that have been embedded by inserting, linked images, or copy and paste methods. However, this will not find your placeholder tags.

Image links create back-link Bookmarks
If enabled, then the Image links create back-link bookmarks option (see below). If you click on the image file and open the Inspector’s Document Bookmark Panel, then you will see a list of files/folders where the image is currently being used inside your project.

In this example this picture has been inserted into two files in the project as listed in the Document Bookmarks list.
Importing Images
Use the Menu command File > Import > Research Files as Shortcut. This can only be done in the Research folder. Here, the image will have a curved arrow to show it is a shortcut to the actual image and not the image itself. This reduces the impact of the image on the Project Size and this imported file can be used as a bookmark.

Clicking on this “Image” Bookmark will display the image below the Bookmark list in the Inspector window. Neither this Bookmark, nor Image documents can be inserted into text as a Link by dragging the document onto the highlighted text. However, you can create a link using the "wiki" style link method of double brackets around the exact name of the picture/document. When this is enclosed by double brackets [[ on both sides, this will create a link to the Research File shortcut.
An advantage of this method is you can update the original file on your computer and see the change reflected in Scrivener.
You can import more than one image at a time if these images are all in the same folder.
Importing Documents with embedded images
Note when importing documents with embedded images from a plain RTF file, then the images embedded in the text will be stripped out by Scrivener during the Import process. You can copy and paste these back in afterwards.
When importing any Microsoft documents with images, you must change your import settings to include the embedded images by changing from the default import Aspose protocol to Microsoft Office. Use the option panel to change your conversion protocols. (see below)

Combing Links with Placeholders
An interesting capability you have at your disposal is combining these place holders with document links. When selecting a placeholder in its entirety and linking to another document with it, the metadata will be extracted from the link document the link is targeting rather than the item you typed the placeholder into.
Image Placeholder Tags
Image Placeholder tags give another way to insert images and keep the project size down. The graphic will not appear but be inserted when the project is compiled.
Image Placeholders
Placeholders are Scrivener’s way of using variables. Putting a placeholder tag instead of inserting a graphic/image inside the text allows the image to be pulled in at the time of compile and functions as a link to the image. {This can decrease Project Size as well.}
There are two types:
Internal Placeholders (Use with images inside the project)
<$img:Image_Name;w+Width;h+Height> (Everything after the image name is optional. Note the underline is placed where a space would occur in the image name.) The tag can specify a specific width and height.
(An Example-<$img:Book_Cover1;w=400;h=200>
All image placeholders begins with <$img: and this bit of text can be used as a search criteria. Searching for images placeholder tags: since the image is defined as text, means you can search for a placeholder tag by looking for the beginning text <$img OR search by the actual image name with an underline in place of spaces between words. Using a Placeholder for images may prevent you from slowing down your Project if you are using high-resolution graphics. Embedding these large graphic images can drastically increase a Project’s Size. Another potential solution is using Shortcuts to files on your computer instead of the actual image.
To function the Internal Placeholder must exactly match the name of the image document in the Research section of your Binder. Images in the Research folder are saved as individual files.
2. Example -<$img:My_Book_Cover> Where the image is in the Research section in the Binder in a file called My Book Cover
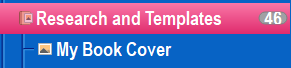
The string after <$img: would refer to this file using the Binder title of the image document. Then the image would be pulled into the project when you compile it. For Internal Tags, you only need to supply the file name and NOT the file type. (i.e. jpg., png, gif, etc are not needed).
External Placeholders
For these to work, they must use a valid path to the image’s location on your hard drive inside the tag.
An Example - <$img:E:\My Thesis\Author_photo.jpg> (where the folder holding the image is My Thesis and image’s name and file type are defined. In this example the name of image file is Author photo.jpg in the computer. [For External Placeholders, the file type of the image must be included in the name for this to work.] NOTE: Again, you must have an underline wherever a space in the computer file’s name occurs and include the file type.
Note: Windows uses the backward slash and Drives are designated by capital letters. (The Scrivener Manual is incorrect and uses the Mac method of identifying picture locations on your computer).
Key Points on Placeholder tags:
The optional properties w (for width) and h (for height) are in points, not pixels (unless your image is of the same resolution as your screen: 72 or 96 pixels per inch). [Information about width and height is optional.]
A point is 1/72th of an inch, so 72 points equals one inch.
You can squish or squash an image but you MUST define both the image width and height in points for this to occur.
If choose only one option, then the image will automatically resize to that one parameter and maintain the image’s current aspect ration (width to height ratio)
You can insert a different image or a different size with every different Compile format. The image or its size could be different for Compiling an e-book, a Word-document or an Acrobat-file. You could even have two sizes of images depending on desired output such as print book (which needs higher quality images (300 dpi) vs Ebook (72 dpi).
Placeholders are also commonly used in the title prefix and suffix fields.
The IMAGE_NAME is defined as the file name where the underline replaces the spaces between any words in the Image’s name.
Using linked images keeps the storage of large image files outside of the text itself. Keeping your project’s Manuscript/Draft overall size smaller.
Considerations when Compiling Images
Scrivener allows a fall-back value by using a percentage of screen display given the screen size differences of various ereaders and the fact that books can be read on the computer as well. An example of this in action is <$img:MyPicture.jpg;w=360;ebook=50%> for a picture of five inches (5 times 72 points per inch) wide or 50% of an e-reader’s screen size.
Fixed Image widths can be set as a placeholder for different formats. People suggest 180 pixel width for e-books and a 750 pixel width for paperbacks.
Don’t bog down your project with large image files, even in your Research folder. (This only becomes a real issue with large numbers of detailed images.)
Consider linking to images on your hard drive, and using lower resolution versions of images to keep the file size down. A large Compile file size can affect the cost of ebooks.
Larger image files will be needed for print versions. Printed images need higher resolutions to avoid looking grainy.
You can make two versions of important images with less detailed ones for ebooks. You may want to keep the different versions of the same images in different folders. One for print and one for ebooks.
When Compiling nearly all of the compilation formats do not support active image linking. Scrivener must take any linked images and embed them into the final copy.
So if you are in a workflow that involves external help from designers, be sure to get your external images up to date before producing final compiled copies.
Resizing Linked Images - Just as with embedded graphics, you can adjust the display size of the image. It is important to know that doing so will alter the original image’s meta-data on the disk. The image will not have its pixels touched, but its print size information will be altered. If it is important to you that Scrivener not adjust the original files then do not use the resize tool in the editor, or consider duplicating the image and having a folder specifically for Scrivener. This will keep the source images unchanged.
Hopefully, this will help you use images more creatively in your projects and understand linking images while keeping your project size down.