Scrivener Styles Overview Part One
Style functions differently in Scrivener vs Word.
Styles are an overlay of text fonts, settings, sizes etc, really designed to be applied to small portions of your text document.( i.e. stuff you want to be unique) The default formatting (Called No Style by Scrivener) should cover the rest.
Scrivener’s default formatting is not a Style in the Word sense. (Everything applied on top of the basic default presentation of text in your project is a Style) The default formatting is labeled as No Style in Scrivener. Remember, the Compile output can be totally different from the current style for writing in Scrivener. Any text that has the default formatting will be changed to the text formatting you have chosen in your Compile Format Designer.
All basic, body text in Scrivener should be “No Style”, which will be given the style “Normal” or “Body” on compiling as necessary, dependent on the output target. This allows you to write/edit in a font and size that works best for you. Remember, the zoom function can make any text easier to read without changing the font size. I prefer increasing the zoom magnification as the best way to ease eyestrain. I find that by changing the zoom level when editing this forces me to look at my project with fresh eyes. Doing this allows the compiler to produce the output formatted as needed. In other words, using the same project the Compiler can change the format to satisfy the different requirements required by formats as DOCX/ODT or ePub without having to mess with the text in your Scrivener Project.
In Scrivener Styles are for exceptional cases in which you want the text to look a certain way when you write and compile it. The compiler will defer to your Style choices (If added into the Compile Format Designer) and convert any text using the No Style format (default format) to the default output of the particular Compile Format. Thus, with a simple change in the compile text format you choose the final output can be configured to apply a unique style with simple adjustments. (Example a manuscript 12pt Times New Roman would use that font to replace to the Project’s default/No Style format.)
Note: Often the Front and Back Matter sections of a Novel may have unique formatting. These documents can have their formatting preserved by using the Section Layout "As-Is" which will preserve the text formatting of the source document.
Style Facts:
Your Project text in the editor should be considered a working copy.
This can and is meant to be changeable across the whole project at the time of compiling/exporting your project.
For Documents with highly formatted text consider using the Section Layout "As-Is" which preserves all of the document’s formatting.
Styles come in two different forms. Paragraph and Character Styles.
A (Character) Style is a combination of settings including:
Font face/text style
Font size
Font color
Line spacing (Can be included)
Character Styles ONLY can be applied to small groups of words without affecting the surrounding text.
Paragraph Style settings include alignment, indents, and line spacing. [These are set in a different place than the Font settings and are discussed below.]
These two types of styles can be combined. So, a style could include both character and paragraph settings together.
These are designed to applied to small portions of a text document to make them stand out. Styles are for exceptions where you want the text to look a certain way.
The rest of the text will have a default formatting (a base style) that Scrivener labels No Style to distinguish from any personal choices you may make for formatting small portions of the text. This default/no style text format applies to all "unstyled" text.
Styles come in two different forms. Paragraph and Character Styles.
Scrivener treats Styles and Fonts separately. A Style can be associated with a specific Font, but most often it is not.
If you change the default formatting for a Scrivener Project, this will be applied to all NEW documents. Old documents will need to have their formatting converted to the new default style, if you want uniform formatting in the whole project.
Scrivener’s text engine is somewhat unorthodox, in that it doesn’t actually use the selected text for formatting but selects text based on the cursor position. It will select the text to the left of the cursor’s current location, so make sure the cursor is inside the text you want to use for any formatting changes.
Use the Keyboard shortcut CTRL + T to see the current formatting based on your cursor’s current location. You will see a standard formatting box which will show the current text’s settings.
Editors and publishers absolutely hate when you use Tabs instead of indents to start a new paragraph. It’s apparently publishers’ biggest pet peeve we’ve never heard of. AVOID indenting using the tab key and set indents ONLY thru Scrivener’s formatting tools.
Essentially, in Scrivener fonts can be treated as separate from styles.
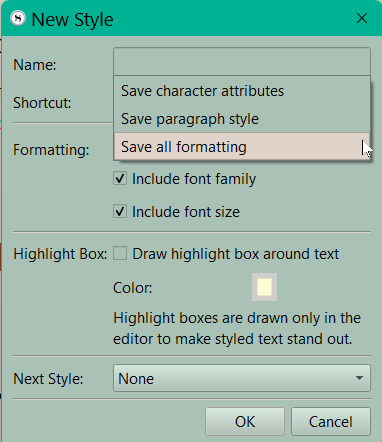
You can choose to label a Style anyway you like. This could include information on the Font type, size, and whether it is bold. However, the Style Panel will show a preview of what the text will look like using the Style’s Name to display its appearance.
There are two different types of Styles:
1.) Paragraph Styles
(Marked by the Pilcrow symbol, see #1 below) are chiefly concerned with the overall shape and size of a paragraph, as it sits on a page. Available settings include the first-line indent, block indent, right indent, tab stops, alignment, line spacing, leading, spacing before and after, line-height and even HTML header levels are all governed here. (A Paragraph Style may only address paragraph settings, BUT a Paragraph Style can also include a Character Style as well and this will be displayed to the left of the Style’s name in the Style list in the font menu. (These combination styles are displayed with both symbols, see #2 below.) Paragraph styles always work underneath character styles. (Even if they also include Character Styles as well.)
To apply a Paragraph Style, place the cursor inside the text of a single paragraph, or a selection of text.
You do have the option to save a font size and font family as well with the style, but you do not have to.
2.) Character Styles
This is marked by a small underlined a (see #3 below). These are only concerned with letter variants including italics, weight (bold vs light vs regular), text colors, and adornments such as strike-through, underlining, and baselines. (see below) Most of the included character styles ignore fonts all together. Essentially, in Scrivener fonts can be treated as separate from styles.
You do have the option to save a font size and font family as well with the style, but you do not have to.
The New Style Panel:
Each of these options will have the symbol showing its purpose in the font style panel with the Style title displayed as the text will appear in the editor.
Font Style Panel:
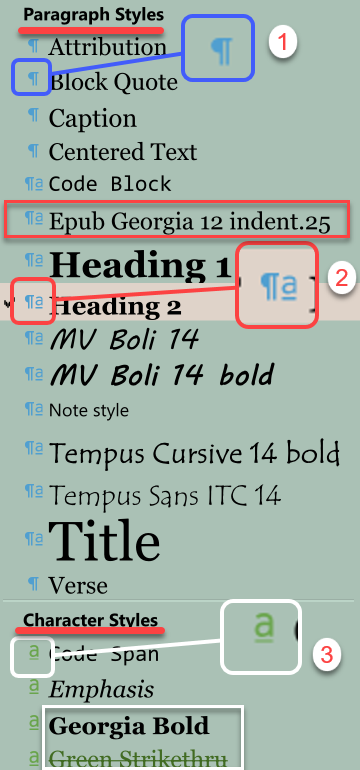
1.) Paragraph Styles are listed first and Paragraph Styles only will have just the symbol above (#1).
2.) If a Paragraph Style also includes a character style then you will see two symbols (#2) and an example of how the text will appear using the title of the Style.
3.) At the bottom of the panel are Character Styles (only) marked with a green symbol (#3) with an example of how the text will be displayed using the title of the Character Style.
Styles in general are overlays of paragraph structure and styling of the characters in your text and DO NOT DEPEND on the FONT AT ALL. (In Scrivener, Fonts are treated as separate from Styles. A Style can be associated with a specific font, but MOST OFTEN in Scrivener it is not.) You can include specific fonts for a character or paragraph style but you do not have to.
You can choose to label a Style anyway you like. This could include information on the Font type, size, and whether it is bold. However, the Style Panel will show a preview of what the text will look like using the Style’s Name to display its appearance.
Scrivener Tip: You can manually select multiple bits of text and format these with a character style all at once. To do this follow these steps:
1. Hold the ctrl key while selecting a word/words just like selecting multiple Binder items.
2. You can then either highlight and select and then move on to the next group, or double click on a word to add to the group you want to format.
3. If you make a mistake, release the control key and click anywhere in the document to start over.
Editor Display Options:
The current style of text where your cursor is will be displayed in the Font toolbar if you have chosen to make this toolbar visible. (see below)
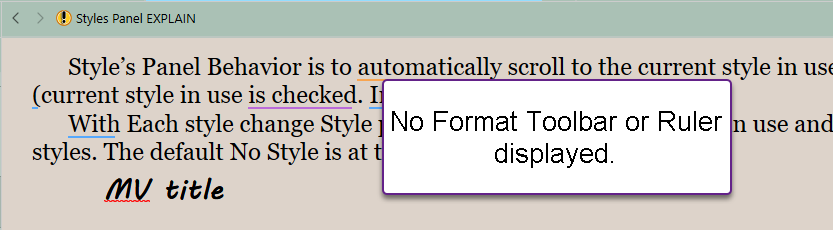
Option one is a minimalist display. This does not distract from writing but formatting information is unavailable.
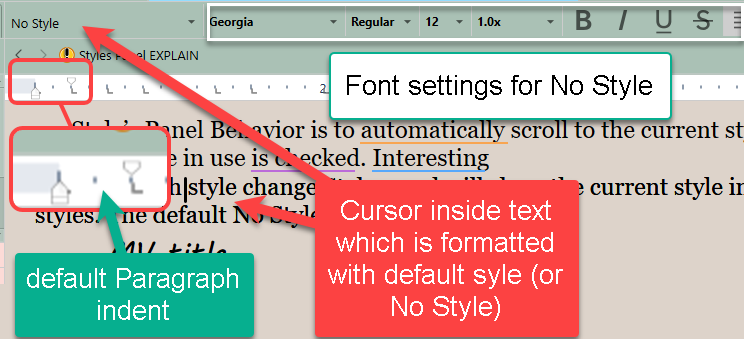
Option two includes the Font Toolbar and the Ruler (which also will show the default paragraph indents). [You can reach these options via the Menu command View > Text Editing > Format Bar and or Ruler.] Though you can decide to show one without the other.
You can reach the Style Panel directly or use the Project Settings Panel to set and/or adjust your Default Formatting via:
Using the Menu command Format > Styles > Style Panel
Highlight text and use the Menu Command Format > Style > New Style from Selection
Using the Keyboard Shortcut Windows Key + Alt + S
Click the Project Settings Icon in the Main toolbar (if you decide to display it).
Use the Menu command Project > Project Settings >Formatting.
Right click on any highlighted text and choose Style > Style Panel at bottom of displayed Style options.
The Options Panel has a similar interface which functions the same way.
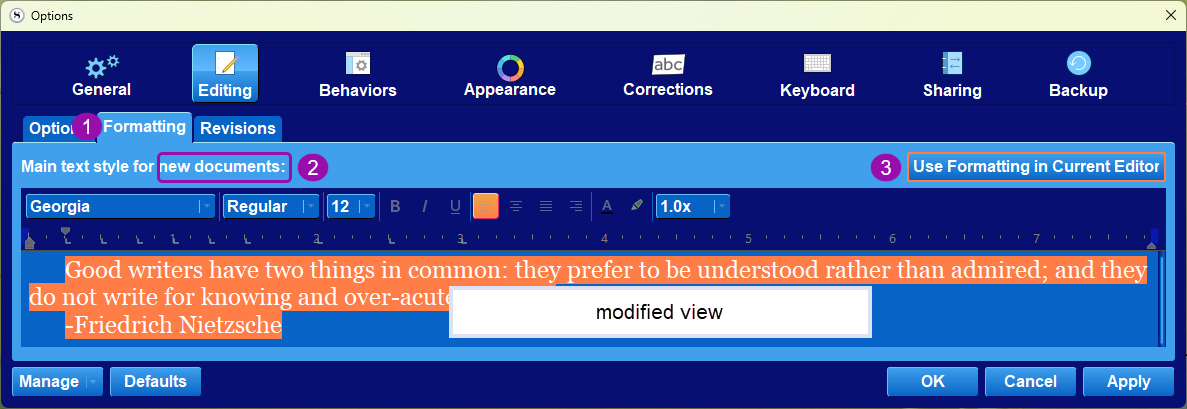
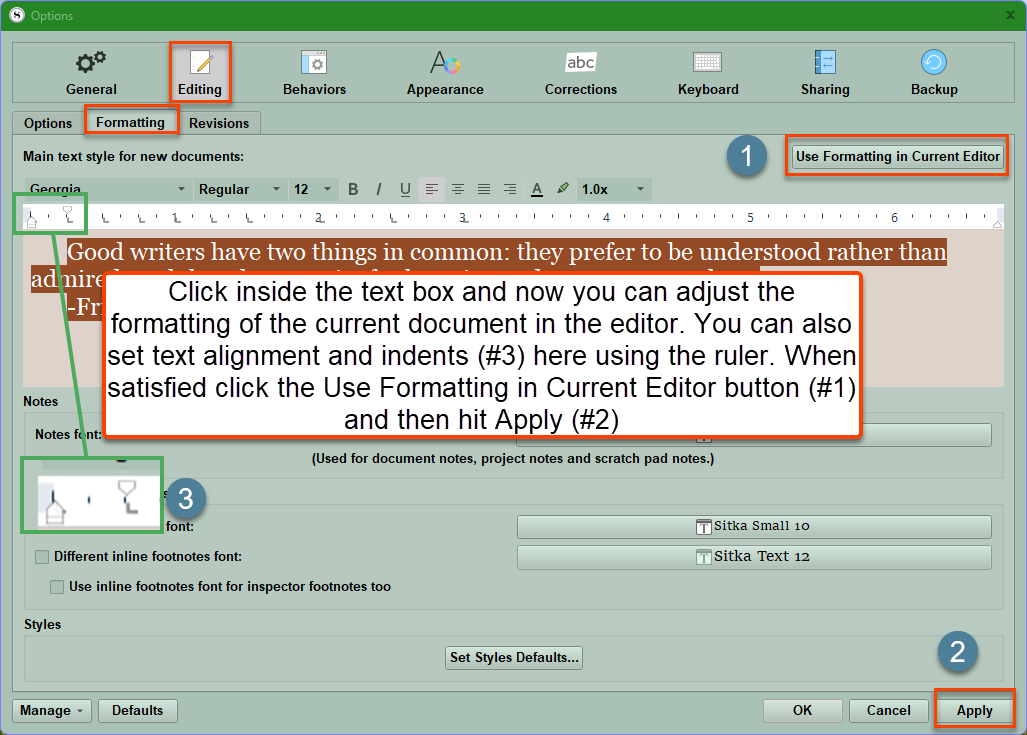
Use the Menu command File > Options > Editing > Formatting (see the image below).
You can use the Format toolbar itself to reach the Styles Panel by scrolling to the bottom and you will see a link to the Styles Panel.

The Default Formatting for the working copy of your project is labeled as No Style by Scrivener. This can be changed across the whole project while writing by using the Project Settings Panel. This will update the default style displayed in the Editor (No Style) going forward, but can be retroactively applied to older documents in your project as well. (You will need to select any documents using the old formatting and convert these to the ("new") Default Formatting.
You can change the default formatting for your project at any time. This should be set in a way that is comfortable for you to read and write with. This can be changed at the time of compiling or exporting. Adjust this to what you want for the whole document or a single paragraph. Adjust or accept the current text with all its settings including paragraph indent, line spacing, font, size, alignment, line spacing, text color, etc. (see below)
The Project Settings Panel (above) has been expanded to show all the formatting options. You can use the mouse to stretch the edges and expand this panel.
1. Formatting Pane of the Project Settings Panel.
2. Displays the Font of currently selected text in the document. Note, on the ruler you see the current preset indents.
The Font Toolbar here is identical to the Font Toolbar that can be visible above the Editor window. You have the options of Regular, Bold, Bold Italics or Italics options for any font. (If the Font can display these.)
You can also set the Font Size, Text Color, and Line Spacing here as well.
3. Use Current text window when setting the Font and its parameters to make Default.
4. This applies formatting to footnotes.
5. When satisfied click the OK button. Any changes to the default formatting are applied going forward.
Once you have set your new default formatting for the project, every new document going forward will use this "style" (formatting) as the default for any new text entered. This can also be applied retroactively by choosing/highlighting/selecting old documents using a different format and then using the Menu command Document > Convert > Text to Default Formatting (or the Keyboard shortcut Ctrl + 0)
NOTE: Scrivener’s text engine is somewhat unorthodox, in that it doesn’t actually use the selected text for formatting but selects text based on the cursor position. It will select the text to the left of the cursor’s current positioning to determine formatting. So you need to make sure that the cursor is placed within any text that you want to use to set your default formatting.
You can also use the Keyboard shortcut CTRL + T see the current formatting based on your cursor’s current location.
Three ways to set Paragraph Indents:
Method 1. Use the Menu command File > Options > Editing > Formatting and set formatting the way you want and set as the default (Labeled by Scrivener as No Style). When compiling all text with the default (No Style) formatting can be changed at once at that time.)
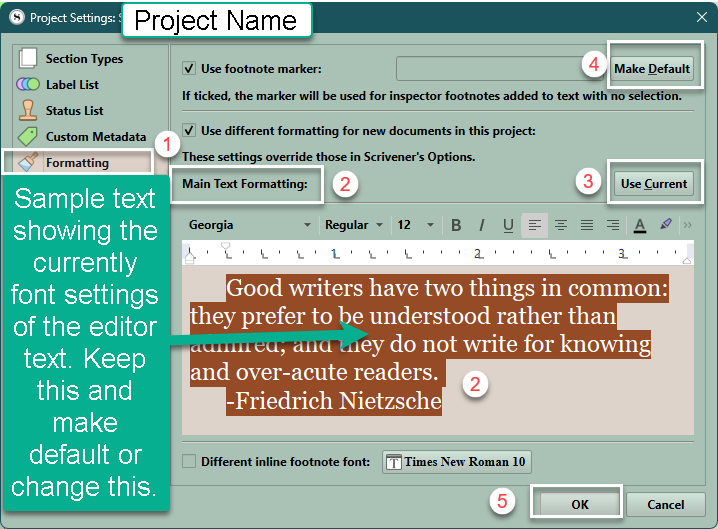
Method 2. Use the Menu command Format > Style > Set Default Formatting. Clicking this will bring up the Project Settings Panel with the Formatting pane highlighted. (See below.)
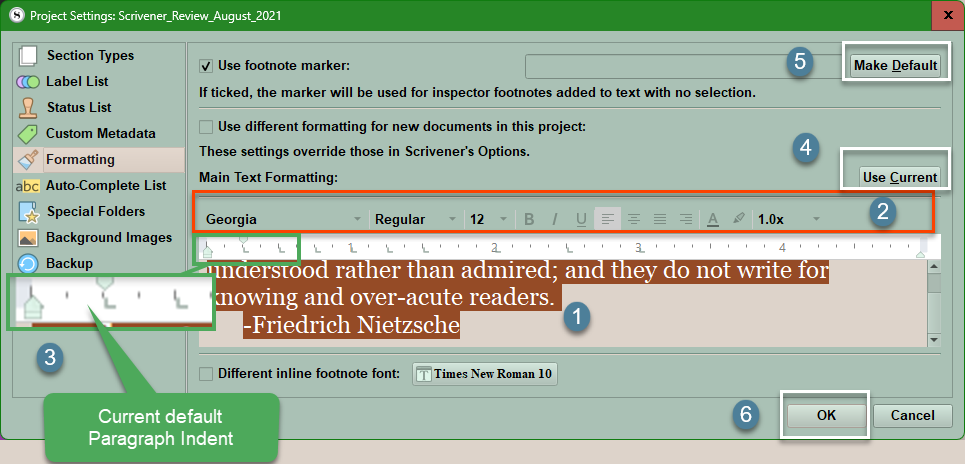
#1 This is the current text for the selected document and above this is the Format Bar (#2) showing the current settings.
#3 This shows the current Paragraph Indent of the current document. (See below how to precisely set the Paragraph Indent. (NEVER use Tabs to indent. Tabs mess up compiling and editors despise them.)
#4 This will use the text on display as your Default Text Formatting for all future documents. Previously formatted documents using other settings can be changed in mass by selecting the documents you need to change and using the Menu command Documents > Convert > Text to Default Formatting.
#5 This applies to footnote markers.
Method 3. Use the Menu command Format > Paragraphs > Tabs and Indents (see red box below) to precisely set the Paragraph Indent setting if have trouble adjusting the Ruler indents with the two methods above.
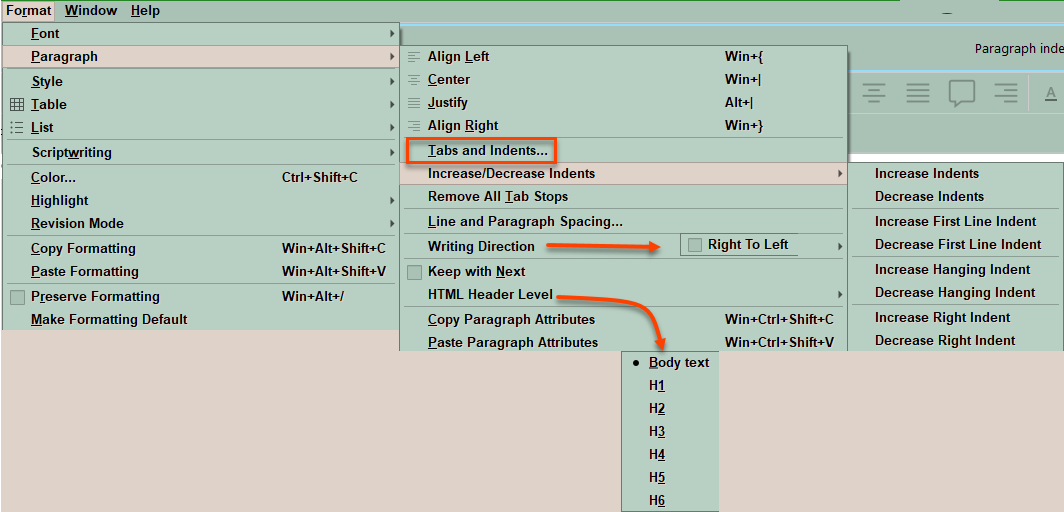
Then you will see a dialog box showing the current settings (see the red box below).
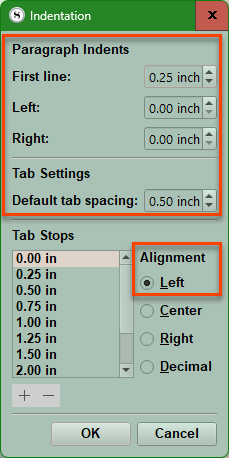
An indent sets the distance between the left and the right margins. It's also used in bullets and numbering to ensure that the text lines up properly. Tabs come into play when you press the Tab key on your keyboard. It moves the cursor one-half inch by default, essentially a shortcut shifting several spaces.
Editors and publishers absolutely hate when you use Tabs instead of indents to start a new paragraph. It’s apparently publishers’ biggest pet peeve we’ve never heard of.
The problem is that the default setting in Word and some other word processors is to begin a paragraph without any indent at all. But writers often want our paragraphs to start with indents. So, when we begin a new document, we simply press Tab to indent our first paragraph. Easy, right? After that, Word sometimes remembers we want to start every paragraph that way, so it puts in a Tab for us. Mostly. Except when it forgets. Then we hit Tab again to fix the occasional goofy paragraph.
However, when a publisher gets a manuscript formatted with all of these Tabs everywhere, it can wreak havoc with their formatting or typesetting software. Now the publisher must go through and remove all of those Tabs—sometimes by hand—to get their formatting to play nice.
DO NOT USE TABS.
Potential Uses of Styles:
You can use a style to tag/mark/highlight types of text such as dialogue, or even all text related to a POV. This could be useful during the drafting phase (even including highlighted text) and then delete this style at the time of compiling.
updated 3/18/2026