The Compile format designer overview on section layouts
Scrivener comes with several default Compile Formats for each type of possible output. These can not be edited as such, BUT they can be duplicated and then manipulated to fit your specific Compile needs. When you do this, the newly created format is now a Custom Format and can be edited to your heart’s content. When you duplicate a default Scrivener Compile Format, it receives a specific name. This is the original format’s name followed by the word copy. This name can be edited and changed to what makes sense to you. I suggest using a name that reveals its planned use or a special aspect of it.
After you open the Compile Panel, you can either use a Compile Format as is by selecting, assigning Section Layouts to the Section Types currently in your project and then checking the third panel for what you want to Compile. In the third panel you check on the content you will compile, metadata such as title and author information, options on things to exclude like highlighting and annotations, replacements and images for certain formats like ebooks. You must decide in the bottom of the panel whether you have front or back matter to include before hitting the Compile button.
If you need to do some customization or tweaking of a default or custom Compile Format, you have three options.
Option 1- Is to Right-Click any format (default or custom) and see the options by #1. The Edit and Delete options will be non-functional for any of Scrivener’s Default Compile Formats.
Option 2- Is to double-click on any format. All formats both default and custom can be duplicated and then customized.
Option 3- Click on the Settings icon and see the dropdown options. Here you can import/export a format, or edit/delete format. The last two options only exist for Custom Formats, these options will be non-functional for any Default Compile Formats. (However, you can export the default Scrivener Compile Format Designs.)
When importing a Compile Format, you will be asked whether to save it as a Project Format (project specific), or as a My Format (available to all Scrivener Projects)
Fives ways to open the Compile Format Designer
#1 You can double-click a Compile Format design to open the Compile Format Designer.
#2 You can right-click and choose the best option. (as shown above)
#3 You can click on the Settings cogwheel in the lower left of the Compile Panel and choose the option you want.
#4 You can click on a displayed assigned Section Layout, and the pencil icon in the upper right corner will appear. You can click on the pencil and then click on the Edit "Layout name" button in the text window that appears.
#5 You can double-click any Section Layout in the second pane of the Compile panel and open the Compile Format Designer.
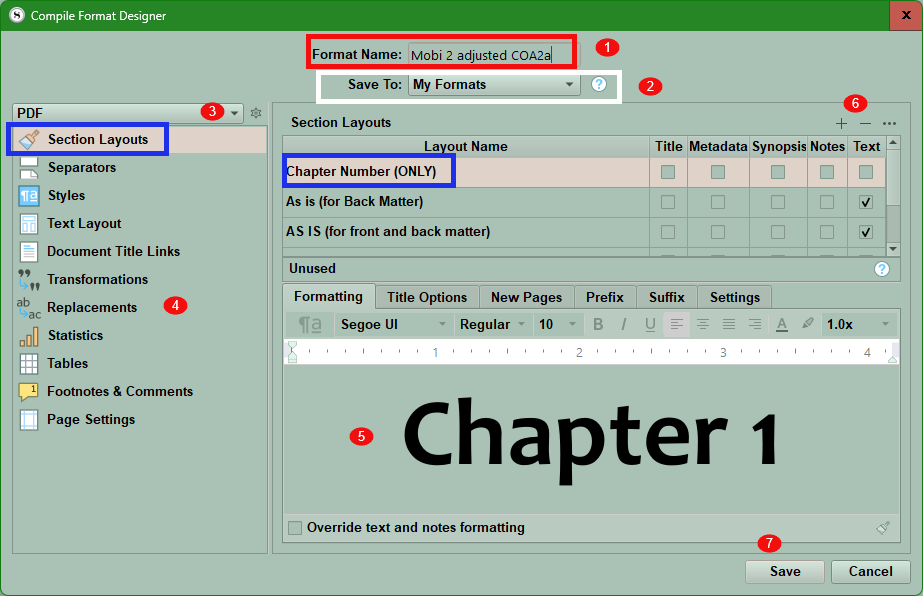
You will now see the Compile Format Designer which is used to create or edit a Custom Compile Format. (see below)
#1. Shows the name given to the duplicate Compile Format. Click inside the name to edit it.
#2. Is where you save the new Compile Format in Project Formats (unique to the current project) or My Formats (which are system wide and available to all your projects on your current device).
#3. Here you decide your Compile Output file format. Different outputs will have different options that can be adjusted. (See #4 above)
#5. This is the panel which changes depending on which part of the Compile Format options (#4) you want to change and if you choose Section Layouts, this will vary depending on which Section Layout you are modifying and what elements are included with it. (ie Title, Metadata, Synopsis, Notes, and/or Text)
Note: Consider including the desired output in the name of your custom Compile Format. Such as My Ebook Format 1 to show this is your preferred Compile Format for Ebooks. (Consider including the year the format is created in the name as well.)
#6. Here you can add blank Section Layouts (+) or delete a highlighted Section Layout or add other options as shown below for a specific Section Layout. Clicking the (+) sign will DUBPLICATE the currently selected Section Layout and all of its current settings, except the name will be blank. This option can be useful when you are experimenting with different options on how your Compile output will appear without losing the current version.
#7 When you are finished making changes then click the Save button to preserve those changes.
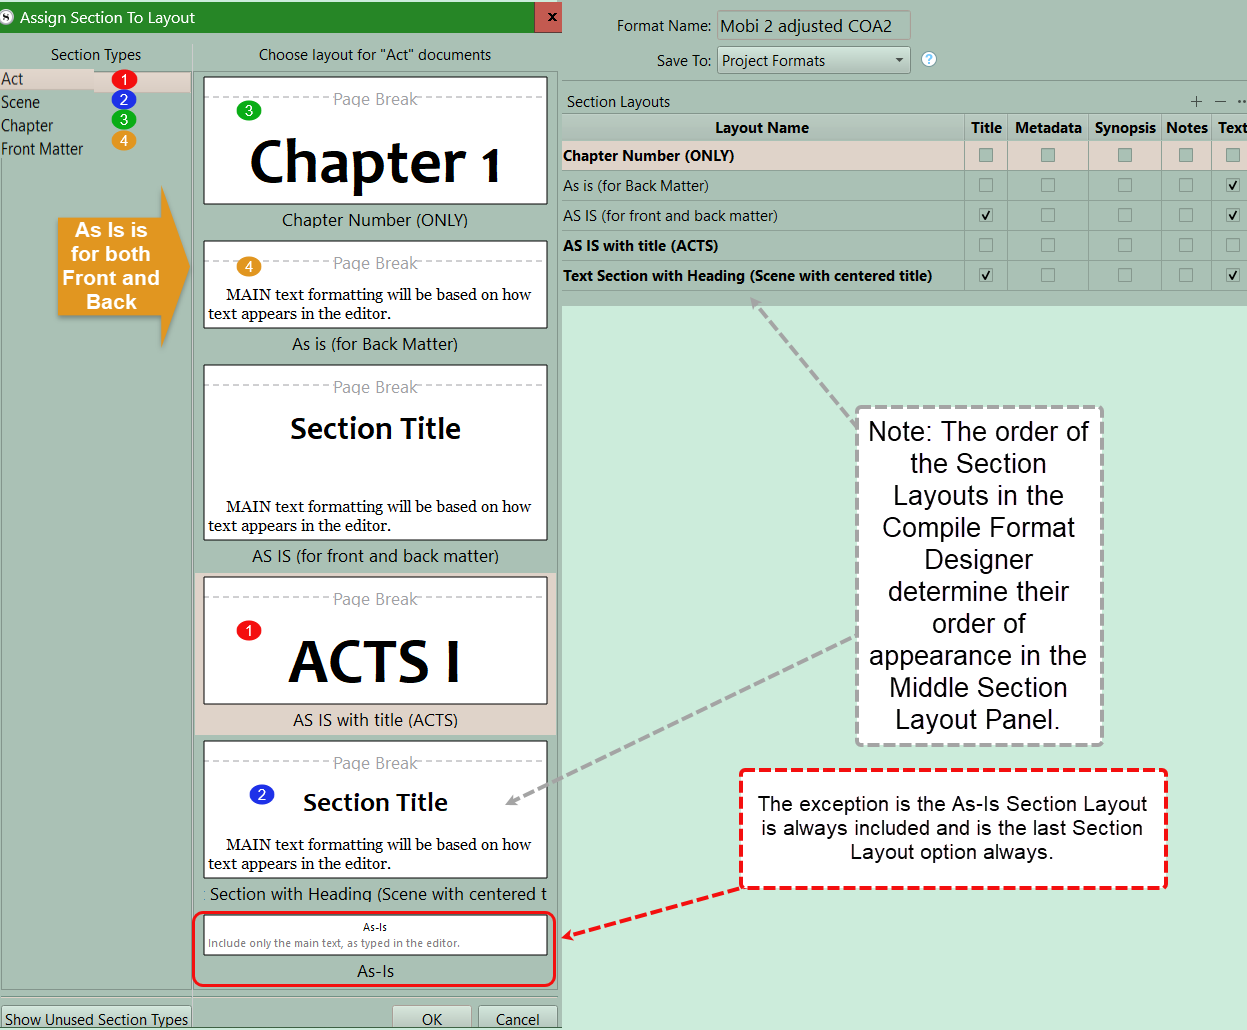
To confirm the changes are displaying what you want, Save your changes to the Compile format and close this window. Go back to the Compile Panel and now click the Assign Section Layout button in the middle pane and you will see how your newly created and assigned Section Layouts will appear when you Compile. The Section Layout’s name is listed below it. (See the image below.)
(Pro Tip: Give them descriptive names which explains their intended function. This makes it easier to assign them and be sure you are using the right one for what you are trying to Compile.)
After you have assigned your Section Layouts to your Section Types, then you will see a preview of how this will appear. (see below) Note the Section Layout name is BELOW its corresponding Section Layout. The option to assign various Section Layouts to the different Section Types occurs in the order the Section Layouts are found in the Compile Format Designer, except for the As-Is Section Layout which is always included at the bottom by default.
Note: You can not change the order of the Section Layouts within the Section Layout Tab. However, if you go to the Separator Tab, you can right-click and drag the Section Layouts to change their order as you would move documents in the binder. This will then be reflected both in the order of the Section Layouts when assigning the Section Layouts to the Section Types and in the Layout name order in the Section Layouts tab. Remember to click save after done rearranging. Doing this puts your currently used Section Layouts at the top and can be placed in the order of your intended use. The Section Layout As-Is is a default Section Layout and always appears at the bottom of the assign Section Layout interface.
These Section Layouts give you a preview of how the current options will appear for your chosen Compile output. If it does not look right here, then you will need to make further changes inside the Compile Format Designer until you achieve the results you want.
When click edit or double click on a custom Compile Format, then this window appears with a myriad of options.
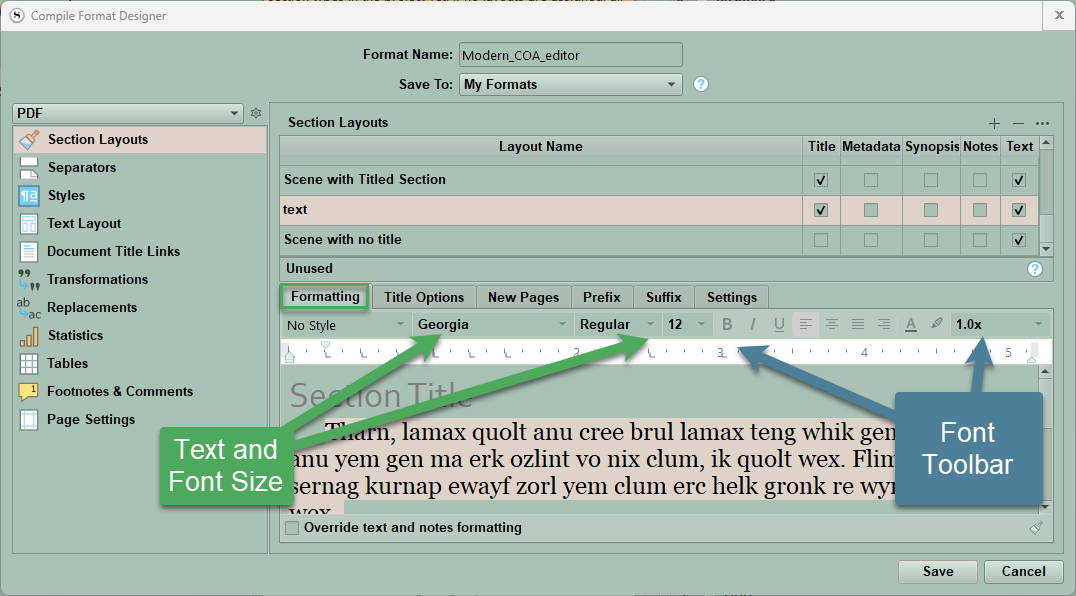
Every Section Layout you currently have or create has the options to add Titles, Metadata, a Synopsis, Notes, or Text to the Section Type it is being applied to.
Titles:
If you want the Title from your Binder document applied for a Section Type, then check the Title box for the Section Layout you are editing. Any item can still have a heading (Example- Chapter 1) without checking the Title Box.
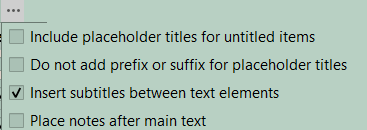
Clicking the … option at the far right of Section Layouts (see below) shows multiple options that can affect what appears or not for Titles for a specific Section Layout.
Include placeholder titles for untitled items -(If checked) Binder items that have been left untitled can optionally use the adaptive name generated from their content or synopses, as they are shown in the binder and outliner. The default behavior is for these types of documents to never show titles, even if they are assigned to a section layout that chiefly exists to generate a title.
Do not add prefix or suffix for placeholder titles
Insert subtitles between text elements - (Unchecking this) Disables automatic subtitles (such as Synopsis or Metadata) between different types of inserted content.
Place notes after main text- The default is to place any Inspector notes above the main text for the item being compiled. When this box is checked, notes will be placed below the main text area instead.
Metadata:
Metadata includes a block of text below the title containing all metadata associated with the items printed by this layout. In the preview area, you will see a simple “Metadata: Listed Here” marker that can be used to format metadata lines in general. The precise content will depend on each item— for example every item will have creation and modification dates, but only some may have a line printing keywords.
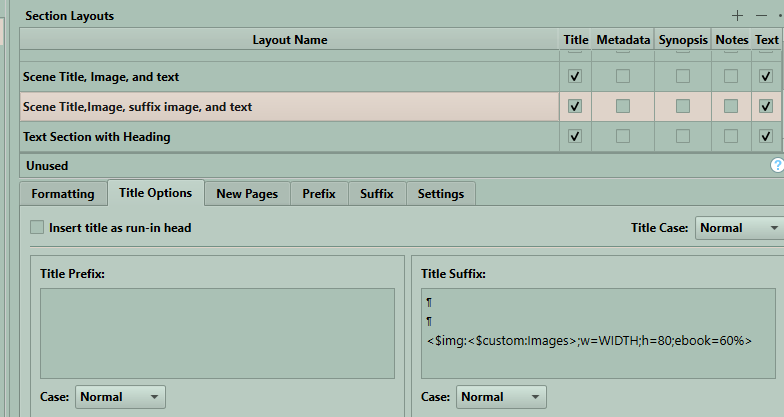
Pro Tip: You can insert images under chapters titles if you use the specific image name (without the image type) in a custom metadata text field (call it Image) added to each Chapter document you wish to add a picture/image to. You will need to use a placeholder in the Title area of the Section Layout you are using for your Chapters. Place this placeholder in the prefix or suffix section depending on how you want it to appear. You can also decide to center the image as well. You can also put parameters on the image size as well. [If the image is too big for an ebook, check the Text Layout Section of the Compile Format designer and look at the image size which triggers images to be displayed at 100% width. This may need to be adjusted.]
All lines of metadata will use the paragraph and character formatting you apply to the sample line. See an example below (the pilcrow symbol represents using the return key to move the image position. In the Compile panel when see the preview of your Compile output in the second panel area, you will only see text.)
Synopsis:
Synopsis The synopsis for the item will be printed and can be formatted as a paragraph in the preview area below if this option is checked.
Notes:
Any inspector Document Notes associated with the item will be printed before the main text unless you check the checkbox shown above which will place notes AFTER the main text.
Text:
Text will include the main text body of the item, such as the content of a section/scene or chapter. Some layouts may not use this option such as in the “Enumerated Outline” format, where the goal is to print an indented outline of topics rather than the entire work.
If you include content, other than Title and Text, subheadings will be inserted automatically to announce them. E.g. ticking “Synopsis” and “Notes” will add respective headings above the content. These headings can be formatted collectively to taste in the Formatting tab. You can choose to not have titles above the inserted text by clicking the • • • button and UNCHECKING the box to Insert subtitles between text elements.
Placeholders can be inserted to automatically use numbers, roman numerals, letters, or numbers as words for Acts and Chapters if desired.
For a list of all Placeholders, use the Menu command Help > List of All Placeholders. These types of snippets can be found in the list of Placeholders under Auto-Numbering. (Below you see the Chapter numbering is determined by the <$n> placeholder after Chapter in Title Options.)
If you want to have your Scenes titled with the text following, this might look like the image below. (Notice the descriptive name for this Section Layout makes it easy to understand its intended function. I have chosen these options to include both a title (#1) and the body of text (#2) in the Scene.
The Formatting tab allows you to adjust information in the window below the format bar AFTER you click on the text in the window which is just a placeholder and not a preview of any actual text in your project.
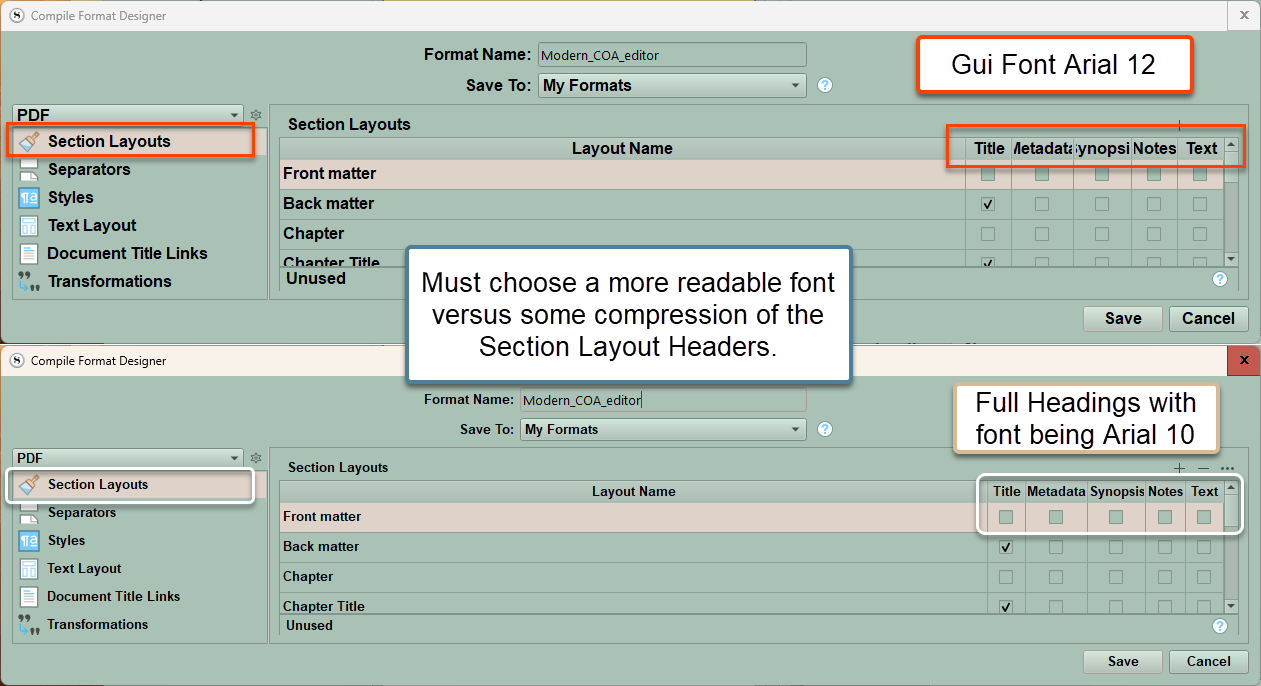
The phrasing in the Format Designer layout section can have text squished if the GUI Menu and Windows font is set to larger than 10 points. The columns cannot be expanded enough to correct this problem when the GUI menu font size is greater than 10.
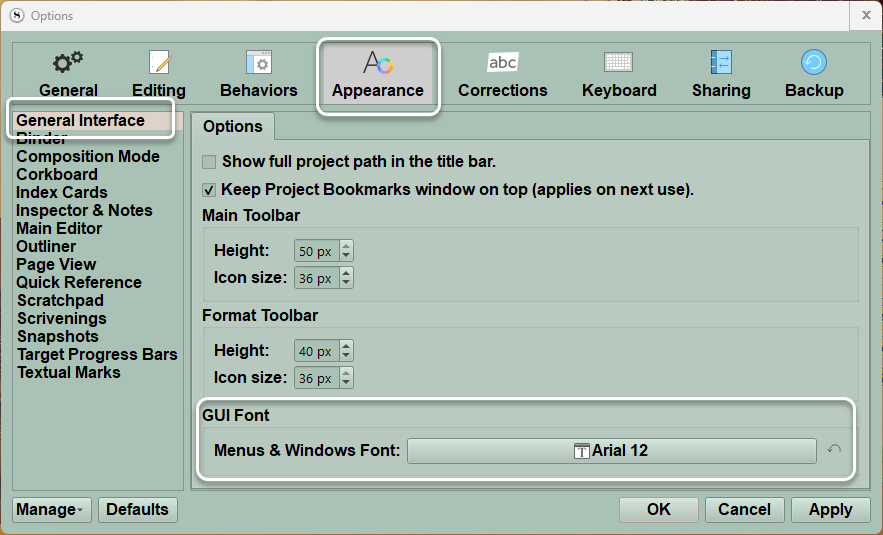
Use the Menu command File> Options > Appearance > General to change the GUI font.
See examples of two different font sizes for the GUI Fonts and how this impacts the Section Layouts readability in the Compile Format Designer. If needed, you could change the font size just for readability when compiling the options in Section Layouts and change back for more readable menus with the rest of the Scrivener interface at other times.
In the lower half of the Section Layouts area on the right are multiple tabs. Each tab has many settings that can be adjusted to change the final appearance of any specific Section Layout. The Images below have been modified to show the various options more clearly in one image.
*** For Custom Compile Formats ONLY
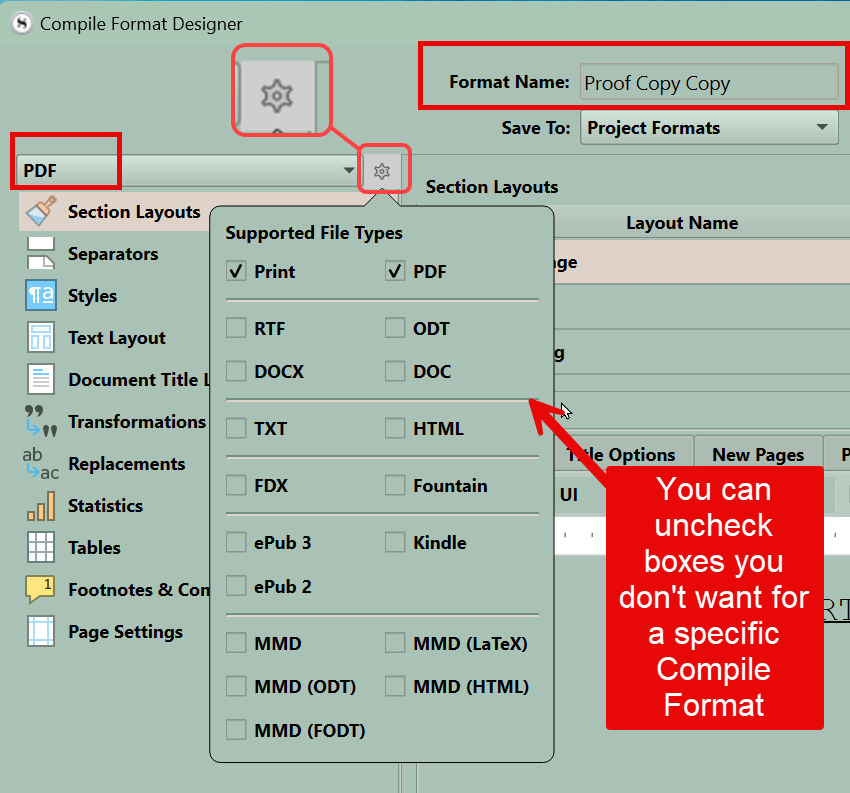
You have the option of restricting a custom format to only certain types of Compile Outputs. When you open the Compile Format Designer, you can specify which types of Compile Outputs a specific Format will support. If a Compile format does not support an Output like Epub then the Compile Format will not appear in the list of Compile formats when you choose to compile an Ebook. See below where you can customize (limit) which outputs a Compile Format will support by unchecking boxes.
Note for the New Pages tab:
1. Set the amount of padding you want above your title on the page.
2. Here you can also choose to have up to the first ten opening words capitalized in either standard or small caps.
! Not in windows version but in the Mac version.
3. You can choose to have sections start on a specific page side (!)
4. A drop-down for each allows selection of Recto (Right) or Verso (left) page. (!)
The Suffix tab offers the similar options to above prefix tab.
1. You can choose to have text appear after the title or end of a subdocument.
2. If the Place suffix after subdocuments checkbox is NOT selected then the suffix will appear after the Title. Selecting the checkbox places the suffix text at the end of the subdocument.
3. As previously, the text can be formatted via the format toolbar.
The Settings tab offers several options for Paragraph first line indents.
This is a matter of personal choice. I vary depending on what I am writing.
These tabs will be discussed in further detail in another blog post.
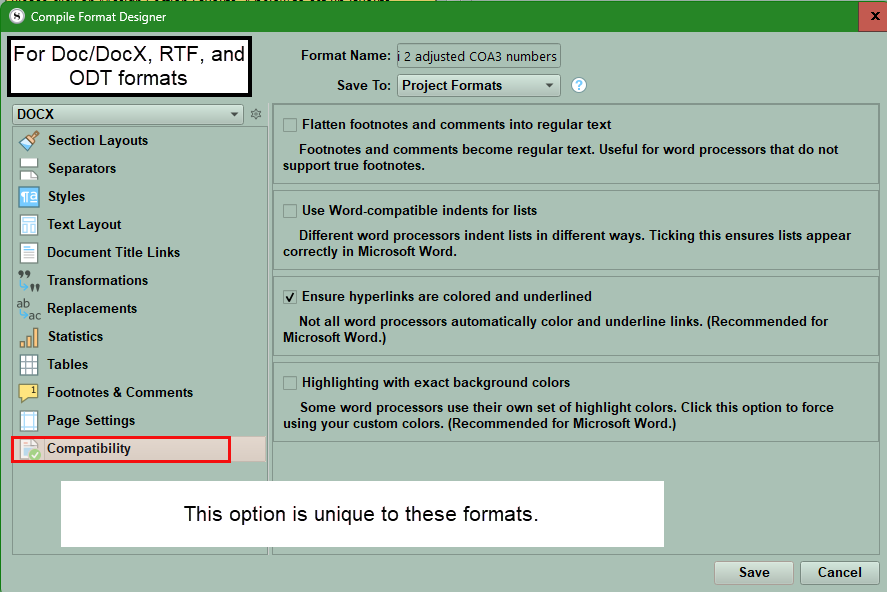
When your Compile output is in Word (Doc/Doc X and RTF/ODT formats) and you have issues with the appearance of your final product, then look at the Compile Format Designer and its last pane, which is Compatibility.
There are multiple settings here that can affect how the Compiled document will look.
If your Word Compile output does not appear the way you want, then you should look at these Compatibility Options. Checking some or all of these may improve how the Compile Output functions/appears in the final product. (see above)
What do these Compatibility options mean?
***** Flatten footnotes and comments into regular text -
If you don’t remove all footnotes or comments during Compile, this option replaces all your footnotes and comments with endnotes and will insert a reference marker at the place they originally appeared. Use this option with Microsoft Word or other RTF-editors to ensure footnotes and comments don’t get lost.
Use Word-compatible indents for lists -
Problems with indenting bullet-listed paragraphs in Word may occur, but ticking this box should ensure those lists appear correctly in Word.
Ensure hyperlinks are colored and underlined -
To avoid hyperlinks being rendered invisible in Word, make sure the compiler colors and underlines hyperlinks has been checked.
Highlighting with exact background colors -
Highlighting colors may change between word processors, like Word, when they are using their own set of colors. Selecting this option forces your custom colors into the output document.
There will be more about using Section Layouts during the Compile Process in future blogs.


