live Syncing versus zip backups
When thinking of cloud syncing in the traditional sense, we visualize putting the original copy of a document in a shared area, where every machine can operate directly on that one copy. While convenient and straight-forward, this method is risky with even the most basic of file structures let alone Scrivener’s complex collection of small files.
Another Approach:
Scrivener offers another approach for sharing projects between computers without risking corruption of your original Scrivener Project. A zip backup of a Scrivener Project is treated as a SINGLE file by Cloud Services which makes it simple to share files between computers with a very low risk of data loss. However, it does rely on a higher degree of personal organization and requires more steps from the user. The benefit is the vastly increased safety of your Scrivener Project information between machines.
This method is so safe that it can work with any sync service available, even ones which have trouble syncing complete Scrivener Projects with their thousands of files.
The principles of this approach are simple:
The following instructions assume you are using a zip backup file rather than an unzipped Scrivener Project.
DO NOT STORE the unzipped Project folder among files stored in the cloud-sync area. Have a separate location for this project folder outside of the cloud backup location.
Set Scrivener's automatic backup location on each machine to the Same Folder which is located inside a cloud backup location. Under the default settings, have your project set to backup on close to the cloud backup folder. Using the Cloud backup software, set this folder to be stored BOTH locally on your computer and in the cloud. Check each cloud service on the method to do this.
Later, you can extract a copy of the project (preferably as a zipped folder) from this cloud backup. Download and open it. The zip file can be unpacked to continue working on the project on your second computer. A zipped backup is a single file and rarely corrupted during the syncing process.
Note: If the zip backup is corrupted go to an earlier zip backup and repeat the process.
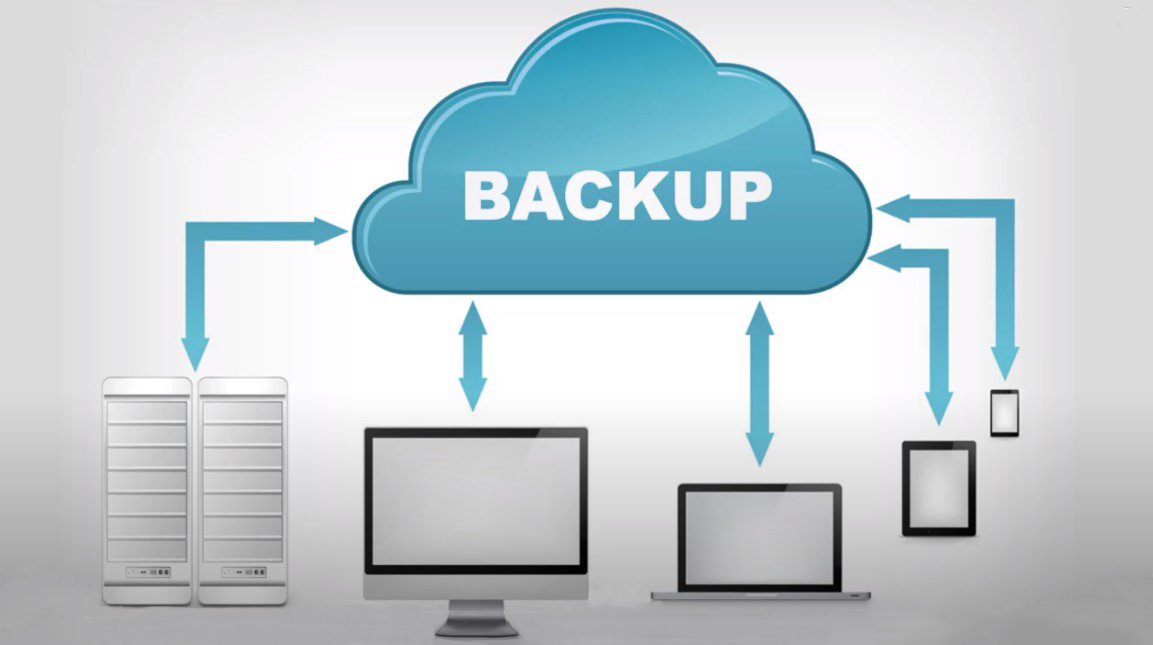
Our recommendations for this method are:
Optimize your Scrivener backup settings:
Set the backup location to the same folder on each machine, all pointing to a folder that is synced by your preferred Cloud service.
Enable the zip compression option (it is on by default). Transferring larger single files over the internet is more efficient and safer than transferring hundreds, if not thousands of internal project files.
Enable the setting to use dates in backup file names. Without date stamps, Scrivener uses a rotating pool of numbered file names. You can circumvent this issue by using the Details view of Window’s File Explorer. With the File Explorer you have the ability to include a date column in the Details view of Windows File Explorer. This makes it easy to find the most recently created files. Enabling the date setting will make it easier to pick out the particular backup you need among a large group of backups.
Maximize Backups. If you have the room on your cloud service and depending on project size, you can keep up to 25 backups. When you reach the 26th backup a project the first will be rewritten. More backups give you a greater window to recover from project errors or problems. You can even save every backup as well, but with numerous projects the amount of data used for this can become prohibitive.
Set up the Machines the same way. Ideally, each machine should have the same setup., particularly with regards to how many backups are kept. The machine with the lowest number of backups will effectively limit the number of backups the other machine can have.
*** If one machine has 10 backups and the other 25, then both machines will be limited to 10 backups.
Always check the sync status when switching computers. This is true for all cloud use, no matter what software you use. Be sure that it is completely finished uploading before you shut down the computer. On the next computer make sure it is finished downloading before copying the latest project out of the backup folder. Your cloud service icon often indicates either active downloading, uploading or Updated status when you hover your mouse over it.
Remove the current versions of the Projects you plan to update and put them in an Old Project Folder with a date on your desktop. (The name and location you choose should make sense to you.)
With the old project folders removed to the desktop, then the .zip files can be extracted to your current Scrivener Project folder on the second computer without issues.
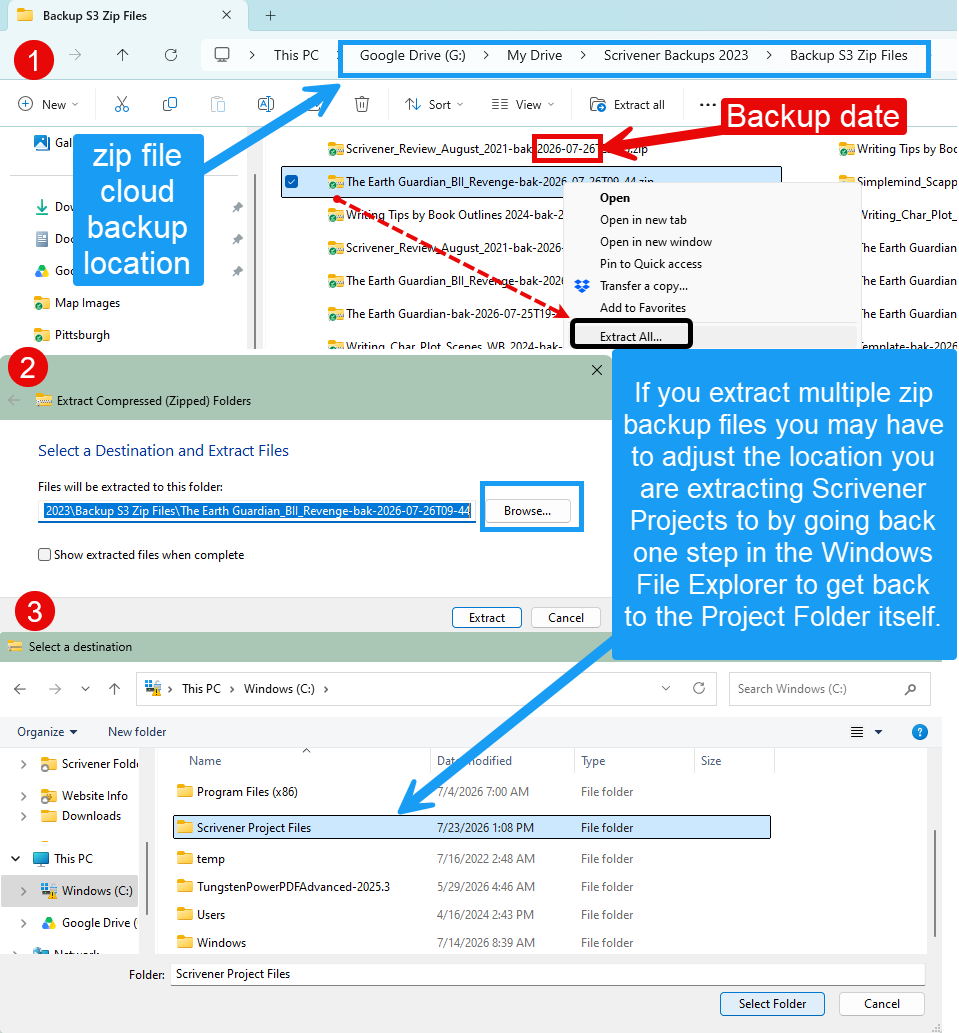
Copying to your local drive. When you switch machines, you'll be taking the latest copy from the backup Cloud folder and creating a fresh copy in an area that isn't synced. You will right-click on the zip file and choose extract all and then choose a location. (This should be the folder where your Scrivener Projects are normally kept.) [In other words you do not remove the latest zip backup from the cloud, but make a copy and paste this locally onto the second computer. Note: You could extract the Project from the zip backup on the cloud folder, but often times the unzipping process will be slower than extracting from a copy on your hard drive.]
Remember:
If when you double-click on .zip files they extract directly into the same folder: drag the project out of the backup area before using it.
If when you double-click and extract the zip file, your file manager asks if you want to replace files, THEN you did not remove the Scrivener Project you are updating from your current folder which holds your Scrivener Projects. Stop the extraction and remove the old project and paste into your desktop folder until this process is complete and you have checked on the newly added Project. Then these old versions of your Scrivener Project can be safely deleted.
Lastly, if you opt to not use compressed zip backups, then move the entire “old” Project(s) you are updating to a desktop folder out of the way before moving the newest version or the Scrivener Project(s) into the second computers current Scrivener project folder.
This method involves more steps than direct syncing but is MUCH safer because you are not counting on a cloud service to directly sync Projects between two computers. If you mess up or forget to sync with this method you are only a day or two out of sync and if the zip backups are in the cloud, this can be fixed when you realize your mistake.
Finally, this means you now have a central backup in the cloud available to each machine linked to your cloud account. You will have access to the zip files (preferable format) for every project you have created.
I recommend you carefully review your backup settings to make sure they are supporting this process.
Use the Menu command > Options > Backup to look at your options
I suggest you set your backup configuration as follows to ensure the most redundancy:
Turn on automatic backups (yes)
Back up on project close (yes)
Back up with each manual save (yes)
Back up before updating from mobile device (yes-only for IOS version)
Compress as zip files (yes-take less space)
Use date in name (yes)
Set Retain backup files to 25. Once you have backed up to the designated number you start rewriting older project backups. (Example with 25- at the 26th backup, Scrivener will delete your first backup. You will only have the 25 most recent backups retained this way). You could retain every backup, but most of us do not have the amount of cloud storage to make this a practical option.
Backup location = Wherever you like, BUT NOT in the same folder as where you store your projects.
Scriverner Tip: Set up the automatic close option for Scrivener. Use the Menu command File > Options > General > Automatic Quit. Check the box to activate this and choose a time to trigger automatic closure of Scrivener if you step away from the computer. This can range from 1 to 600 minutes.
Scrivener Tip: If a problem occurs with a project, then immediately copy and put aside the 10 most recent backups in a special backup folder until the error has been resolved and the project can be restored using the backups set aside to restore your Project data.
Here’s why: If your project gets corrupted for any reason, you will most likely open and close the project many times trying to figure out what’s wrong, and each time you do that Scrivener will make a backup of your corrupted project, and delete your oldest good backup, thus effectively replacing a good previous backup with a corrupted one! If the default number of backups is 5, then opening and closing your project just 5 times leaves you with only corrupted backups.
Finally, one last point:
I recommend despite all of the redundancy discussed above to backup via some additional method(s). Store these zipped backups of your projects another way:
1. In the cloud on a different Cloud service than the one for your normal backup you use to share with other devices.
2. Use a cloud backup service for your “entire” hard drive, which will include backing up both your Scrivener Project folder and the folder holding your zip backups. (Consider the cost digital insurance. You will not only protect your writing creations, but back up any stored memories, music, pictures, or financial documents on your computer. Doing this continously and automatically, and does not depend on us being diligent (Many of us are not, including me.)
3. External Storage be an external USB drive or hard drive.
4. Again, consider setting up an automatic shutdown for Scrivener when the program is inactive to force daily backups of all open Scrivener Projects. for a certain period of time. This will ensure you the best chance to save the most up to date version of your Scrivener Project. If your backups are set this way, then quitting triggers a backup.
You can do using the Menu command File > Options > General > Automatic Quit
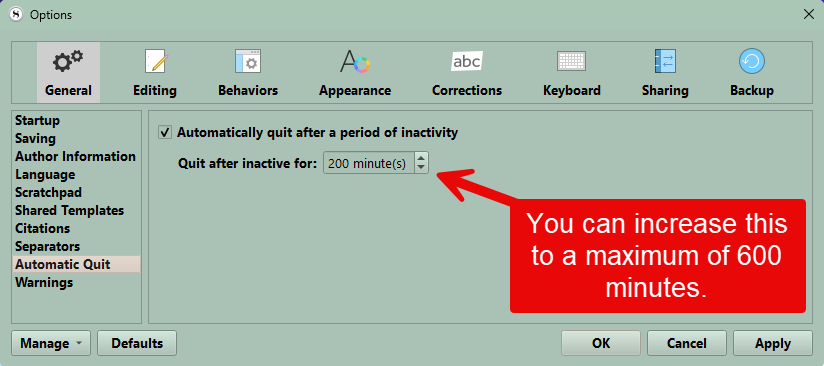
Note: When you close using this method, only the last project closed will open when you click the Scrivener Program icon on your desktop or in the start taskbar. Other Projects which had been open will need to be opened manually.