Help, my work disappeared
A.) First, Find your automatic backups in Scrivener
Two easy options:
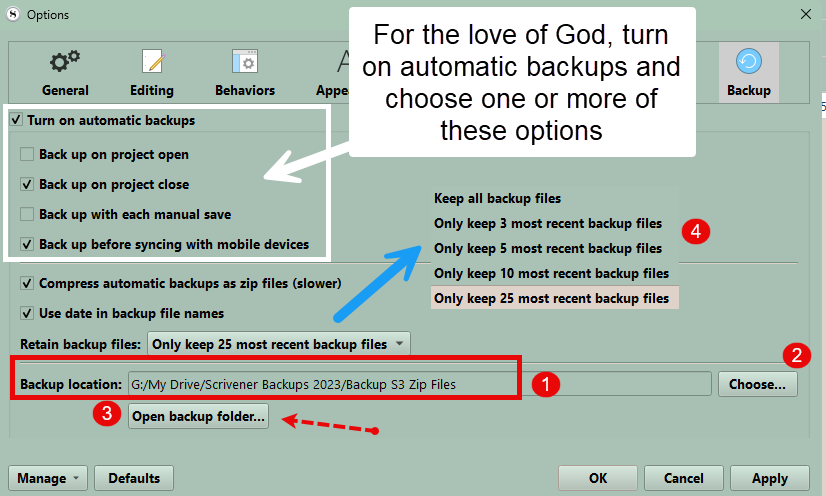
A.) File > Options > Backup > Backup Location (#1 below). Note if click #3 below, then this will open your backup folder. Option #2 Allows you to choose your backup folder.
Scrivener Tips:
1. Choose a single folder to hold all your Scrivener Projects (even if have subfolders within) so you always know where your projects are. I place this in the C drive in a folder called Scrivener Projects (I know, an original name.).
2. For the Love of God set up automatic backups. Choose one or more of the options in the white box below. DO NOT rely on yourself to always remember to manually backup.
3. Go to File > Options > General > Automatic Quit and set a time to automatically quit if the Scrivener program is inactive. This can help prevent issues if sudden power shutdowns occur.
4. After major upgrades, Scrivener may change your default Backup location for the application, and you may need to reset this.
B.) File > Show Project in File Explorer Using this option on another Scrivener Project that is working, will open the folder holding your Scrivener Project in the Windows Explorer Window. If you followed tip #1 above, then the problem project will be in this folder as well.
Scrivener Tip:
Remember Tip #1 above.
B.) Second, Copy all your backups of the current Project you are having issues with and save these in a folder on your desktop labeled copy of Project’s name.
Scrivener by default has five automatic backups and when you reach this limit, then your sixth backup replaces the oldest backup for your project to keep five backups. If you don’t realize an error it can be very easy during this recovery process to overwrite a valid backup. If you have the room, consider increasing the number of backups you are keeping. This is set in the Options Panel by clicking the dropdown caret (#4 above).
Scrivener Tip:
1. Consider adding a date to your zip backups (The safest backup option) to make it easy to determine which is the oldest versus newest version of your backups. (#5 above)
2. However, another way to know which backup files are the newest is right inside the Windows Explorer window. You can right-click on the header and choose the columns you see when you choose the Details view in the Explorer window. The advantage is these dates can be arranged in descending order and are easier to read in this view and include a time stamp as well. You can also include the Project size as a column to review in the Details view. You can compare the size of the zip files to see when the size decreased which in this situation would indicate data loss. (The highlighted projects below show no data loss between versions.)
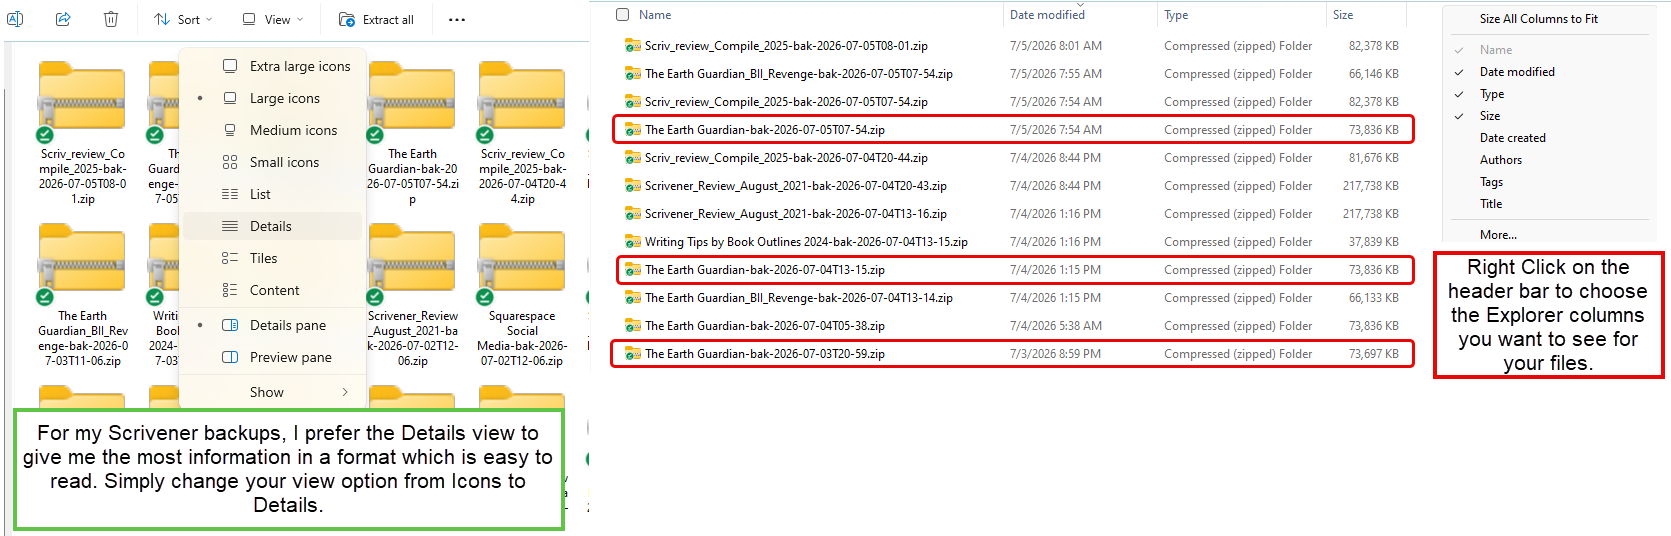
Now you see if any of your Project’s backups are intact to use for your recovery. To open a zip backup, right-click on the file and choose Extract All. Next, select a folder to save this copy of the project in. (Often the Desktop is easiest.) Now, rename this Project folder to something like Recovery version “Project Name”. Renaming the Project folder changes the name of the project opened when clicking on the .scrivx file. Renaming this Recovery Version eliminates confusion. Now when you open this project folder and double-click the .scrivx file to open the project its new name will distinguish it from the original Project.
You can review the size of the backup files to decide which may be your best choice to open. You can either restart from this going forward, or examine the latest copy for differences to see if anything can be recovered. If you are having trouble remembering the names of the newest files, then let Project Search help. You can search by date in your project to find the most recently created or modified files.
Scrivener Tip:
Right-click on the Search magnifying glass and choose Search Modified Date. This search includes BOTH recently modified AND created files. An example mdate:>7d would find all the files created or modified in your project in the past 7 days. This makes it much easier to look for recently missing files, or conversely in the older projects you can look for files you were recently working on to see if they are in the corrupted project though you may have to go back further in time to find a list of recently manipulated documents depending on the date of the backup you are using.
Controlling your Cloud Backups
Rule #1 is the only cloud service which should back up your project folder to sync with another computer is Dropbox.
Rule #2 is the preferred form of Project Backups for Scrivener are zip backups. These are single files which are compressed and contain all the information in a Project folder. As single files, they are very unlikely to be corrupted by any of the reputable cloud services.
Rule #3 is the OneDrive exception. This is often installed automatically on Windows platforms by Microsoft and can be partially syncing your Scrivener Projects to the cloud which will cause havoc and data loss within any projects you open on the computer.
The simplest solution to this issue is to delete the OneDrive app and use another service. This is discussed below.
Make sure only the cloud service(s) you want is/are backing up Scrivener.
If you do not use OneDrive, then go to Settings > Apps > Installed Apps > OneDrive and click on the … at the far right and left-click and choose uninstall. Removing this unnecessary software will save you from future headaches.
How can you control what OneDrive backs up if you retain the software??
If you want to keep this program but control what is backed up on windows then, follow the steps below to designate what folders are backed up and how.
Remember, having the latest daily zip backups will save all the information in your Project Folder when the backup occurs. This is why I check the option to make a zip backup on close. (ie closing the Scrivener program)
Set up which folders are backed up by OneDrive following the method below:
Click the OneDrive cloud icon in your notification area.
Select the OneDrive Help & Settings icon, then choose Settings.
Go to the Sync and backup tab.
Select Manage backup.
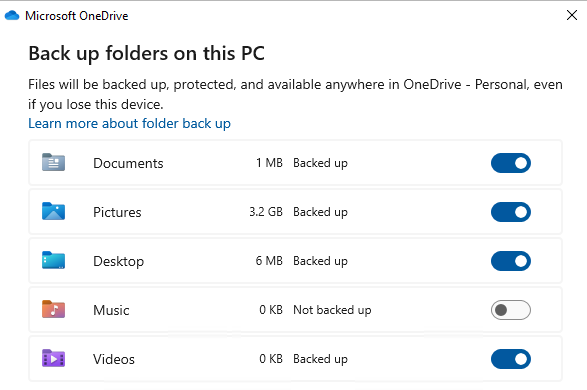
To start backing up a folder, click the toggle on any folder which is gray to blue (in the example above) and then save the changes.
To stop backing up a folder, toggle it off (blue to gray in the example above).
Choose whether to keep files only in OneDrive or only on your PC.
Note:
If the folder you wish to stop backing up contains cloud only files, you will see a message saying "Some files couldn’t be moved. Download them first by changing their state to Always keep on this device"
Backups are like insurance.
We hope we never have to use them, but if we do, we’re glad to have them. Make sure you have backups of your Scrivener projects so you don’t lose weeks or even months of hard work.
Taking steps now will avoid the frantic Help!!!!! my work has disappeared nightmare.