How to Transfer Scrivener to another computer
Follow these steps to transfer Scrivener to a new Machine:
A.) Install the Software
All you need to do is download the application and install it, just like you did the first time, using the registration information instructions that were sent to you.
I save the installation file and keep it in a folder where I save the installation files for any software I download.
Enter your license information when prompted.
Software is operating system specific (Windows vs Mac vs IOS)
Scrivener may be installed on up to two computers you own. You may need to deactivate an old machine to do this. (This is discussed at the end of this blog.)
(If you've lost the original email you can still recover your license details by clicking on the link below) https://www.literatureandlatte.com/lost-licence-recovery
The download link for the installer is Download Scrivener - Literature & Latte.
Install the Scrivener software on your new machine. You can then directly transfer your Scrivener Projects to your new machine but:
BUT before you start, I have a few Suggested Precautions:
Backup every Scrivener Project Folder, any zip backups of Projects, (Consider making a fresh copy of your projects and backups before beginning this process.) If you are not sure where your Project folders are use the Menu command File > Show Project Folder in (Windows) File Explorer. Normally all Scrivener Projects are saved in one location. I personally create a folder on my C drive called Scrivener Projects to make them easier to find.
NOTE: A Scrivener Project is a normal Windows folder which contains all the data contained in a Scrivener Project and a .scrivx file which the software will use to open the Project. Scrivener CANNOT open a .scrivx file inside a zip file.
You can directly paste the ENTIRE Scrivener Project folder onto the new machine, or unzip a backup using the Extract all command and put inside your new Scrivener Projects folder.
Consider have a Scrivener Customization’s Folder on the new computer. Save your general application settings in this folder. Use the menu command File > Options > Manage (button in lower left corner of every pane in Options Panel) > Save Options to File (.prefs file) and place this on your new computer in your Customization folder.
For me, my Scriverner Customization folder is on a Cloud platform to be available to any computers I use. These could just as easily be on an external drive or USB key. (You could even place a copy of the entire Scrivener Application folder in here as a backup as well.)
Most of these customization you can save are found in the application data folder. This is normally found at C:\Users\Account (Name)\AppData\Local\LiteratureAndLatte\Scrivener.
A few minutes spent backing up this information to an external location is worth the time for the peace of mind in case any errors occur in the transfer process. You have spent significant time creating this information. Keep your old computer running until you have assured yourself of the successful transfer of your work.
Save your software key and installation file in the same area where you have backed up your projects and customizations.
If you use Linked Images or research files or imported research files as shortcuts, transfer these files to the new computer, BUT you will need to relink them. (This also applies if going from a PC to a Mac.)
Additional Points- If you are going from a PC to a MAC. Make sure your PC project uses a compatible font such as Times New Roman, or Arial which are supported on a MAC. ) Keep your old machine working until you are sure all of the Scrivener projects and assorted information have successfully transferred.
B.) Copy and transfer your Scrivener backups (and or the whole Project folders) from the old computer.
Ideally make a fresh (dated) backup of every current Scrivener Project you have on your old computer before you begin. The easiest way to transfer these copies may be a USB key or external drive due to portability. A 32 gig USB key is an inexpensive and easy way to transfer all the information. If you keep backups on a cloud folder, then this is unnecessary. (Again, make sure your cloud software is set to keep a local copy of the files on every machine you use.)
Remember:
1. Backups should NEVER be saved in the same folder as your live Projects on any of your computers.
2. Your Scrivener Project Folders should NEVER be stored in the cloud, unless you use Dropbox. The only cloud service which works well with the whole Project folder. However, make sure Dropbox ALSO saves its files locally on the computer as well.
3. Open the Scrivener Project file on your new computer by double clicking on .scrivx file inside the Project Folder. Now use the Menu command File > Options to open the Options Panel. Click on the Manage tab in the lower left and choose Load Options from File to restore the preferences/configuration for Scrivener from your first computer.
4. If you have custom themes, you will need to also use the same Manage tab to Load Theme from File to restore the theme you were using.
How to find your Project Backups:
1. As a precaution, backup the folder holding your project backups to an external drive/USB key in case of errors in the migration process.
2. If your Project backups are on a cloud sync folder such as Dropbox, OneDrive, Google Drive, etc they should automatically sync to the new machine, but note and copy the backup path in case you have to reset on the new machine.
3. If you do not have a cloud sync folder, then use the Menu command File > Options > Backup and find the Backup folder location on the old machine.
4. Copy this entire folder to the new machine, but for safety, back this folder up to an external drive/USB key as well.
5. On the new machine in this backup panel, choose the Backup location and find the folder you just copied to the new machine so future backups will be placed here. Check to make sure your backup settings are correct.
You can write down or take a snapshot/snip image of your current backup settings to reproduce these on the New Scrivener installation. (Windows can do this by using the shortcut Windows key + Shift + S. You can save this image and transfer it to your new machine as well.)
Now Extract the backups:
Extract the zip backup (right click on the file and click Extract All) and follow the prompts and choose the new location for your Scrivener Projects folder (on the new computer).
Again, I suggest you copy all the zip backups to an external drive/USB key as a precaution and backup up multiple copies of each project in case a backup was corrupted.
To find your backup location, use the Menu command File > Options > Backup (see below) You will see the current backup location. Remember, you may want to change the default backup location chosen by Scrivener during the new installation. You can click the choose tab (see below) to choose another backup location.

Once Scrivener has been installed and you have chosen a Windows folder for your Scrivener Projects, then the Menu command File > Show Project in File Explorer will remind you of its location in case you forget. (All your live Projects should be in the same folder, which will make it easy to transfer this whole folder at once.)
Scrivener projects are just ordinary folders on your machine that have a .scriv (Mac) or .scrivx (Windows) extension. You can copy them to the new computer using the Windows file browser, just like copying any other folder.
Be sure when copying a project that you copy its entire .scriv folder, not just the .scrivx file contained inside it. It can often be safer to make the project folder a ZIP archive before you transfer the file to the new machine, especially if you are transferring it via email or some cloud-sync systems. You can extract the project folder from the ZIP file on the second PC.
Windows tip: *** I use both methods for redundancy.
I would also include your software key on a Word document and save with the installation file in a software folder on the new computer in case of problems in the future.
Transfer your individual Scrivener Projects in one of two ways to a second (new) machine:
Method 1: Copying the whole project folder to the new machine.
Again as a precaution, backup as mentioned above.
I also suggest when you have transferred the information to the new machine, you open Scrivener on the new machine and make sure everything transferred before wiping the old machine.
The simplest way to find your Scrivener Project Folder (on your old computer) is to use the Menu command File > Open (which opens a Scrivener Project) and this will open the Windows Explorer to your current Scrivener Project Folder which should contain the folders of all of your Individual Projects.
Copy the ENTIRE FOLDER to your new machine in a location outside of any cloud folders. (Ideally, all your Scrivener Projects should be kept in one folder.) Now when you open the software and use the Menu command File > Open you will migrate the Windows File Explorer to this folder and open any of your projects and double click on the .scrivx file to open the Project. Repeat this process to open your other projects to make sure the information transferred successfully. Once this has been done, Scrivener will open to this new location going forward.
*****DO NOT ERASE the old computer until you are sure your move to the new computer has been successful and your data is intact.
Method 2: Open a Zip backup on the new computer and extract the backup of your project to the location of your new Scrivener Project folder.
C.) Copy your Scrivener Application folder.
To copy custom project templates, layouts, compile settings, script formats, personal word list, and themes you need to copy the Scrivener Application folder from the old machine to the new one.
You can find this folder two ways:
1. The easiest way is to use the Menu command File > Show Application Support folder. This folder also contains copies of many of the things you want to back up, including the items with arrows in the image below. It may be easier to copy the whole folder and save on an external hard drive or USB key. Once you do this, you can either harvest the information as needed to update the new computer or simply replace the new Scrivener Application folder with the one from the old machine.
2. Open Windows File Explorer and migrating to the following location to find the Application folder: C:\Users(replace this with your User Account Name)\Account\AppData\Local\LiteratureAndLatte\Scrivener.
After you have found the Applications folder and copied it, then:
A. . Copy the new installation of the “Scrivener” Applications folder to your desktop and save this until your transfer is complete.
B. Copy the old “Scrivener” Applications folder into the same location on the second machine replacing the folder you copied to the desktop.
These steps will transfer your customizations onto the second machine. It is also possible copy Project Templates, layouts, themes, and compile and script settings separately and add them to the second computer one by one. Each of these also can be exported and imported individually within relevant functions in Scrivener.

D. How to copy Themes to a new machine. Themes manipulate the overall color scheme and include changes in the settings in the Options Panel under the Appearance tab.
Steps to migrate Themes-
On the first computer, open a project in Scrivener and go to File > Options,
At the bottom of the options dialog, you will see a drop-down menu titled Manage. Click this and select Save Theme to file to create a .scrtheme file to use to import any themes or customized versions of these to your second computer using the Menu command File > Options > and clicking the Manage tab in the lower left.
Note: You can also save themes you want to save use the Menu command Windows > Themes > Save Theme to file will save your current theme to use on a second/new computer or to save in any folder location you want.
3. On the new computer, use the Menu command File > Options > Manage tab > Load Theme from File and the new theme will be available to use on the new machine.
Note Options are saved for how your Project functions when you use the Menu command File > Options > Manage tab > Save Options to File. (NOTE: the choice to Save Theme Options to File only partially saves Scrivener’s Behaviors and is rarely a useful option.)
E.) Check key Options Settings on the new Machine.
You can write down or take a snapshot/snip image of your current key options settings to reproduce these on the New Scrivener installation. (Windows can do this by using the shortcut Windows key + Shift + S. You can save this image and transfer it to your new machine as well.)
Your settings in options will not necessarily all be transferred. (Look especially at the ones below and make notes or take snip images of these.)


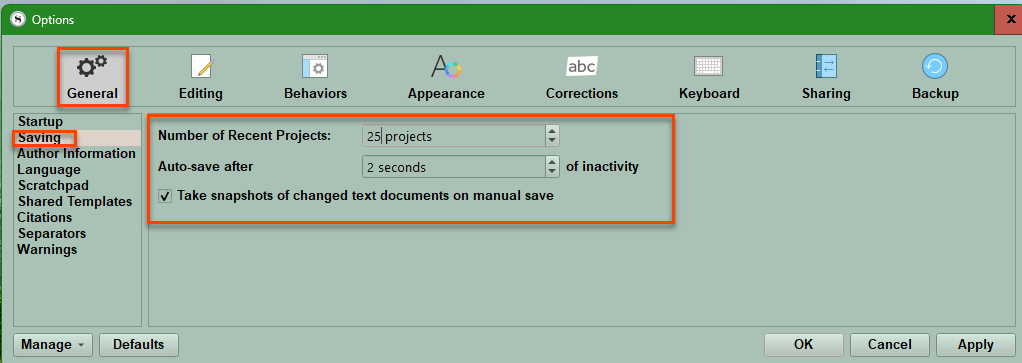
F.) Copy the general application settings:
1. On your original computer while a Scrivener Project is open use the Menu command File > Options.
2. In the Options Panel (see below) you will click on the Manage button in the footer bar (#1 above).
3. Then you will click the Save Options to File…. (#2 above) to create a .prefs file of your settings. The Windows Explorer will open to ask you where you want to save this file. Again, I would save on an external drive/USB key and put inside a folder where these files are easy to find. (ex. Scrivener Transfer Folder)
4. Open this .prefs file on the second computer by choosing the Load Options from File… (#3 above) AFTER Scrivener has been installed, and a transferred project has been opened. Now Select the .prefs file you created.
G.) Copy custom Project Templates (.scrivtemplate files), Layouts (.scrivlayout files), Compile Formats (.scrformat files), Script Formats, Personal Word Lists (wordlists.txt file), Themes (.scrtheme files), and Custom Name Generator Name Lists*?
If you have not changed the default location for automatic backups on your new machine, they will also be copied during this procedure.
However, to be safe, I would copy the folder holding this information to an external drive/USB key. To find this folder, on the first computer use one of two methods:
1. Use the Menu command File > Show Application Folder and this will open the folder where all these settings are and you can copy the entire Application folder and save on the new computer or replace the Applications folder of the newly installed Scrivener software.
2. Use the Windows file browser to navigate to the Scrivener folder in your user application data directory: C\Users\Account name\AppData\Local\LiteratureAndLatte\Scrivener. (This folder is a hidden directory by default. Replace “Account” with your Window’s user name.)
Copy this "Scrivener settings" folder to the same location on the second machine and backup to an external drive/USB key.
These steps will replace these items on the second machine.
You can export and import Compile Formats from the lower left options in the Compile Panel footer. (see below)
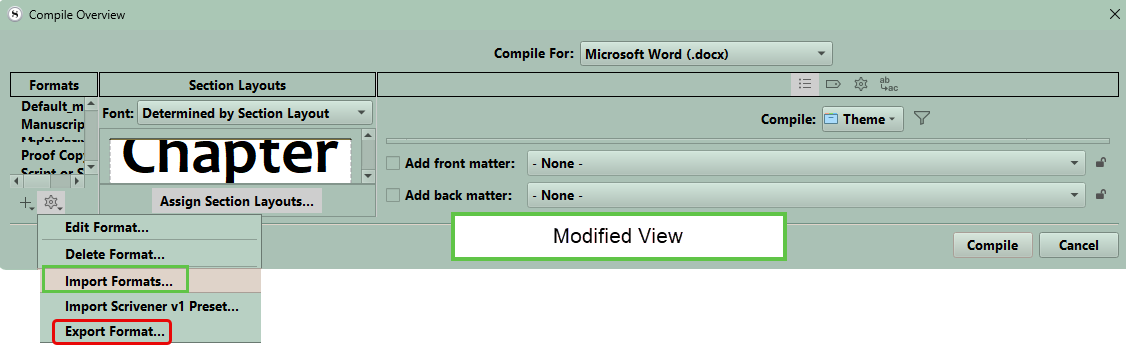
*** An exception is your Custom Name Lists for the Name Generator. These must be saved separately to the new computer. You should also save a copy to an external drive/USB key.
You will have to go to where you saved any Custom Name Lists and migrate these to a folder you remember (? Custom Names Folder). Again, I would save your custom names (Numerous lists created by Scrivener beyond what is included in the base offerings.) to an external drive/USB key. Note: The legacy name lists are included with the software.
Other exceptions are the graphics used for various custom themes such as icon files, custom backgrounds, or even small tileable files will also need to be transferred to make the transition seamless.
Another exception is Styles.
You CANNOT EXPORT Styles or save Styles directly, but you CAN IMPORT Styles. Once you have saved and moved your previous Scrivener Projects to the new machine. You can on the new computer and a newly opened Scrivener Project, use the Menu command Format > Style > Import Styles. Now Windows Explorer will open. Now navigate to where the full Scrivener Project folder is on the new computer and select a Project Folder with the styles you want to import and using this command will bring them into a new Project.
H.) Saving Customizations to use on the new computer.
I suggest creating a Scrivener Customization Folder on any computer you use Scrivener on. (You could save this on a cloud folder to make these customizations available everywhere, but make sure the backup software saves this file locally as well. See Cloud Backups) In this you can store any Custom Project templates, custom themes you download, custom icons you create or download, Custom Compile formats, custom/downloaded name lists, personal word lists, layouts you export, section types you have created and exported, any custom keyboard commands can be exported/imported inside the Options panel under Keyboard, custom document or project templates, and research materials. Inside the Customization folder, I would have subfolders for each of these categories to keep the transfer organized.
I would also include your software key on a word document or save inside a scrivener project and save the installation file, in case of problems in the future.
Remember:
It is easy and cheap to get a 16 or 32 gig USB key for under 10 dollars to have peace of mind during this transfer process and ensure that none of your hard work or favorite settings are lost during the transfer process. Most of the time, this will not be necessary, but when it is the extra time becomes a life saver.
Again, make sure Scrivener is up and running on your new computer before deleting the data on the old one.
Custom Name Lists are not included in any of the backup methods above and must be saved separately.
Backup as discussed at the beginning of this blog. Never forget to backup first.
And NEVER erase the hard drive on the old computer, until Scrivener is up and running correctly with all your customizations on the new computer.
I.) Save your Scratchpad notes:
If you wish to copy Scrivener's Scratchpad note files, go to Scrivener > File> Options > General and choose Scratchpad from the list. By default, they will be in a folder called "~(Your User name)/Documents/Scrivener Scratchpad Notes".

If you use a Cloud service to backup files, then you might consider setting your Scratchpad location to your cloud folder on all computers, so that you can share notes automatically.
Go to the current (Scratchpad) Notes folder and copy the Documents within. I suggest saving these on an external drive/USB key to move and copy onto the new computer’s (Scratchpad) Notes folder. (Don’t get rid of the old computer till you are sure the transfer process was successful.
J.) Deactivating the Old Machine (remove)
Remember, please keep the old machine around, when using Scrivener on the new machine for at least a week or two, in case there are issues/missing information from the transfer process.
If Moving from one computer to another you MUST Deactivate the Old Machine if you have more than two computers using the same software key.
If you are moving from one computer to another (rather than expanding to owning two computers) it is a good idea to deactivate Scrivener from the old machine. You can do this by selecting Help > Deactivate Scrivener. Once deactivated, Scrivener will not be accessible on that machine unless the license information is renewed. To reactivate, you would have to reenter the license.
In Conclusion:
I do hope this makes the transfer process safer and easier in migrating Scrivener to its new home. You could certainly bypass some of these steps, but redundancy ensures a safe and smooth transfer and is worth the extra effort.
Updated 8/28/26