Scrivener Section Types
Using Section Types
Section Types are a fundamental to how Scrivener works. They directly correlate to how your work is formatted when you export it during the compilation process. Every item in the Binder is a document, including folders and files that hold subdocuments. An analogy would be to think of Binder documents as body parts and Section types as the specific parts such as arms, legs, torso, neck, and head. The key is consistency when applying Section Types so that all folders with the same function are uniformily a specific Section Types like Acts, Chapters, or Front or Back Matter as classic examples. In a novel, Scenes are usually single documents. When compiling, each Section Type is assigned a Section Layout. Think of these as the color or fashion style chosen for each clothing item which you cover your body part with. The whole becomes a body with a specific coordinated clothing style which gives your Compile output a distinctive look. The key is being consistent. All Acts or Parts should have the same Section Type, which will be different from the Chapter Section Types.
Section Type Facts:
Scrivener Tip: Remember Section Types are a searchable criteria, just like labels and status.
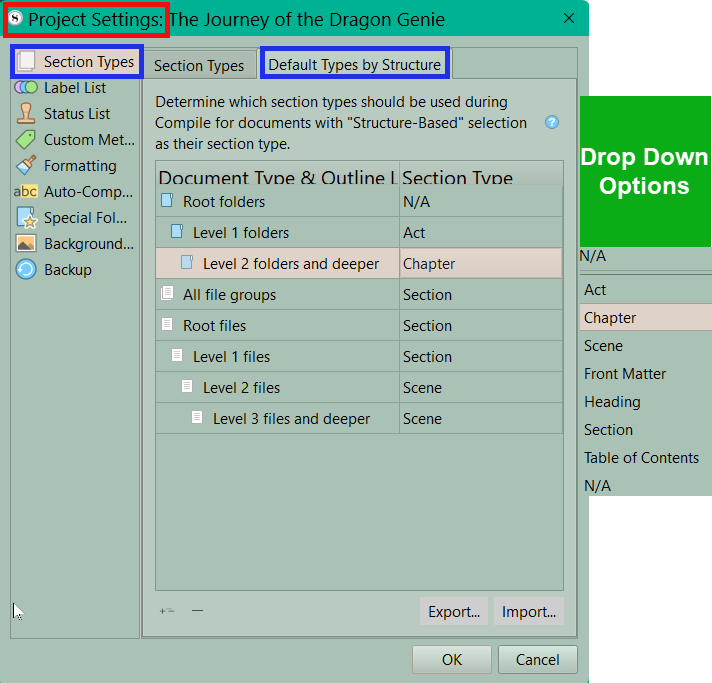
Scrivener applies Section types based on the Binder structure automatically using Default Section Types by Structure.
You can override this by applying your own Section Types, which may be a better choice depending on your intended use.
Section Types can be applied to Templates, so if you use a template, it can be automatically associated with certain Documents (Acts, Chapters, Scenes, Front/Back Matter) depending on its planned use.
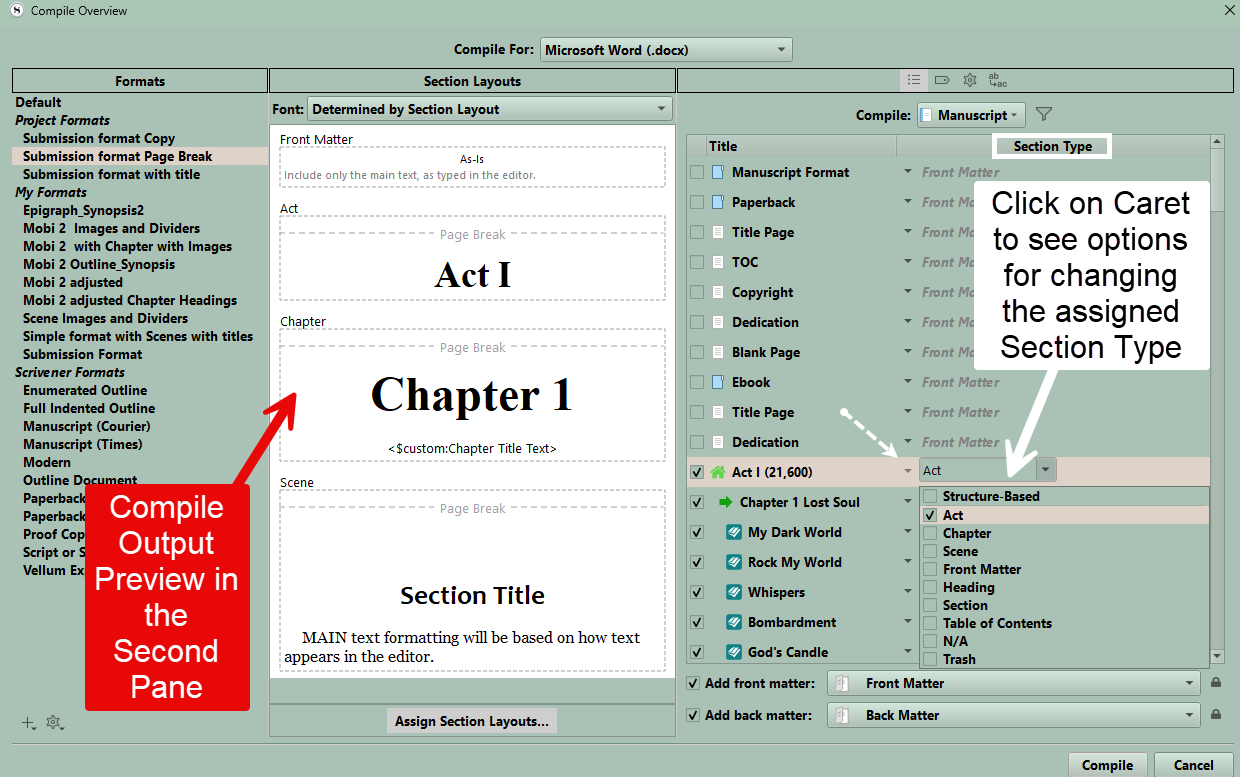
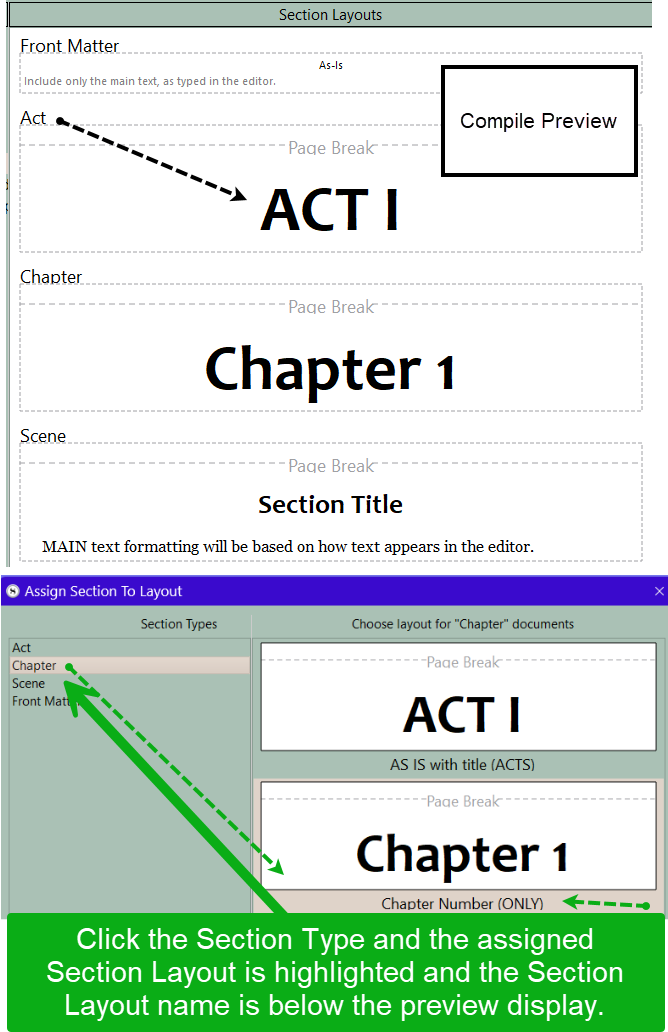
During the Compile process after you assign each Section Type a specific Section Layout (in your project), then the yellow warning box disappears under the second Compile pane (Section Layouts) and you see a Layout preview showing how the Compile Output will appear.
Manually assigned Section Types appear in regular black text, while any automatically applied Section Types by Binder structure will be identified with a grey text.
Only text documents outside the Draft/Manuscript can be used for Front matter or Back matter. You must click the box at bottom of Compile Window in the third pane on the right and choose specific folders to include when you Compile to add Front and Back matter to your Compile output.
Assigning a document’s Section Type can be done in four different ways.
(NOTE- When assigning Default Section Types this is context based and folders will have different options than files/groups of files):
1. Binder:
Use the right-click (context) menu with a Binder item, and select a Section Type you want.
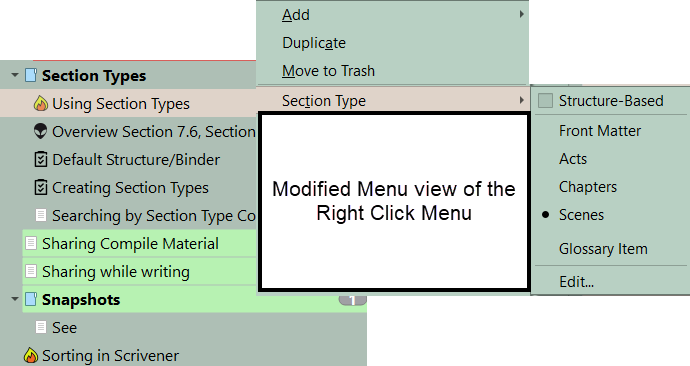
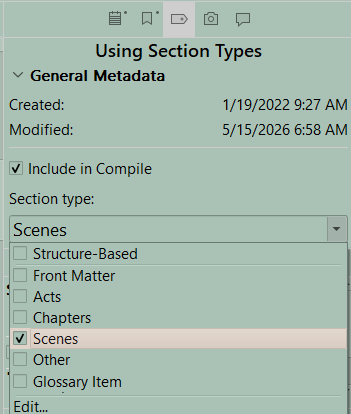
2. Inspector:
In the General Metadata pane in the Metadata tab, centered above the Inspector, select a Section Type from the drop-down menu.
Below is an example of Section Type options for any document (file or folder). Clicking the last option -Edit takes you to the Project Settings Panel and you can add additional Section Types for any special needs you may have for your project.
Section Type options for a folder:
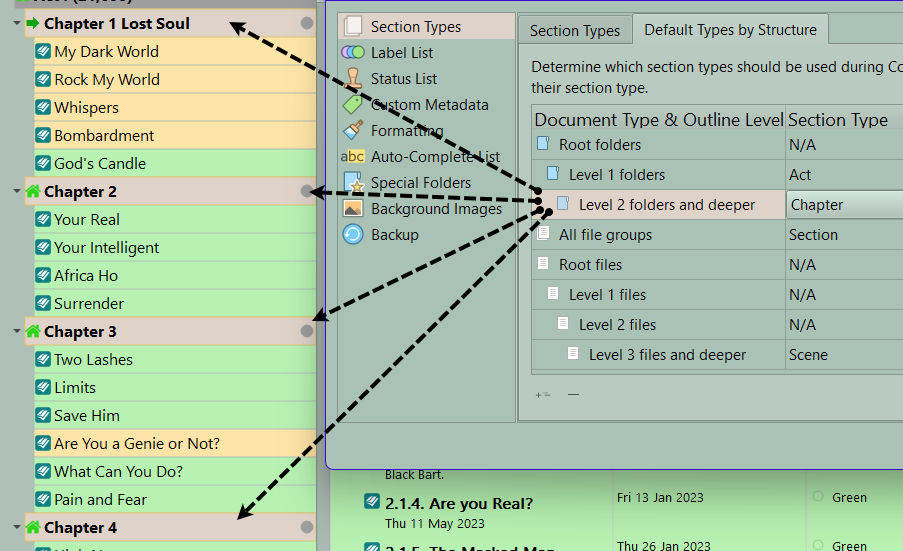
These can be customized using titles you choose or create. Section Types can also be assigned based on a folder or file’s position within the Binder. (ie the level or sublevel depth of a document. You can replace Scrivener’s Structure based titles with your own customized names like Act/Part, Chapter, etc and assign them to replace a Structure based document’s Section Type name. This allows the Structure based names to make sense in your specific Project.) When in the Project Settings Panel and click on Section Types by Default Types by Structure you will see the Section Type you choose highlighted in the Binder. This way you can make sure all Acts, Chapters, and Scenes have the same Section Type.
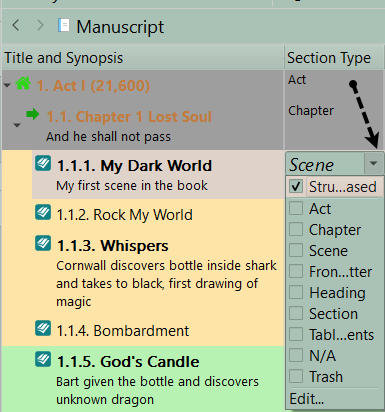
3. Outliner:
In the Outliner Layout Type column, Click a document and click on caret to display your list of Section Type Options which is Structure based. (Scrivener Tip: Label Structure based Section Types in Project Settings in a way which makes sense before using this method. Also you can move the Section Type column next to the Title and Synopsis column to make it easier to make changes. Now choose the Section Type and change it if needed in the dropdown menu. This dropdown is structure based.
4. When Compiling:
In the Compile Overview Window’s far right column, the items to compile are listed. Before Compiling you can in the third pane click on any document’s assigned Section Type and change it. Usually, they should all be set by the time you are ready to Compile.
Compile Tip: After you assign each Project Section Type a specific Section Layout, then the yellow warning box disappears and under the second Compile pane (Section Layouts) you see a Layout preview showing how the Compile Output will appear. The effects of some placeholders you have added to Section Layouts may not be displayed in the Layout Preview below. Here is your first chance to see if there were any errors in the Section Layout choices you made.
Section Types can be an alternate to labels for folders/files-
Sometimes my Section Types have no distinct usage in the compiler in fact—a lot of them just get wired to “as-is” because they aren’t meant to do anything special except be a tool at the project organization level. Some of them aren’t even meant for items that go into the Draft, but rather to classify types of supporting material being used for the novel. Remember, Section Types are a searchable criteria, just like labels and status.
Scrivener Tip: You can create various non-compile Section Types such as character sketches and worldbuilding. Using Section Types can become an easy searchable tag for useful research information or material from a previous book. Like Labels, only one Section Type can be assigned to any file or folder in Scrivener. In my mind I would use non compile Section Types as another searchable criteria for my research material.
Three methods to adjust Section Types manually:
A. Structure Based
Here you define in Project settings what the Section Type is labeled based on whether it is a folder or file and its level (depth) within the Binder. You can see an example below. So assignments of Section Type are based on the decisions and labels you choose.
If you set up a Section Type to be inherited from the folder holding a document, then this is listed as structured base such as Glossary (folder) and Glossary Entry (document).
B. Manual Creation:
You can create any section type you need in Project Settings, and once created it will appear under the Section Tab in any of the four methods discussed previously.
C. Default Subdocument Type:
This Menu option only appears when viewing a folder or file group, both of which can have subdocuments. You can use this menu to assign a default Section type to any children added in the future. The Section Type will only change when you choose another Section Type for the folder’s subdocuments.

Visually identifying Section Types:
1. Open the Project Settings panel and click on Section Types > Default Types by Structure.
2. Now clicking on any level (including Root Folders) will highlight any file/document on the currently selected level in the currently visible Binder. (Unfortunately, you cannot scroll the Binder in this view. You must exit, move the Binder’s focus to examine another area of the Binder in this way.)
(Below illustrates choosing various Section Types and seeing these highlighted to check on consistent Section Type assignment which is crucial to a consistent Compile output.)
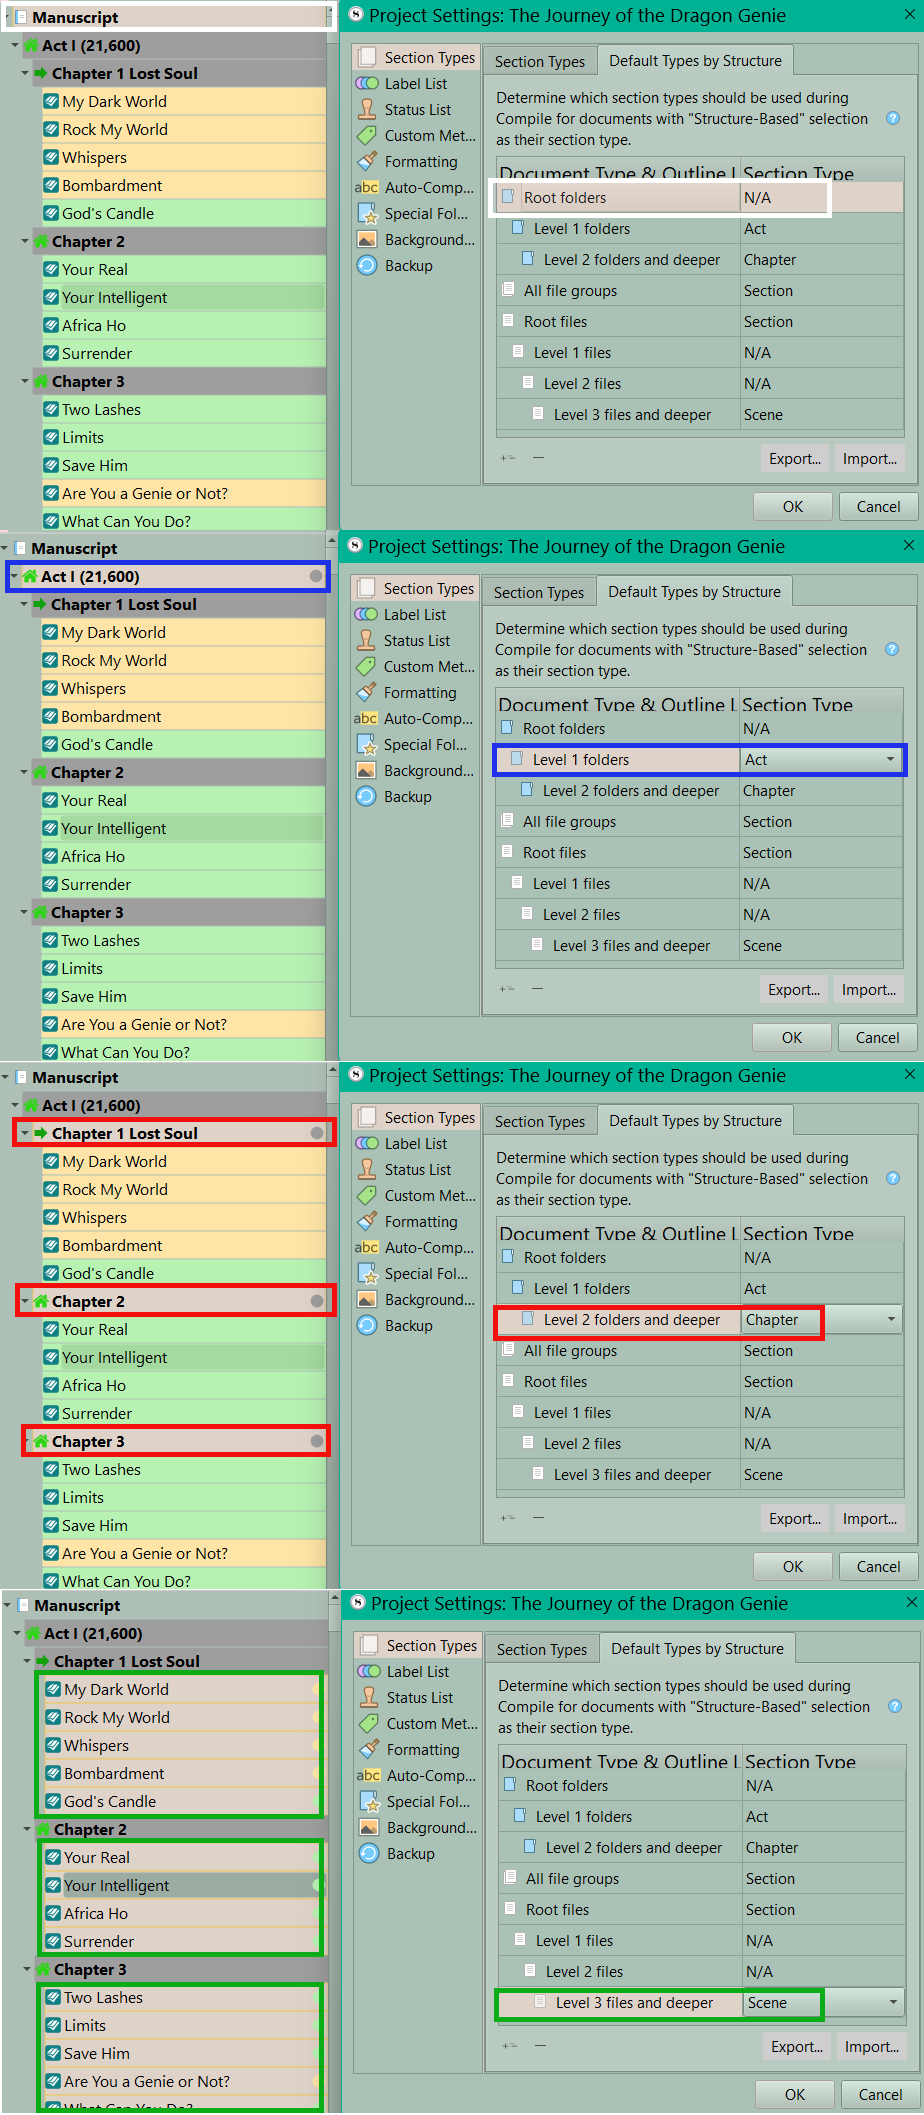
As shown above, you can see any Level for folders or files and see the currently assigned Section Types.
Root folders are the highest level and in Scrivener are the Manuscript, Research Folder, and the Trash Folder. These Root folders are technically outside of the Draft and will not usually be compiled.
Level 1 Folders in novels correspond to Acts or Parts.
Level 2 Folders in novels correspond to Chapters. (You could even go further and add another level inside Chapters of folders containing notes for the story or editing. Typically these would also not be compiled. You can have Level 2 folders in research but you can use their Compile status (or lack of) to exclude them from the Compile Process other than the folders for Front and Back Matter if used.
On the File side, in novels, Scenes would reside inside folders and in the classic novel structure will be Level 3 files or deeper. You could have other arrangements based on your needs for a specific Compile output. (See display above)
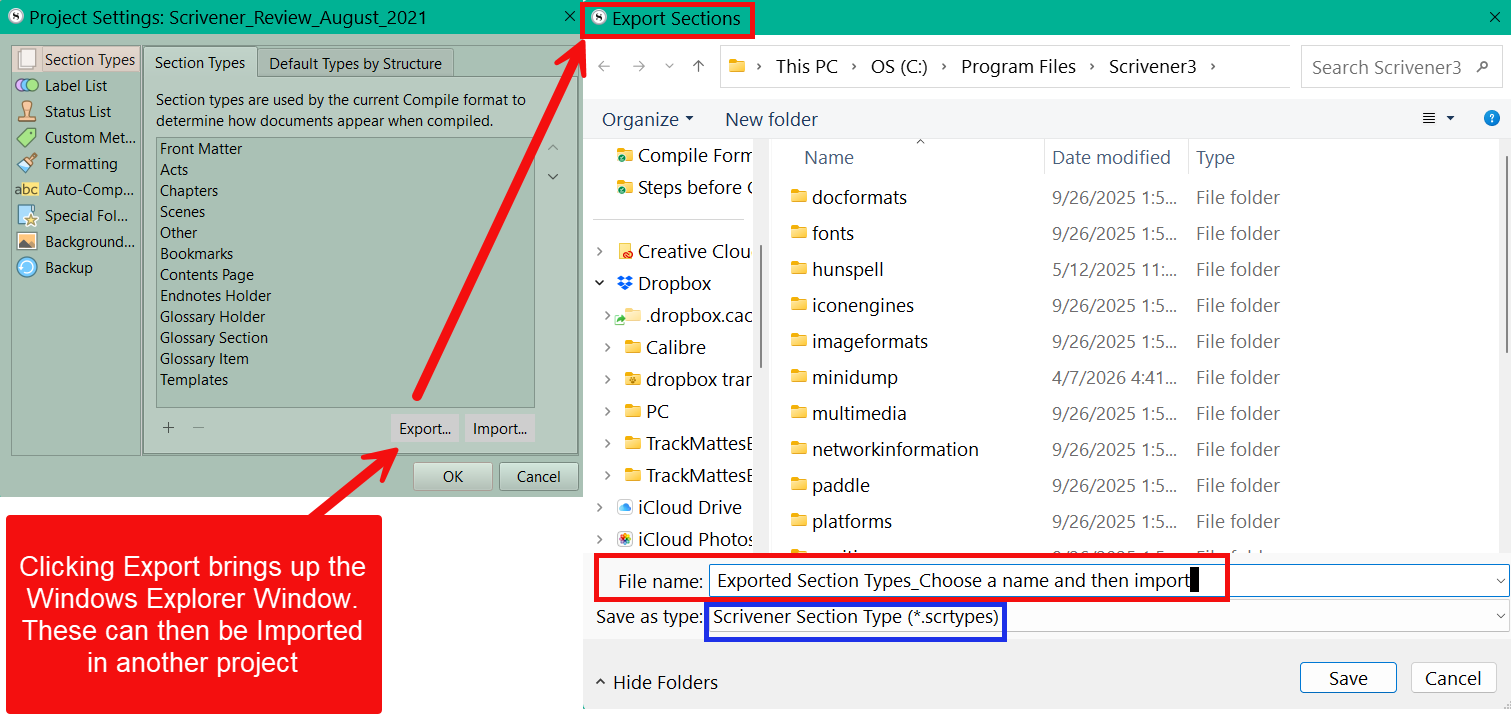
Section Types can be Exported and Imported between projects, but cannot be dragged between projects like labels and custom metadata.
When copying information between Projects Section Types will transfer between Projects ONLY IF both Projects use the exact same name for Section Types. However, default subdocument Section Types will not be copied. (If you have templates with default subdocuments and default subdocument Section Types, then these are not copied.)
Viewing Section Types using the Outliner:
While in this view, add the columns for Include in Compile and Section Type next to each other. These can be next to the title. Here you can quickly review the Compile Status and Section Types of Binder documents.
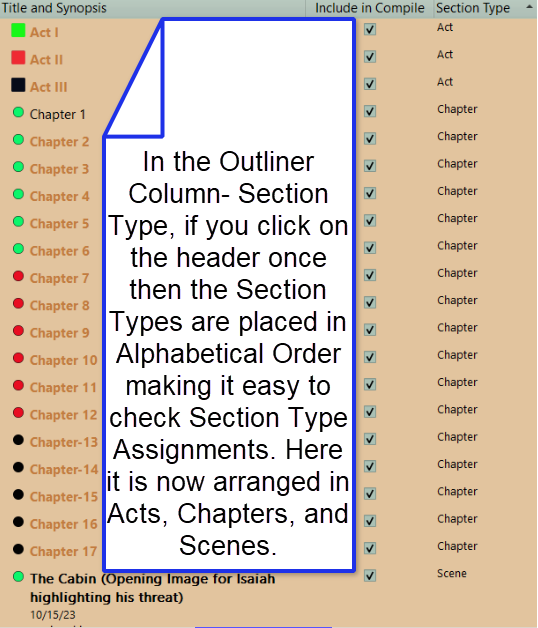
Scrivener Tip: If you click the down caret on the Section Type Column below, it will change the order of displayed Section Types. (Binder order, or Alphabetical in ascending or descending fashion for the Section Types) This can make it easy to check status of Acts or Chapters (see below).
In this view, it becomes easy to see if you have assigned the correct Section Types and if all documents in the Draft (Manuscript) are set to be compiled. You can make quick changes in this view.
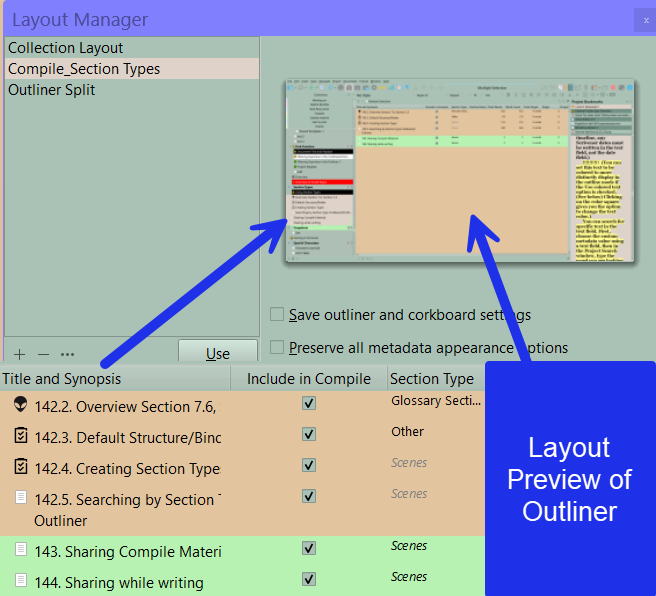
Scrivener Tip: You can go to the Layout Manager using the Menu command Windows > Layouts > Manage Layouts and save this view to use again when checking on Section Types and Compile Status. (Call this Layout Compile or a similar name to remind you.)
This becomes a quick way to ensure the Section Types in your project are assigned to the correct files/folders. Ie Acts have the same heading (ex Part Heading/Acts), Chapters all have the same heading (ex. Chapter heading), Scenes all have the same setting (Scene), Front and Back Matter all have the same setting (Front Matter- or another unique Section Type name for these folders). Note: Front/Back Matter Section Types often use the (As Is) Section Layout type to preserve any special formatting for these sections.
If you need to change the compile status, you can change their Compile status by checking or unchecking the include in Compile checkbox. However, you can only change one item at a time this way. The Compile icon in the Editor Footer will change from an X for not Include in Compile to a Check Mark. (Note: You can change the Compile Status of multiple documents at once from the Binder.)
The organization of your Binder outline is of crucial importance when compiling your book. A strictly regular structure is best, but Scrivener can deal with exceptions to the rule as well.
These Units of structure can be renamed (Even Default Section Structure names) to make sense to you.
Parts (Acts) -
Used only if your writing contains separate parts (Acts).
Chapters -
A normal folder with a collection of text documents.
Scenes or Sections -
A series of text documents in a folder. If multiple scenes are contained in a chapter within a single file, then you will need a separator, be it an empty space, #, ***, or some small image divider that occurs as a transition between files in one folder. You can also give individual Scenes a title to use as the separator between multiple scenes in one chapter.
Note: Only text documents outside the Draft/Manuscript can be used for Front matter or Back matter. You must click the box at bottom of compile in the third pane on the right and choose specific folders to include when you Compile to add Front and Back matter to your Compile output.
Using Collections
Pro Tip- Consider making a Scene Collection with every scene manually added. Now open this Collection in the Outliner view with a Section Type Column next to the Scene name and the Include in Compile column. If your Project is organized correctly, every scene will be assigned the Scene Section Type and have the Include in Compile box checked. It now becomes easy to scroll your Scene Collection and make any needed changes.
With Chapters you can order the Section Type column in the Outliner to group all Acts and Chapters in an ascending or descending alphabetical order as discussed earlier. Especially if these items are numbered, this view makes it easy to see if everything has been correctly assigned.
You could make an Act or Chapter collection is needed and use the same method above to ensure uniformity.
Note: If you use Section Types rather than the default Scrivener file structure, then how you arrange the Section Types in Project Settings window is how they will appear in the Compile area where you assign Section Layouts. So make sure they are arranged from largest (Act/Part), to the smallest unit of a your project (usually a Scene in a novel).
The Section Layout title for the Section Type preview you see in the second Compile pane is in the upper left corner.
You should ensure your Section Types are consistent and correctly assigned BEFORE beginning to Compile.
See more on Compiling here.