Collections: an overview
There are three Types of Collections
1. Type One— Static/Standard Collections:
These allow you to freely add, shuffle and remove documents/files as you work. This is the most flexible and freeform type of collection.
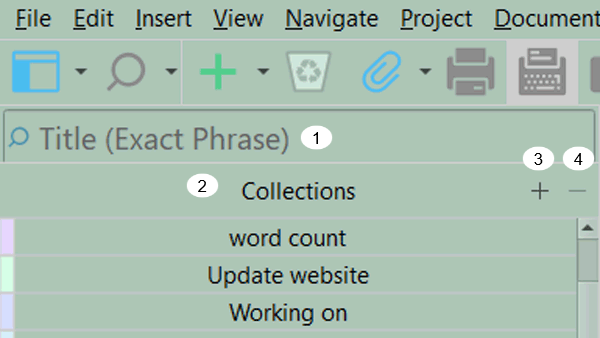
1. Project Search Window
2. Collections Header
3. When you create a new Collection using the + sign in the Collections header, the Collection created is a Static one. The current document visible in the Editor is automatically included in this newly created Static Collection.
4. Click the - Sign to delete any single collection (Static or Dynamic). You will receive a warning message before you can delete this file.
2. Type Two—Dynamic/Saved Search Collections:
These are indicated by a magnifying glass icon to the right of their name, these collections will be dynamically populated by a list of items that match a stored search query which is run every time you click on the search title (ie you rerun the original search updating the Search results by adding any new items which fit the search criteria since this was last run.) To create a new Dynamic Collection, you must first do a Project Search and then left click on the magnifying glass icon and choose the last option on the list- Save Search as a Collection to create a new Dynamic Collection. You cannot add or delete documents from Dynamic Collections as the list of items in them are generated solely by your chosen search criteria. Note: You can modify your current Dynamic Search at any time which will result in a different group of files being found.
3. Search Results:
A special built-in unremovable collection. This contains the results of your last search and cannot be deleted. Any project’s LAST search will have their query and results stored in this collection automatically for future referencing. Every new search replaces the old search results. This is the Last Collection and just above the Binder, but you can change its default position. If not visible, then slide the scrollbar to bring this into view.
The Dynamic Collection Header Bar
The Dynamic Search Collection Header Bar (see below) is different than that of a Static Collection in that a magnifying glass (D) is at the far right to identify it as a Dynamic Collection. The - sign has been removed because you cannot delete files from a Dynamic Collection.
Dynamic or Search Collections (see above):
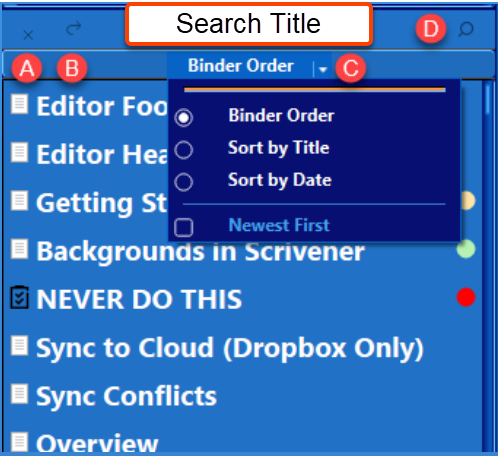
A. Click x to close the Collection.
B. Clicking the bending arrow will display all the current Search contents in one of Scrivener’s three group views which include Scrivenings, Corkboard, or Outliner Views. The view Scrivener chooses will be the last of the three group modes you used. So if the last group view was the Outliner View, then any collection viewed this way will have its contents displayed in the Outliner View, until you change the Group View mode.
C. The Binder Order dropdown option gives you choices on how to arrange your Search Collection. Above the Binder is a caret which can be clicked to add a color theme to the collection (also available below in Static Collections).
D. The magnifying glass indicates that the currently chosen search is a Dynamic one and the results will be regenerated (using the original search parameters) every time you click the title of this Dynamic Search. (You can not remove items from this list as you can in Static Collections.)
To the right of the Search Title there is a down caret that allows you to customize the Dynamic or Static Collection color. (as seen below for a Static Collections) The Search Results Collection cannot be customized unlike other Dynamic Collections.
The Static Collections Header Bar
(see image below):
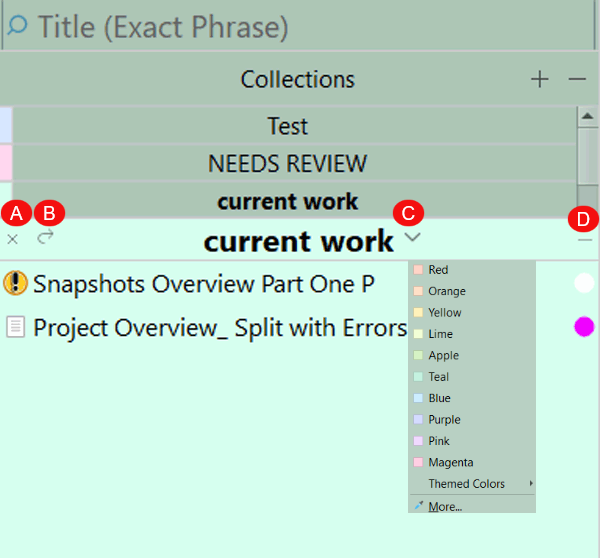
A, B, and C offer the same functions as in the Dynamic Collection Header Bar. However, you cannot change the automatically created order of items in a Static Collection. They can be dragged by clicking and using the mouse.
D. Here your only choices are to add files from the Binder to this collection or whether to delete the currently highlighted file(s) by clicking the minus sign. The minus sign (see D above) allows removal of any single or multiple highlighted files/folder from your Static Collection. (By holding the Ctrl key you can select and remove multiple items at once.) Remember, you are not removing Binder files or folders, but merely the shortcuts to those files in your project. With Static Collections it is easy to add or subtract documents in the collection.
The Collection’s Footer Bar is the same as the one in the Binder, regardless of the collection type.
The Collection view can be toggled on or off in 3 ways:
1. By Using the View icon if available in your main toolbar and checking or unchecking the Collections checkbox.
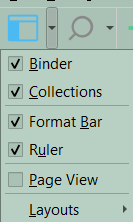
2. Using the Menu command View > Collections (check the box to show the Collections view)
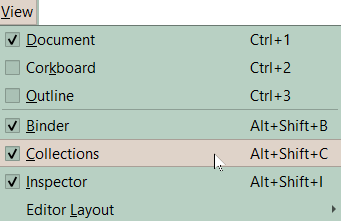
3. Using the Keyboard Shortcut Alt +Shift +C will toggle the Collection view on or off.
Naming Collections
1. Double click a collection title to edit the name, just like any item in the binder.
As shown above, the small Window above the Binder has a limited space to potentially display Collections (with the newest at top) followed by your last Project Search Results regardless of whether the Search Collection was saved. The current Search Results only become a permanent Dynamic collection if you use the Save Search as Collection option at the bottom of the search menu when you LEFT click on the search bar magnifying glass icon. When you click on a Collection the results will be displayed below the Collections area and replace the Binder view. Clicking the X in the Collection header will restore the Binder view. Clicking on the Binder name above the Collection also restores the Binder view.
Two other ways to see a list of your current Collections if not visible above the Binder:
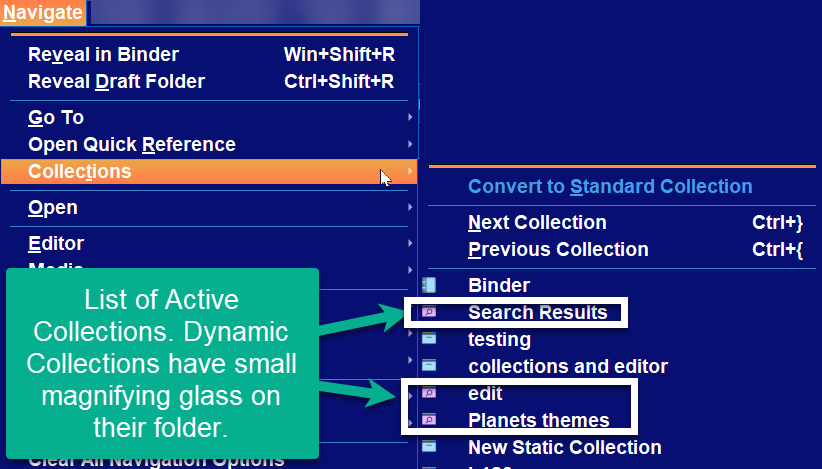
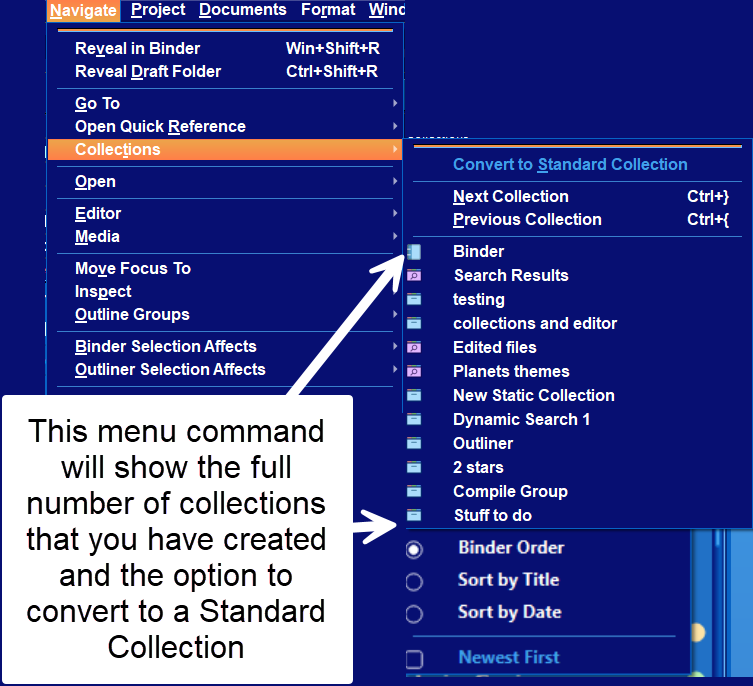
A. Using the Menu command Navigate > Collections will show your full list of collections in order from the oldest to the newest at the bottom of the displayed list. The icon in the list will tell whether the Collection is Dynamic or Static.
(Any collections with a small magnifying glass are Dynamic Searches. (These type of searches rerun the original search criteria to search your project again whenever you click on them. This updates your Collection with any new search results.)
This Menu Command also includes the option to convert a Dynamic Collection to a Standard (Static) Collection. The option will be grayed out/inactive (or different colors based on your current theme) if you choose a Collection that is already a Standard (Static) one.
Remember:
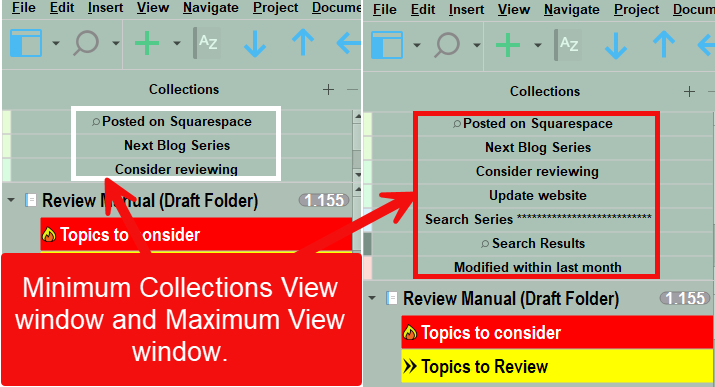
The Collection window above the Binder has a slider. Moving this could hide some of your Collections and the Search Results if you create enough collections.
You can change the collection order by dragging individual collections up or down in the list. Hold the right click mouse button while dragging.
You can see icons next to each Collection in the list.

Static Collection Icon

Dynamic Collection Icon
1. This first icon is next to Static Collections.
2. The magnifying glass icon is next to Dynamic Collections (Scrivener also refers to them as Saved Search Collections.)
A small magnifying glass will be to the left of Dynamic Collection in the list of Collections above the Binder.
B. Right click on the Icon of the current file visible in the editor header.
You will see the option Go To Collection and this will show/open any of your current group of Collections. (Again showing the icons to designate a Collection as dynamic or static.) The list of Collections is the reverse of the order displayed above the Binder.
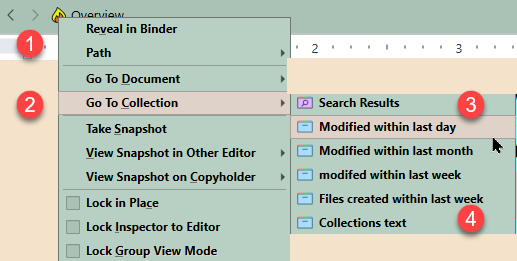
1. Right click Editor icon to bring up this menu.
2. Choose Go To Collection
3. Choose either a Dynamic Collection with the magnifying glass OR Choose a Static Collection to open.
4. When opened, any Collection can be viewed in any of the 3 group views if you choose the entire Collection (Keyboard shortcut Ctrl + A) or a select group of documents inside the Collection. (Scrivenings, the Corkboard, or the Outliner view)
5. If you click a single document in the Collection, then this will be viewed in the Editor.
Collection Rules
1. Deleting a whole collection or a part of a collection DOES NOT remove the original files from the binder. This only deletes the shortcuts to those files. A Collection is a list of shortcuts to the original items.
2. You can change the order of items in a Static collection WITHOUT affecting the order in the binder.
3. HOWEVER, editing either a document’s title or content in a collection will change that document/file in the binder. If multiple copies of the same file exist in the Collection then all of them will be changed at the same time.
4. Collections can be either Static, Dynamic (a saved active collection using previously defined search criteria), or the current Search Results.
5. The different and distinct background color of the header and sidebar will help remind you that you are not in the full Binder. The background for each collection can be customized and will be discussed in another blog on the appearance options for Collections.
6. You can use the Menu command Navigate > Collections > Convert to Standard Collection to change any Dynamic Collection you are currently viewing into a Standard Collection.
7. Search Results displays your LAST Project Search, and will be erased with your NEXT Project Search UNLESS you use the Save Search as Collection option at the bottom of the left click menu. A new Project Search replaces the last Project search and those results are lost unless you save those results as a Dynamic Collection.
A.) If you click the Search Results tab, then your previous search criteria will be rerun on the binder to yield the most current results. (This behaves like a Dynamic Collection.)
8. Use the View Icon, View menu, or keyboard shortcuts to show or not show the Collections list above the Binder.
9. If you Right Click on a single or multiple Binder documents at once, then you have the option to add that file(s) or folder(s) to any of your current Standard (Static) collections. You can use this option as you’re going through your binder to add particular files that you would find useful for a particular function such as a research collection, files related to a location, or point of view character. You can even create a new collection as well.
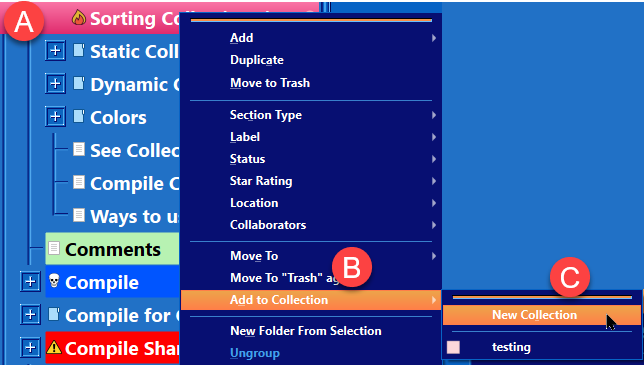
A. Select a file or folder and Right Click
B. Choose Option to Add to Collection
C. Choose an existing Collection (or create a new Collection) to add a file/folder(s) to.
10. Right-clicking on a document’s icon in the Editor shows the option Go to Collection (but NOT the Add to Collection option). This will allow you to click on a specific Collection and immediately open the entire collection in the Scrivenings, Corkboard or Outliner views.
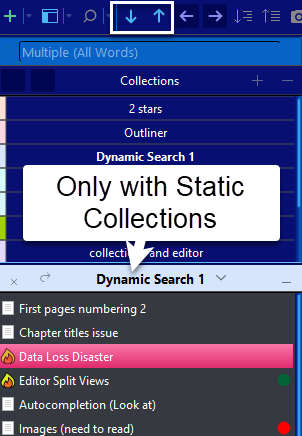
11. ONLY Static Collections allow files or folders to be moved inside a collection (or added/removed from the collection). You can only move documents up and down and not left or right using the Main Toolbar arrows (if added) or drag the file(s) up and down with the mouse. The usable toolbar icon arrows you can use will be larger/highlighted. You can shift multiple files/folders if selected within a Static Collection. (Files can not be shifted in Dynamic Collections).
12. To rename a collection, double click the name and edit.
13. Collections are not text documents but shortcuts to those text documents
14. You can add as many collections as you want. (not all collections may be visible in the small window above the Binder and you may have to scroll to see all the Collections you have created.)
15. Using the Menu command Navigate > Collections > Collection Name, you can select a specific collection EVEN IF the collection is not currently visible above the Binder. To exit any collection, click the small x at upper left corner to return to the binder.
16. A Single file/folder can be included in many different Collections. Deleting one Collection with a short cut to a particular file, has no affect on any other Collection that the specific file/folder might be in.
17. If you view the collection as a whole the numbering you see in the Outliner or Corkboard views will reflect the container (ie treat the collection as a single folder). If you take things out, the Outliner/Corkboard will renumber.
18. In the third Pane of the Compile Panel under the contents icon, if you click the dropdown you will see a list of Collections that can be used to Compile from. Dynamic Collections will have the distinct magnifying glass icon different from the folder icon of a Static Collection.
When you open the collection view (View>Collections), then you will see any saved collections (static or dynamic) as well as a Search Results Collection (Which is your last active search.)
When clicking on any search collection a magnifying glass on the right side of the header means the Collection is Dynamic. The other type of collections (Static) will not have the magnifying glass. The Binder listing all your documents in your project is displayed below.
1. Above is the Collections Section below the Project Search Bar and above the Binder. Here every current Collection you created is listed here. By default you will always have the Search Results Collection which is always Dynamic and will not change till you do a new search. (You can change the position of any Collection in the list by clicking on it with the mouse and dragging it up or down the list.)
2. You may create/add new collection here with the + sign, or delete any collection except the Search Results with the - sign.
3. Dynamic Collections will have a small magnifying glass to the left of their name as previously discussed.
Windows Tip- Consider adding a (D) after the title of Dynamic Collections to allow a quick glance to show which current Collections are Dynamic without having to click on the Collection, or if a theme makes if difficult to see the magnifying glass icon.
4. Static Collections will not be marked this way.
5. The size of viewing area for Collections above the Binder is a fixed height. However, you can create as many Collections as you want. If the number of collections exceeds the display area, then a slider will be visible to let you view any collections currently out of view. Remember, you can drag Collections by using the mouse up and down in the list to have the most commonly used ones visible.
6. This is the Collection’s header bar. Clicking the X will close the current collection results being displayed. Clicking the bent arrow will display the whole collection in one of the three Group views. (Scrivenings, the Corkboard, or the Outliner view)
7. The current Search Results only become a permanent Dynamic collection if you use the Save Search as Collection option at the bottom of the search menu when you LEFT click on the search bar.
If your Collections are visible above the Binder (see above), then you will see a list of searches which can be arranged in any way you want. The default mode is a newly created Collection is placed at the top of the list. This window can be shrunk to display only three Collections or increased to display a maximum of seven. If you have over seven Collections, you will need to use the scroll bar to see them.
Whereas the Collection list displayed using the Menu command Navigate > Collections shows a complete list of Collections arranged from the oldest one to the newest. The window below the Project Search bar and above the Binder displays a list of your Collections.
Viewing Collections in the Editor.
Right-clicking on the icon of the current file or folder in the Editor window shows the option to go directly to Collections. If you choose a collection it will display in the Editor window in the Scrivenings, Corkboard, or Outliner Views. The view will be determined by the current configuration of the Editor. If you are in the Outliner View, then the collection will be displayed in the Outliner View initially.
The distinct header bar and background color of the Collection will remind you, you are in a Collection and not in the full Binder.

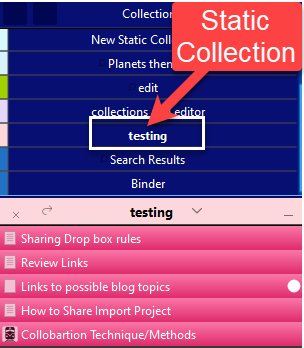
In the Image above the numbers mean:
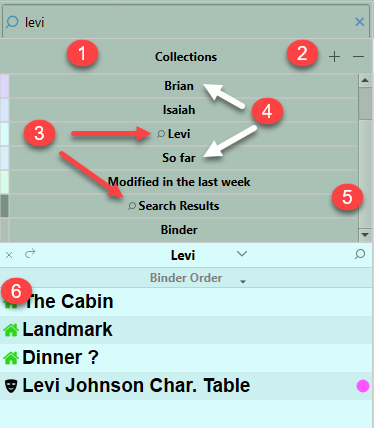
1. The list of your current Collections.
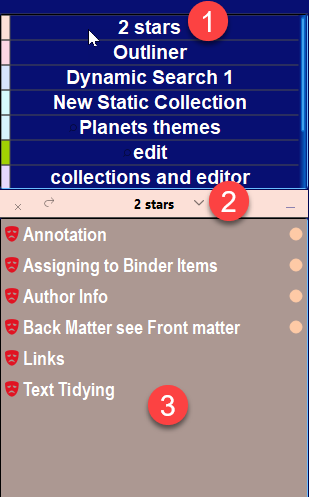
2. The header bar of the selected Collection - 2 stars.
3. The Collection’s search results and a different sidebar color to remind you, that you are viewing a Collection. The color can be changed by using the down caret in the header bar.
With a large number of Collections, you may need to scroll to see all the Collections. At the bottom of this area are two entries that will always be there.
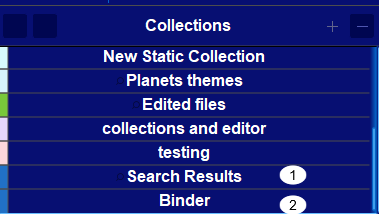
1. Search Results contain the results of the last search you ran. The current search criteria will remain UNTIL you change your search criteria and run a new search. You can change the position of the Search Results Collection.
2. Binder- If you click this, then you return to the normal Binder view.
The Search Results and Binder entries are the only two that cannot be deleted from Collections area.
If you click the backward arrow in the Collection title bar this will display the ENTIRE Collection’s files in either Scrivenings, Corkboard, or Outliner View as though they were in one folder.

Sorting the order of files/folders in a Static Collection-
1. Use Ctrl + A (or other method) to select all the files in the Collection.
2. Use the Menu command Edit > Sort
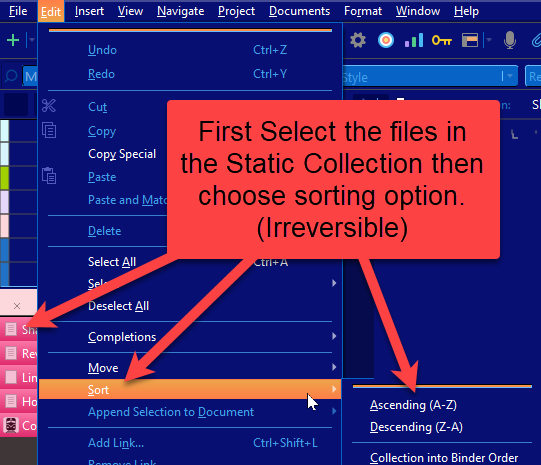
 
You are allowed three irreversible choices.
1. Ascending order (A-Z)
2. Descending order (Z-A)
3. Binder order
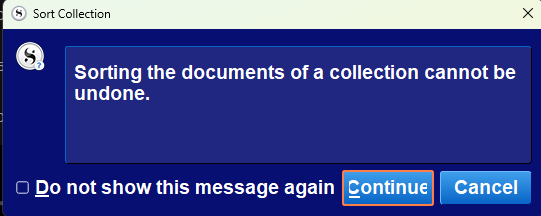
When you do this, you will see a warning message. After this is done, the order can be changed again by manually moving documents in the Collection. (You can select all the documents in the Collection and sort again as long as you use a different command than the first time.) If a document seems out of alphabetical order looks closely at the Document’s Title. If there is a space before the title begins, this will mess up alphabetical sorting. You can correct this by editing the Document title and removing the space.
Sorting Dynamic Collections
Click below the Collection’s title in the header see options of sorting your dynamic collection.
Binder Order
Sort by Title (and can do by A to Z order)
Sort by Date (and can do by Newest)
Checking this changes the order, and unchecking changes order again for either option above.
Reveal in the Binder (3 Methods)
You can select a single file, multiple , or all the files in a Static or Dynamic Collection and right click on these document(s) and see the option to reveal in Binder.
You can after choosing files use the Menu command Navigate > Reveal in Binder
Or use a Keyboard shortcut Windows Key + Shift + R
Viewing All Current Collections
This is helpful when you have large numbers of Collections that don’t fit in the small default space allowed by Scrivener. You can move frequently used Collections (by dragging it) to the top of the list including Search Results to make the currently important Collections easy to find.
You have the option of backing up a collection into a blank document. (This is discussed in another blo
Trash items in a Collection
You can exclude the Trash folder from searches by checking the box under Project Search options, but if you do not, trash items will be represented by faded icons in a Collection.
We will cover more details on both Dynamic and Static Collections in other blogs in this series.