Scrivener's Project Search by Specific methods (Dates, Snapshots, Keyword, and Metadata)
Special Search Terms
Beyond simply typing in the text you want to find, there are some useful tricks you can use to narrow down your search further, or even mix certain types of searches together.
Searching by modification or creation dates:
A common desire is to locate items that have been modified recently, or to find files that were created within a certain window of time. Scrivener supports these operations and many more besides, using its special date search syntax. When suffixing a search term with either of the keywords mdate: or cdate:, project search use the current “Search In” settings and searches documents based on the dates they were Created or Modified.
When used alone, they will simply return a list of all documents based upon that date request. Thus, a search for "cdate:2017" will return all documents created in the year 2017.
Windows tip: mdate is the more inclusive search term. It will return any documented modified within the search criteria, HOWEVER this will also include any documented created within the search criteria as well. Mdate searches treat any newly created documents as modified documents for search purposes.
If you search with "mdate:2017", then the search will return both documents modified in 2017, but also documents created in 2017 as the act of creation is considered a modification as well.
Using the Search term "Paris cdate:2017" will find documents referring to this city, created in the year of 2017.
If you often search for documents created or modified say in the last week or month, then creating a dynamic search collection to run this search again and again maybe the best way to go.
A Dynamic Search for "files created within the last week" (cdate:>7d) could be saved to be run again and again as needed and name the Dynamic Collection to display its purpose. (Such as Anything Created in the Last Week) If you use mdate:.7d then you will collect any newly created documents in the past seven days, but ALSO any documents modified in the same period.
Date Search Terms/Criteria
By a Given Date
YYYY-MM-DD or YYYY/MM/DD
Find everything from a specific day, such as 2017- 04-08, which will find everything on the 8th of April, 2017.
YYYY
All documents that were created or modified within found within the specified year depending on whether you combine your criteria with cdate:, or mdate:.
By a Relative Date
#d
Find everything written since the number of days specified. Eg. "7d" would find everything edited within the last week. Use "1d" to search for dates matching today and yesterday as well.
#m
As above, but using months. Eg. "6m" will find everything edited in the past half year, or six months.
#y
As above, but using years.
Searching Before and After
>
Expands any of the above forms to also find everything since the given date. For Example: >2014 will provide a list of all edits within the year 2014 or later, while 2014 by itself just returns edits from within that year. Using >7d will return all documents created (cdate:>7d), or modified (mdate:>7d) within the last 7 days. If you have the Inspector open to the Metadata pane you can see this date information as well.
<
As above, but in this case edits found on or before the given date in the Search Bar. Thus cdate:<2y will return everything created that is older than two years.
Or using cdate:<2022 will finds everything created on or BEFORE the given date)
Search by Date using the Outliner:
Another way to sort by modified or created dates is to use the Outliner view. The Outliner has column options for modified or created dates. These columns can be clicked to rearrange their contents in chronologic order of when the listed items were created or modified without using the above syntax.
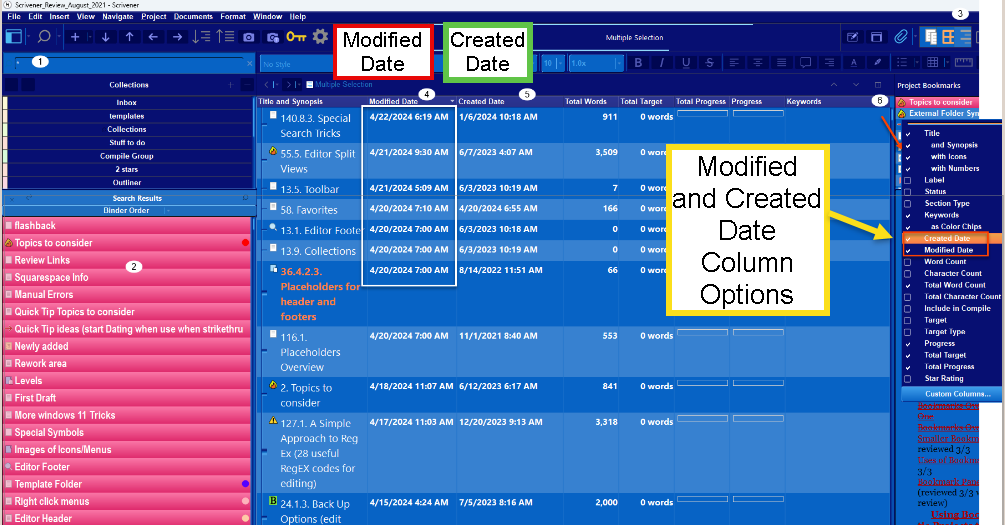
1. Type the wildcard symbol (*) in the project search window to pull up every file in the Binder in a flat order.
2. Click one item within this generated search list.
3. Use the keyboard command Ctrl + A to select every item in the search results or Ctrl + Shift to pick only a range of the document from the search results.
4. In the Outliner view, make sure you have the modified or created date columns visible in the center pane. Now click them to change the order to the most recent and see a list of the most recently created or modified items in your entire project. (see below)
Note: When searching by date, anything found that fits the search criteria but is now in the trash folder will appear in the search results but the actual entry for the file will be faded.
1. If the * symbol is used in the Search window, then this pulls up every file/folder in your project in a flat order (all on the same level).
2. Use Ctrl + A to select all the documents in the Search Window. (Or Ctrl + Shift to click just a range of the files.)
3. Choose the Outliner view using the Group View toolbar icon.
4-5. Pick the Modified or Created date columns based on what information you want. (If these columns are not visible, then click #6 to show the available options for the Outliner Columns and choose them. The Outliner will now display the creation and modification dates for any document currently displayed in the Outliner. Depending on the number of columns you have chosen, you may need to drag the columns to bring them into view.
In the above example, clicking the header of the Modified Date, or Created Date columns of documents changes the chronological order of the files with each time the header is clicked. The first time it shows the dates in order from the oldest to the newest, the next click changes the order to the newest to the oldest, and the final click restores the documents to their original binder order, but in a flat view.
This way you can easily see recently created or modified items and roll back in time by scrolling the Outliner as long as you need to. Any particular item’s icon can be right clicked on and the option to Reveal in the Binder is available to choose to find its precise location in your project.
This would be another way to show the most recently created documents in the Project all together regardless of their location in the Binder.
Combining Search Terms
Most of the techniques we’ve discussed can be combined together to create more specific and complicated search criteria.
Using the Date syntax in a combined Search:
For example, if you were searching for the phrase "black car" (Using quote symbols makes the enclosed phrase act like a single word in the search function window.) but you only want to find documents that hadn’t been modified in the past six months then this combination (of this search word and the date combination. Putting this combination of terms in the Project Search bar "black car" cdate:<6m would show every document with "black car" in it, which was NOT Created within the last 6 months.
Or you could use a metadata search term such as a Label value or an entry on a Custom Metadata list. For example, if you pick the Label named "important" and want to search for documents created in 2022 which had the important Label attached to them then your Project search bar would look like this: important cdate:2022 (separate these two search terms with a space to combine them.) This Search would pull all the items marked with the particular label named important and which were created in 2022. (Remember, you search for labels by their name in Project Settings and not their color.)
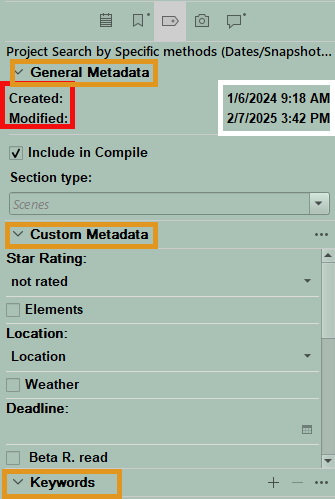
To make sure you have set the Date syntax properly to get the correct parameters you want. Leave the Inspector open to the Metadata pane and under General Metadata you will see the information showing the Created and Modified dates for the current document and in the Inspector. Here, you can check to see if your search results show dates in the documents that match the parameters.
Searching for text duplicates in your Project
If you use a Project Search and search in text and use the parameter Exact Phrase, then if you copy text and paste into the search bar, the Search function will search inside your Project for the EXACT match for the whole phrase and thus you can find all the places where this exact phrase appears. You probably only need the first full sentence for this to work and not a whole paragraph or multiple sentences to find exact duplicates in your project.
You can also use Reg Ex to find duplicates as well.
A Reg ex formula for Finding Duplicates
(b\{n,}\b)\W+(?:\w+\W+){1,m}?\1
This formula will find the same words of n characters or more within m characters using RegEx.
The Snapshot Manager Interface and searching Snapshots
Use the Menu command Documents > Snapshots > Snapshot Manager to bring up the Snapshot Manager
(There is no keyboard shortcut.)
Searching for Snapshots within the Snapshot Manager Interface:
#1. The Search bar (see Searching below)
Above the snapshot list sidebar on the left is a search tool that you can use to quickly locate snapshots by their snapshot name, snapshot date, or the name of the binder item they are associated with or even by fragments of text within the snapshot itself.
This simple search tool has a few rules and capabilities to be aware of:
1. The basic mode of this form of search will always use “exact phrase”, meaning the text you type in must be found in the order you type it in, but is case insensitive.
2. All content is searched- You do not need to specify which type of content you want to search through. All matches will be returned, wherever they are found as text.
3. Search by Date- to isolate snapshots by a particular day, month or year, or even by all dates before or after a certain time. The date search syntax is almost identical to the one used in the main project search tool
Examples-Search before <1y/#m/#d (ie all snapshots over 1 year old, or #months, or # days)
> 1y/1m/1d would find all snapshots taken since last year, month or day, or X number of days. For example, using >1d would find all snapshots taken yesterday and today.
If you use >2014 to define the date, then this would find all snapshots taken in 2014 or later.
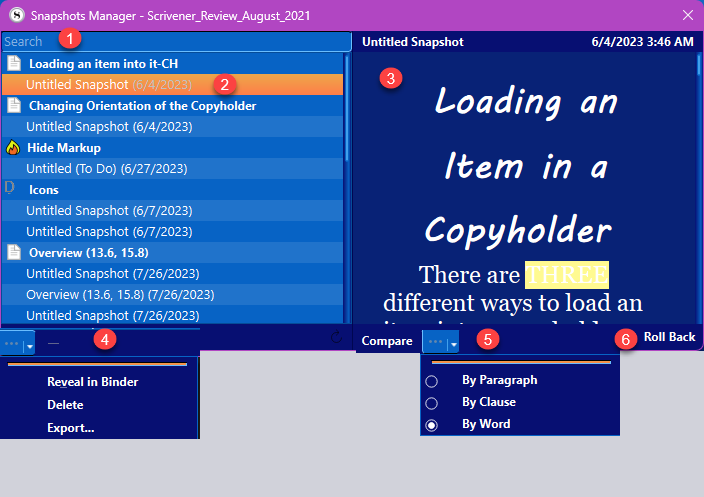
#2. The sidebar on the left contains a list of every document in the binder that has a snapshot, and then grouped within each document is a list of all the respective snapshots in reverse chronological order. If you click and highlight the name, you then see the snapshot previewed in the right panel. (#3 above) Double clicking on the name allows you to edit the snapshot. (Binder titles CANNOT be edited from within the Snapshot Manager)
#3. This is the display area for the currently selected snapshot. The mouse can expand the viewing area with the mouse by dragging the panel’s edges.
#4. Here are the Snapshot Footer Options which are identical to the options in the Inspector’s header for Snapshots and include:
Reveal in Binder- to show where the file containing the snapshot is located, IF you are not sure inside the Snapshot manager where it is originally from.
Delete- (Note: the - sign just to the right of this menu preforms the same function.)
Export…- This will export the snapshot as a RTF file that can be read in Microsoft Word or a similar word processor. (See below.)
5. Compare- This is the same dropdown menu as in the Snapshot Inspector Pane with the same options for comparing current documents and previous versions, or even just two previous versions.
6. Roll back- This will roll back to an earlier version of the file or folder and has the same function as in the Snapshot Inspector Pane.
Renaming Snapshots (not Document titles)
1. Double click a titled or untitled snapshot name in the manager and rename.
2. Or Click a Snapshot name and then use the F2 key to rename.
Keyword Searches
Searching by Keywords
Although it is always possible to create your own searches for keywords by hand using the Project Search Bar, the project keywords panel provides a convenient way to search for keywords in your project. Simply click on the keywords you need to hunt down, and then click the magnifying glass button in the bottom right-hand side of the panel.
Reach the Keyword Panel by:
Using the Menu command Project > Project Keywords
Using the Toolbar Icon if added to the Main Toolbar
Using the Keyboard Shortcut Windows key + Shift + K
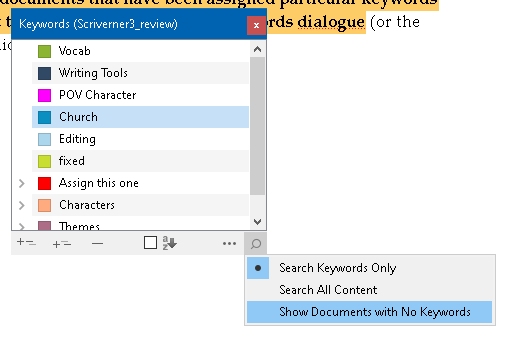
Clicking on the magnifying glass in the Keyword Manager footer shows three drop down options (see above):
— Search Keywords Only: this is the default search mode.
The project search tool will be set so that only keywords are scanned throughout the project.
— Search All Content:
The limitation above is lifted, and the words represented by the keywords will be scanned for throughout all searchable areas of the project—in the main text editors, through binder titles, custom metadata, labels, synopses and so forth.
— Show Documents with No Keywords:
Simply put, any documents in your project that have no keywords currently assigned to them will appear in the results list using this option.
NOTE
If your keyword selection includes multiple keywords, then only those documents that contain ALL the selected keywords will be returned (boolean AND) in the search results.
Ex. If choose keyword A, B, E (or separate by spaces-THEN ONLY Documents/files/folders with ALL THREE keywords (A,B,E) will show up in search results of the Keyword Panel. If your search does work the way you expect, then check the (search) operator and make sure it is set to include All Words or the setting which will work for your specific search.
All Metadata searches, such as labels, status, custom metadata, and keywords, are NOT case sensitive.